

High-Lightマニュアル
High-Lightの概要
High-Light v1.2
はじめに
High-Lightは、ウェブページ上でソースコードを表示したいユーザーの為のRapidWeaverプラグインです。
このプラグインはRapidWeaverのスタイル付きテキスト領域で利用可能な書式設定オプションを拡張します。
それは、色のついた構文またはCSSタグやXHTML出力タグを High-Lightでマークされたスタイル付きテキスト領域を適切に生成して表示します。
またこれは、可能な限り、元のテキストの字下げが保持されます。追加のオプションで行の番号を自動的に利用可能にすることができます。
High-Light works as a frontend for the GNU source-highlight command line application that is written by Lorenzo Bettini.
ハイライトは、ロレンツォBettiniによって書かれているGNU出所ハイライト・コマンドライン適用用のフロント・エンドとして働きます。
As of version 1.1 of High-Light this command is now bundled within the High-Light plugin so you do not have to install it separately.
このコマンドが現在High-光のバージョン1.1現在High-光のプラグインの中で添付されるので、あなたは別々にそれをインストールする必要はありません。
High-Light still supports the use of an external version of source-highlight if you have your own version that you still want to use.
GNU source-highlight(GNUのソースハイライト )
by Lorenzo Bettini
This is a short description of source-highlight, the backend part of High-Light. For a more detailed description open the documentation for source-highlight or visit the website http://www.gnu.org/software/src-highlite/
GNU source-highlight, given a source file, produces a document with syntax highlighting. The colors and the styles can be specified (bold, italics, underline) by means of a configuration file, and some other options can be specified at the command line. These command line options are wrapped inside the GUI in High-Light. Not all of the commandline options are available in High-Light though. The settings dialogue in High-Light allows you to configure the different options for linenumbering, inline CSS and the tags which wraps around the generated output. The actual language definitions are not in the scope of this plugin.
High-Light v1.2 comes bundled with version 2.8 of source-highlight, which at this point was the latest version. But if you want to use another version it is possible by specifying the location of your own source-highlight binary. High-Light has been tested with v1.11 and v2.5-v2.8, but it should work with other versions too. Version 2.x of source-highlight supports a long list of languages out-of-the-box and can also easly be extended with more languages if you are missing “your” language.
High-Light supports the following languages by default with v2.x:
C/C++, Bison, Caml, ChangeLog, Diff, Flex, Fortran, Html, Java, Javascript, Lang, Latex, Log, Logtalk, Lua, Outlang, Pascal, Patch, Perl, Php, Postscript, Prolog, Python, Ruby, Shell, Sml, Style, Syslog, XHtml, Xml
Source-highlight actually supports a longer list of “languages” but those are just different names for one of the above languages. If you really want to see all languages that source-highlight reports that it supports you should enable "Use dynamic menu" in the settings dialogue. But you should be aware that the menu can be very long with this option.
Requirements(必要条件 )
High-Light has the same system requires as RapidWeaver 3.5, i.e. it should work on any Mac, both PowerPC and Intel, running OS X 10.3.9 or greater. Although it is not actively supported it should also work together with RapidWeaver 3.2.1.
Installing the plugin
Installing the High-Light is easy. You can either double-click on the plugin and it will be installed by RapidWeaver or you can install the plugin by manually dragging it into the folder:
~/Library/Application Support/RapidWeaver
When you have restarted RapidWeaver a new submenu called “High-Light” should appear in the “Format” menu in RapidWeaver.
High-Light v1.2
はじめに
High-Lightは、ウェブページ上でソースコードを表示したいユーザーの為のRapidWeaverプラグインです。
このプラグインはRapidWeaverのスタイル付きテキスト領域で利用可能な書式設定オプションを拡張します。
それは、色のついた構文またはCSSタグやXHTML出力タグを High-Lightでマークされたスタイル付きテキスト領域を適切に生成して表示します。
またこれは、可能な限り、元のテキストの字下げが保持されます。追加のオプションで行の番号を自動的に利用可能にすることができます。
High-Light works as a frontend for the GNU source-highlight command line application that is written by Lorenzo Bettini
ハイライトは、ロレンツォBettini
As of version 1.1 of High-Light this command is now bundled within the High-Light plugin so you do not have to install it separately.
このコマンドが現在High-光のバージョン1.1現在High-光のプラグインの中で添付されるので、あなたは別々にそれをインストールする必要はありません。
High-Light still supports the use of an external version of source-highlight if you have your own version that you still want to use.
GNU source-highlight(GNUのソースハイライト )
by Lorenzo Bettini
This is a short description of source-highlight, the backend part of High-Light. For a more detailed description open the documentation for source-highlight or visit the website http://www.gnu.org/software/src-highlite/
GNU source-highlight, given a source file, produces a document with syntax highlighting. The colors and the styles can be specified (bold, italics, underline) by means of a configuration file, and some other options can be specified at the command line. These command line options are wrapped inside the GUI in High-Light. Not all of the commandline options are available in High-Light though. The settings dialogue in High-Light allows you to configure the different options for linenumbering, inline CSS and the tags which wraps around the generated output. The actual language definitions are not in the scope of this plugin.
High-Light v1.2 comes bundled with version 2.8 of source-highlight, which at this point was the latest version. But if you want to use another version it is possible by specifying the location of your own source-highlight binary. High-Light has been tested with v1.11 and v2.5-v2.8, but it should work with other versions too. Version 2.x of source-highlight supports a long list of languages out-of-the-box and can also easly be extended with more languages if you are missing “your” language.
High-Light supports the following languages by default with v2.x:
C/C++, Bison, Caml, ChangeLog, Diff, Flex, Fortran, Html, Java, Javascript, Lang, Latex, Log, Logtalk, Lua, Outlang, Pascal, Patch, Perl, Php, Postscript, Prolog, Python, Ruby, Shell, Sml, Style, Syslog, XHtml, Xml
Source-highlight actually supports a longer list of “languages” but those are just different names for one of the above languages. If you really want to see all languages that source-highlight reports that it supports you should enable "Use dynamic menu" in the settings dialogue. But you should be aware that the menu can be very long with this option.
Requirements(必要条件 )
High-Light has the same system requires as RapidWeaver 3.5, i.e. it should work on any Mac, both PowerPC and Intel, running OS X 10.3.9 or greater. Although it is not actively supported it should also work together with RapidWeaver 3.2.1.
Installing the plugin
Installing the High-Light is easy. You can either double-click on the plugin and it will be installed by RapidWeaver or you can install the plugin by manually dragging it into the folder:
~/Library/Application Support/RapidWeaver
When you have restarted RapidWeaver a new submenu called “High-Light” should appear in the “Format” menu in RapidWeaver.
Basic usage(基本的な使い方)
High-LightはRapidWeaverのテキスト領域用のテキスト・フォーマットプラグインです。
これは、デザインされたあらゆるテキスト領域の中でそれを使用してもよいことを意味します。
明らかに「スタイルText」と言われるページスタイルの他に、RapidWeaverのためのページスタイルのほとんど(全てではないにしても)を含みます。
それを使用することができないただ一つの場所は、「HTML」ページスタイルと特別のフィールド(例えば「タイトル」「ブラウザ・タイトル」コンタクトフォームのフィールドなど)です。
したがって、どこでもこのpluginを使用することができるか可能性は大です。
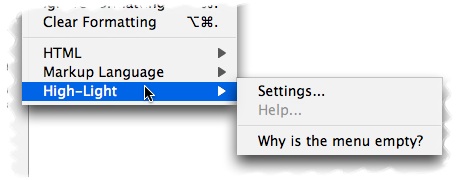
このRapidWeaverの「書式」メニュー>「High-Light」のサブメニューがあります。
もしサブメニューが空で“Why is the menu empty?”(なぜ、メニューは空ですか?)となっているなら、それは、High-Lightがソースハイライトバイナリの場所を見つけていないことを意味します。
完全なメニューは、「“High-Lightメニュー」章で記述されます。
上の「Setup」ダイアログを開いてください。そして正しいバイナリにブラウズするためにソースハイライトファイル名を含むフルパスを書くか、
ファイルダイアログを開くために、「閲覧」ボタンを使用してください。
「閲覧」ボタンを使用したなら、High-Lightは、すぐに、選択されたファイルを有効にして、それが有効なバイナリであるかどうか知らせます。
さもなければ、「Setup」ダイアログを終えるとき、確認は実行されます。
(普通インストールしたときのパス ~/Library/Application Support/RapidWeaver/High-Light Support/source-highlight これが自動で読み込まれて表示されています。)
利用可能な設定の、より詳細な記述に関しては、「High-Light settings」という章を見てください。
High-Lightの使用例
High-Lightを使用するにはテキストページのスタイルに合わせた他の形式を適用するのと同じくらい簡単です。
それに関して特別なものは何もありません。
コードスニペットを含んでいるのがウェブページでどれくらい簡単である場合があるかを理解するでしょう。
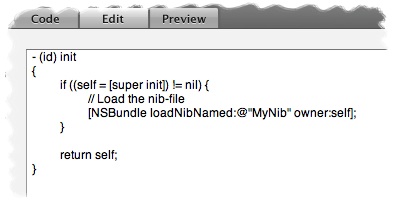
上記のように何らかのテキストを書くか、または貼ることからページを始めます…
… 次に、High-Lightにしたいテキストを選択します…
…High-Lightメニューから、言語フォーマットを適用してください。
それは1つのテキスト/コードをページ上にフォーマットし、ハイライトさせるのに要するすべてです。
また、特定のハイライトされたテキストに行番号を加えたいか、または取り除きたいか、それも簡単です。
もう一度テキストのすべてをマークし、「ハイライト」メニューのサブメニューから「Line numbers(行番号)」を選択。
以下に、上のコードスニペットが「コード」タグをどうRapidWeaver標準のAqualiciousテーマに適用する2つの例があります。
上がlinenumbers(行番号)のない結果…
…そして、linenumbers(行番号)を表示した結果。
High-Light メニュー
「High-Light」メニューはこのpluginの中心です。
これは、フォーマットをすべて適用し、出力を形成する場所です。
ハイライトからオプションをフォーマットする言語は、RapidWeaverの中の「書式」メニューに加えられる、新しいサブメニューにおいて直接利用可能です。
(下図参照)
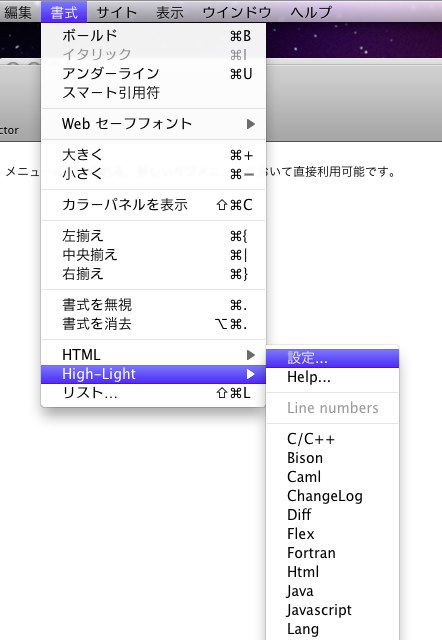
Settings --High-Lightを構成できる「設定」ダイアログを開きます。
Help - ブラウザだけ起動して何も表示されない。
Line numbers - 現在選択された-High-Lightによって選択された領域から、linenumber(番号)オプションを加えるか、または取り除きます。
C++, Caml etc. - これらは選ぶことができる異なるフォーマット言語です。この写真の中にあるメニューはハイライトv1.x向けです。
あなたがv2.xを使用しているなら、より多くの言語が利用可能です。サポートされた言語の簡単な説明に関して「GNUのソースハイライト」という章を見てください。
High-Light 設定
High-Lightには、ソースハイライトバイナリの位置といくつかのデフォルトとグローバル設定を指定できる「設定」ダイアログがあります。ダイアログは、いくつかのタブに分けられます。
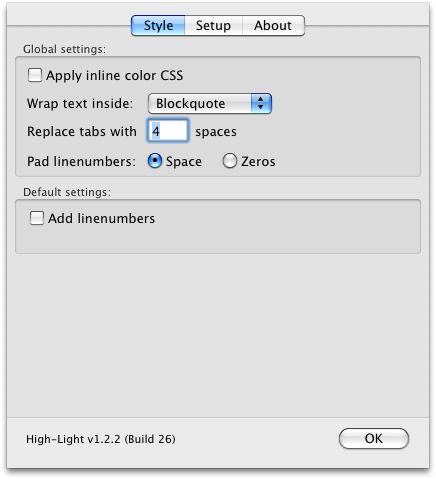
Style タブ
設定ダイアログの最初のタブは、「Style」タブです。
これは、High-Lightされたテキストがどのようなスタイルにするかグローバルな設定とデフォルト値を形成することができる場所です。
グローバルなセッティングはプロジェクトですべてのHigh-Lightのついたエリアに適用され、1つのハイライトエリアだけを変えることはできません。
ここで設定を変えた場合、デフォルト設定はすべての新しいハイライトにすぐに適用されます。また後でメニューからの個々のハイライトを変更することができます。
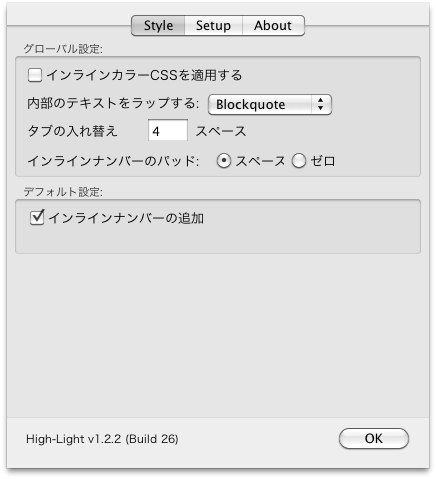
グローバル設定:
インラインカラーCSSを適用する - チェックすると(デフォルト)、構文ハイライトされた色のついたインラインCSSを加えます。(色をつけたくない場合ははずします。)
このオプションCSSのチェックをはずせば、構文に自分の指定したCSSコードを適用することができます。
それは、あなたがカラー化することができる以下のタグを生み出します:some text
クラス名に関するその他の詳細に関しては、ソースハイライトに関してドキュメンテーションを見てください。
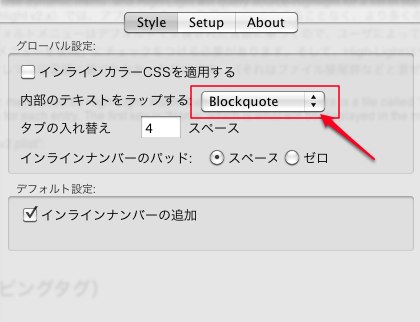
Wrap text inside(内部のテキストをラップする) -
生成されたテキストは、HTMLタグの内部で包まれます。あなたは以下の間で選ぶことができます。
Blockquote(デフォルト)、Code、および Paragraph(パラグラフ)。 これらのタグはRapidWeavers HTMLで選ぶことができる対応するタグと同じように作成します。
したがって、メニューはそれらは既存のRapidWeaverのテーマと一致するでしょう。
Code:書体が変わる。枠で囲まないコードをを表示するときに使う。
Blockquote:枠で囲んで回りにスペースを作る様になる。
Paragraph:パラグラフ(paragraph)とは、文章の段落のことです。(囲まれた状態でなくそのままで文字の色が薄くなる。)
Replace tabs with(タブの入れ替え) -
もし字下げを保ちたいならば、生成された出力はすべて、タボスペースと取り替える必要があります。
ここかで入力する数は、すべてのそれらのタブを置換するのに用いられます。
インラインナンバー(行番号)のパッド -
パッド(詰め物)が、「スペース」と「ゼロ」でHigh-Lightの中で行番号の表示方法を変更することは可能です。
「00001:」と表示するか、「1:」と表示するかの切り替えということです。
注:この機能は、v2.8以上のソースで使用可能なハイライトです。
デフォルト設定:
インラインナンバーの追加(行番号を加える)- チェックなし(デフォルト)では、正確にスタイルを整えられたテキスト域そのままです。
このチェックボックスをオンにすると、各々の列の行番号を先頭に加えます。これは、テキストを参照することを簡単にします。
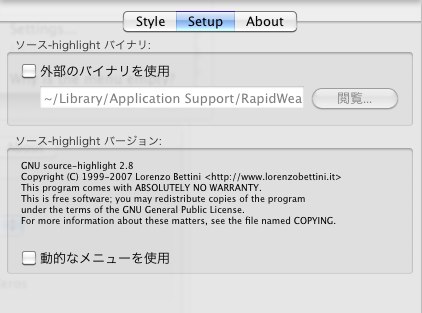
Setup タブ
セッティングダイアログの第2のタブは、「Setupアップ」タブです。
これは、ハイライトのあるところが分かるところです。 そして、また、ソースハイライトv2.xに関して、メニューがどう発生するかを変えることができます。
これは他のHigh-Lighを使用して見たいときに使うものかな?
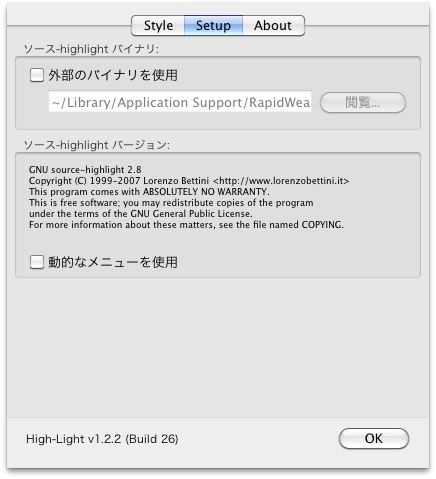
外部のバイナリを使用 - 内部のHigh-Lightの中で添付されているバージョンの代わりにソースハイライトのバージョンを使用したいと思うなら、
このオプションをチェックしてください。(デフォルトではここにチェックを入れる必要がない)
source-highlight binary - あなたのマック上で2進法(バイナリ)のソースハイライトを見つけることができる場所へのパスを入力してください。
2進法の有効な出所ハイライトが見つかったら、下のtextフィールドでバージョンおよびライセンスを見ることができます。
それは反転表示された文章がどう処理されるかに影響があるので、しばしばバイナリを変えるべきではありません。
High-Lightは選択を処理することができないならば、それはエラーメッセージをページに表示します。
Use dynamic menu(動的なメニューを使用) - チェックがはずれた(デフォルト)では、High-Lightは、固定された言語メニューを使用します。
High-Lightが外部からのソースハイライトに基づく言語メニューを構築することを望むならば、このオプションをチェックしてください。
ソースハイライトv2.xが使用されている場合にだけ、このオプションは利用可能です。
高度な使用法
High-Lightがどう働いているかに満足していない高度なユーザのために、「容易に」変えることができるいくつかの項目があります。
しかし、自分で変更された場合サポートをするつもりでないので、あなたがすることに注意してください。
あなたがHigh-Lightの変更をするならば元ファイルをバックアップしてから初めてください。
これは、あなたが変えることができるもののリストです。 それぞれの部分の詳述は以下に続きます。
注意:すべての変更は、この章で説明したように公式にサポートされていません。
Localization(ローカライズ)
ユーザ>ライブラリ>ApplicationSupport>RapidWeaver>High-Light.rwpluginの中にあるファイル(右クリックで「パッケージの内容を表示」)>Contents>Resourcesフォルダの中の話です。
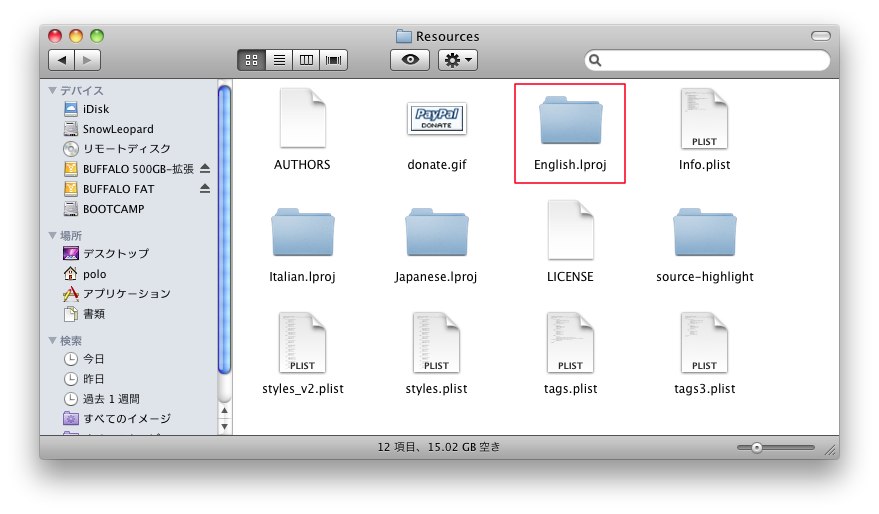
プラグイン内部にあるフォルダ「English.lproj」のコピーして、アップルにより用いられる名前である「japanese.lproj」に名前を変えてください。
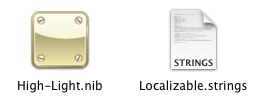
nib-file(High-Light.nib)は、言語を支援するために変更することができるセッティング対話を含んでいます。
しかし、結合を壊さないように、nib-fileを変更する場合、慎重にしてください。
そうしないと、プラグインがきちんと機能しない原因になります。
また、「Localizable.strings」と呼ばれるファイルがこのフォルダーにあります。
このファイルはメニューとエラーメッセージのプラグインによって使用されるすべてのストリングが入れてあります。
あなたの言語に応じて、各文字列を変更することができます。
しかし再び、保存する場合、文字列のいくらかが引用の書式を設定するので、注意深くする必要があります。
注:「English.lproj」で見るもの以外の他のものはローカライすべきではありません。 そうしなければ、恐らくこのpluginによって提供される機能性を壊すでしょう。
あなたが行った翻訳が良いと確信し、他の人にもにあなたの日本語化を使って欲しいと思うなら、あなたはそれを私に送ることができます。
そして、私は将来のバージョンであなたの翻訳を含もうとするでしょう。
Language menu(言語メニュー)
With source-highlight v2.x it is possible to add support for more languages without recompiling the application. Since the default menu used by High-Light is based on the languages supported by default any new language added by the user will not be present in the menu.
One option is to turn on the setting “Use dynamic menu” and High-Light will query source-highlight for a list of supported languages. But that menu is long and not only based on languages (it is mixed with file suffixes etc.).
ソースハイライトv2.x(source-highlight v2.x)では、アプリケーションを再コンパイルすることなく、より多くの言語のサポートを追加することが可能です。
ハイライトによって使用されるデフォルトメニューはデフォルトで支援された言語に基づくので、ユーザによって新しく加えられたどんな言語もメニューの中にないでしょう。
1つのオプションは、設定「動的なメニューを使用」にチェックをつける必要があります。そして、High-Lightはサポートされた言語のリストのためにソースハイライトについてたずねます。
しかし、そのメニューは長くて、そして単に言語に基づかなかっただけです。(それはファイル接尾辞などと混ぜられます)
So instead you can modify the static menu used by High-Light. Inside the “Resources” folder there is a file called “styles_v2.plist” which contains the menu items. You can edit this file with Apples Property List Editor, a text editor or any XML editor and add/remove as many entries as you want. The menu entries in this file is based on a dictionary with two keys for each entry. The first key is “Name” which is what will be displayed in the menu. The second key is “HighLightCommand” which is the language argument that is sent to source-highlight.
This is a sample entry from “styles_v2.plist”:
Name
C/C++
HighLightCommand
cpp
Wrapping tags(ラッピングタグ)
The menu in High-Light that offers you a choice of tags to use around the generated text can also be modified. Inside the “Resources” folder there is a file called “tags.plist” which contains the tags present in the menu. You can edit this file with Apples Property List Editor, a text editor or any XML editor and add/remove as many entries as you want. The tag entries is based on a dictionary with three keys for each entry. The first key is “tag” which is what will be displayed in the menu. The second key “start” is the tag that is put in front of the generated text. The third key “end” is the tag that is put immediately after the generated text.
あなたに生成されたテキストのまわりで使用するタグの選択を提供するハイライトの中のメニューも修正することができます。
"Resources"フォルダ内に「tags.plist」と呼ばれているファイルがあります。Apples Property List Editor、テキストエディタまたはどんなXMLエディタででもこのファイルに加えたり、削除したり編集することがができます。
タグエントリーは下のように各エントリーあたり3個のキーがあるライブラリに基づいています。
最初のキーはメニューに表示される「tag」です。下の図で「Blockquote」の文字を表示します。日本語でも表示することができます。
2番目の主要な「start」は、選択したテキストの最初に置かれるタグです。 3番目の主要な「end」は、同じく選択されたテキストの最後に置かれるタグです。
これは"tags.plist"のサンプルエントリーです:
tag
Blockquote
start
<blockquote><p>
end
</p></blockquote>
注意: 「始め」と「終わり」タグを編集するときには、有効なXML構文でテキストを必ずフォーマットしてください。
そうしないと、High-Lightをメニューを解析することができなくなります。
Frequently Asked Questions(よくある質問)
Q: When I check the page in the “Code” view in RapidWeaver I see warnings about empty … tags. Why does this happen?
A: This happens when you are using source-highlight v2.x and have deselected the option “Apply inline color CSS”. The reason is that source-highlight v2.x with default definitions creates a … tag around whitespace when it converts the text to HTML. This does not happen with source-highlight v.1.11 so this is a regression in version 2.x. For that reason I have decided, at least for now, to leave this without adding a “workaround” for it in High-Light. This may change in the future.
Q: I found the following text on one of my pages where I have used High-Light:
#######################################################
WARNING: High-Light was unable to convert the text
according to the applied language: C++
#######################################################
A: The high-light language applied to the text was not found in the current configuration of High-Light. This can happen if you mark the text when High-Light is configured with source-highlight v2.x and you have since switched to v1.x which supports less languages. The same thing can happen if you switch between the dynamic and static menu for source-highlight v2.x. Or if you have manually edited the “tags.plist”. The solution is to mark the text and apply the High-Light formatting again on that page.
Q: Why is there no option available to wrap the output inside
A: That has been disabled because the styled text areas in RW does not handle
High-LightはRapidWeaverのテキスト領域用のテキスト・フォーマットプラグインです。
これは、デザインされたあらゆるテキスト領域の中でそれを使用してもよいことを意味します。
明らかに「スタイルText」と言われるページスタイルの他に、RapidWeaverのためのページスタイルのほとんど(全てではないにしても)を含みます。
それを使用することができないただ一つの場所は、「HTML」ページスタイルと特別のフィールド(例えば「タイトル」「ブラウザ・タイトル」コンタクトフォームのフィールドなど)です。
したがって、どこでもこのpluginを使用することができるか可能性は大です。
このRapidWeaverの「書式」メニュー>「High-Light」のサブメニューがあります。
もしサブメニューが空で“Why is the menu empty?”(なぜ、メニューは空ですか?)となっているなら、それは、High-Lightがソースハイライトバイナリの場所を見つけていないことを意味します。
完全なメニューは、「“High-Lightメニュー」章で記述されます。
上の「Setup」ダイアログを開いてください。そして正しいバイナリにブラウズするためにソースハイライトファイル名を含むフルパスを書くか、
ファイルダイアログを開くために、「閲覧」ボタンを使用してください。
「閲覧」ボタンを使用したなら、High-Lightは、すぐに、選択されたファイルを有効にして、それが有効なバイナリであるかどうか知らせます。
さもなければ、「Setup」ダイアログを終えるとき、確認は実行されます。
(普通インストールしたときのパス ~/Library/Application Support/RapidWeaver/High-Light Support/source-highlight これが自動で読み込まれて表示されています。)
利用可能な設定の、より詳細な記述に関しては、「High-Light settings」という章を見てください。
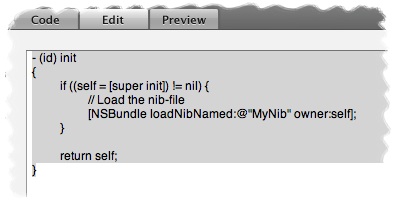
High-Lightの使用例
High-Lightを使用するにはテキストページのスタイルに合わせた他の形式を適用するのと同じくらい簡単です。
それに関して特別なものは何もありません。
コードスニペットを含んでいるのがウェブページでどれくらい簡単である場合があるかを理解するでしょう。
上記のように何らかのテキストを書くか、または貼ることからページを始めます…
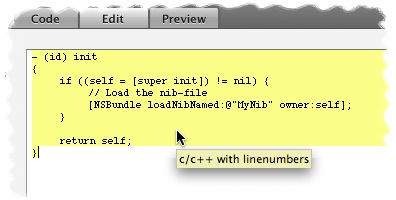
… 次に、High-Lightにしたいテキストを選択します…
…High-Lightメニューから、言語フォーマットを適用してください。
それは1つのテキスト/コードをページ上にフォーマットし、ハイライトさせるのに要するすべてです。
また、特定のハイライトされたテキストに行番号を加えたいか、または取り除きたいか、それも簡単です。
もう一度テキストのすべてをマークし、「ハイライト」メニューのサブメニューから「Line numbers(行番号)」を選択。
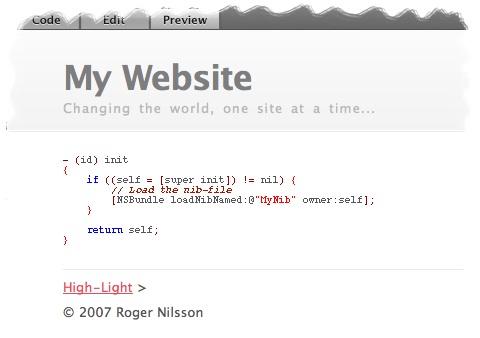
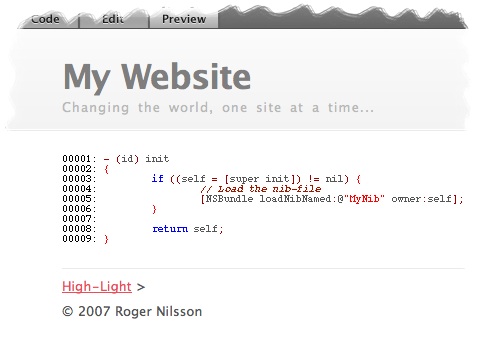
以下に、上のコードスニペットが「コード」タグをどうRapidWeaver標準のAqualiciousテーマに適用する2つの例があります。
上がlinenumbers(行番号)のない結果…
…そして、linenumbers(行番号)を表示した結果。
High-Light メニュー
「High-Light」メニューはこのpluginの中心です。
これは、フォーマットをすべて適用し、出力を形成する場所です。
ハイライトからオプションをフォーマットする言語は、RapidWeaverの中の「書式」メニューに加えられる、新しいサブメニューにおいて直接利用可能です。
(下図参照)
Settings --High-Lightを構成できる「設定」ダイアログを開きます。
Help - ブラウザだけ起動して何も表示されない。
Line numbers - 現在選択された-High-Lightによって選択された領域から、linenumber(番号)オプションを加えるか、または取り除きます。
C++, Caml etc. - これらは選ぶことができる異なるフォーマット言語です。この写真の中にあるメニューはハイライトv1.x向けです。
あなたがv2.xを使用しているなら、より多くの言語が利用可能です。サポートされた言語の簡単な説明に関して「GNUのソースハイライト」という章を見てください。
High-Light 設定
High-Lightには、ソースハイライトバイナリの位置といくつかのデフォルトとグローバル設定を指定できる「設定」ダイアログがあります。ダイアログは、いくつかのタブに分けられます。
Style タブ
設定ダイアログの最初のタブは、「Style」タブです。
これは、High-Lightされたテキストがどのようなスタイルにするかグローバルな設定とデフォルト値を形成することができる場所です。
グローバルなセッティングはプロジェクトですべてのHigh-Lightのついたエリアに適用され、1つのハイライトエリアだけを変えることはできません。
ここで設定を変えた場合、デフォルト設定はすべての新しいハイライトにすぐに適用されます。また後でメニューからの個々のハイライトを変更することができます。
グローバル設定:
インラインカラーCSSを適用する - チェックすると(デフォルト)、構文ハイライトされた色のついたインラインCSSを加えます。(色をつけたくない場合ははずします。)
このオプションCSSのチェックをはずせば、構文に自分の指定したCSSコードを適用することができます。
それは、あなたがカラー化することができる以下のタグを生み出します:some text
クラス名に関するその他の詳細に関しては、ソースハイライトに関してドキュメンテーションを見てください。
Wrap text inside(内部のテキストをラップする) -
生成されたテキストは、HTMLタグの内部で包まれます。あなたは以下の間で選ぶことができます。
Blockquote(デフォルト)、Code、および Paragraph(パラグラフ)。 これらのタグはRapidWeavers HTMLで選ぶことができる対応するタグと同じように作成します。
したがって、メニューはそれらは既存のRapidWeaverのテーマと一致するでしょう。
Code:書体が変わる。枠で囲まないコードをを表示するときに使う。
Blockquote:枠で囲んで回りにスペースを作る様になる。
Paragraph:パラグラフ(paragraph)とは、文章の段落のことです。(囲まれた状態でなくそのままで文字の色が薄くなる。)
Replace tabs with(タブの入れ替え) -
もし字下げを保ちたいならば、生成された出力はすべて、タボスペースと取り替える必要があります。
ここかで入力する数は、すべてのそれらのタブを置換するのに用いられます。
インラインナンバー(行番号)のパッド -
パッド(詰め物)が、「スペース」と「ゼロ」でHigh-Lightの中で行番号の表示方法を変更することは可能です。
「00001:」と表示するか、「1:」と表示するかの切り替えということです。
注:この機能は、v2.8以上のソースで使用可能なハイライトです。
デフォルト設定:
インラインナンバーの追加(行番号を加える)- チェックなし(デフォルト)では、正確にスタイルを整えられたテキスト域そのままです。
このチェックボックスをオンにすると、各々の列の行番号を先頭に加えます。これは、テキストを参照することを簡単にします。
Setup タブ
セッティングダイアログの第2のタブは、「Setupアップ」タブです。
これは、ハイライトのあるところが分かるところです。 そして、また、ソースハイライトv2.xに関して、メニューがどう発生するかを変えることができます。
これは他のHigh-Lighを使用して見たいときに使うものかな?
外部のバイナリを使用 - 内部のHigh-Lightの中で添付されているバージョンの代わりにソースハイライトのバージョンを使用したいと思うなら、
このオプションをチェックしてください。(デフォルトではここにチェックを入れる必要がない)
source-highlight binary - あなたのマック上で2進法(バイナリ)のソースハイライトを見つけることができる場所へのパスを入力してください。
2進法の有効な出所ハイライトが見つかったら、下のtextフィールドでバージョンおよびライセンスを見ることができます。
それは反転表示された文章がどう処理されるかに影響があるので、しばしばバイナリを変えるべきではありません。
High-Lightは選択を処理することができないならば、それはエラーメッセージをページに表示します。
Use dynamic menu(動的なメニューを使用) - チェックがはずれた(デフォルト)では、High-Lightは、固定された言語メニューを使用します。
High-Lightが外部からのソースハイライトに基づく言語メニューを構築することを望むならば、このオプションをチェックしてください。
ソースハイライトv2.xが使用されている場合にだけ、このオプションは利用可能です。
高度な使用法
High-Lightがどう働いているかに満足していない高度なユーザのために、「容易に」変えることができるいくつかの項目があります。
しかし、自分で変更された場合サポートをするつもりでないので、あなたがすることに注意してください。
あなたがHigh-Lightの変更をするならば元ファイルをバックアップしてから初めてください。
これは、あなたが変えることができるもののリストです。 それぞれの部分の詳述は以下に続きます。
- Localize the plugin to your own language.(あなたの国の言語にプラグインをローカライズできます。)
- Customize the language menu.(言語メニューをカスタマイズできます。)
- Customize the available tags that wraps around the text.(利用可能なテキストのまわりを包んでいるタグをカスタマイズできます)
注意:すべての変更は、この章で説明したように公式にサポートされていません。
Localization(ローカライズ)
ユーザ>ライブラリ>ApplicationSupport>RapidWeaver>High-Light.rwpluginの中にあるファイル(右クリックで「パッケージの内容を表示」)>Contents>Resourcesフォルダの中の話です。
プラグイン内部にあるフォルダ「English.lproj」のコピーして、アップルにより用いられる名前である「japanese.lproj」に名前を変えてください。
nib-file(High-Light.nib)は、言語を支援するために変更することができるセッティング対話を含んでいます。
しかし、結合を壊さないように、nib-fileを変更する場合、慎重にしてください。
そうしないと、プラグインがきちんと機能しない原因になります。
また、「Localizable.strings」と呼ばれるファイルがこのフォルダーにあります。
このファイルはメニューとエラーメッセージのプラグインによって使用されるすべてのストリングが入れてあります。
あなたの言語に応じて、各文字列を変更することができます。
しかし再び、保存する場合、文字列のいくらかが引用の書式を設定するので、注意深くする必要があります。
注:「English.lproj」で見るもの以外の他のものはローカライすべきではありません。 そうしなければ、恐らくこのpluginによって提供される機能性を壊すでしょう。
あなたが行った翻訳が良いと確信し、他の人にもにあなたの日本語化を使って欲しいと思うなら、あなたはそれを私に送ることができます。
そして、私は将来のバージョンであなたの翻訳を含もうとするでしょう。
Language menu(言語メニュー)
With source-highlight v2.x it is possible to add support for more languages without recompiling the application. Since the default menu used by High-Light is based on the languages supported by default any new language added by the user will not be present in the menu.
One option is to turn on the setting “Use dynamic menu” and High-Light will query source-highlight for a list of supported languages. But that menu is long and not only based on languages (it is mixed with file suffixes etc.).
ソースハイライトv2.x(source-highlight v2.x)では、アプリケーションを再コンパイルすることなく、より多くの言語のサポートを追加することが可能です。
ハイライトによって使用されるデフォルトメニューはデフォルトで支援された言語に基づくので、ユーザによって新しく加えられたどんな言語もメニューの中にないでしょう。
1つのオプションは、設定「動的なメニューを使用」にチェックをつける必要があります。そして、High-Lightはサポートされた言語のリストのためにソースハイライトについてたずねます。
しかし、そのメニューは長くて、そして単に言語に基づかなかっただけです。(それはファイル接尾辞などと混ぜられます)
So instead you can modify the static menu used by High-Light. Inside the “Resources” folder there is a file called “styles_v2.plist” which contains the menu items. You can edit this file with Apples Property List Editor, a text editor or any XML editor and add/remove as many entries as you want. The menu entries in this file is based on a dictionary with two keys for each entry. The first key is “Name” which is what will be displayed in the menu. The second key is “HighLightCommand” which is the language argument that is sent to source-highlight.
This is a sample entry from “styles_v2.plist”:
Wrapping tags(ラッピングタグ)
The menu in High-Light that offers you a choice of tags to use around the generated text can also be modified. Inside the “Resources” folder there is a file called “tags.plist” which contains the tags present in the menu. You can edit this file with Apples Property List Editor, a text editor or any XML editor and add/remove as many entries as you want. The tag entries is based on a dictionary with three keys for each entry. The first key is “tag” which is what will be displayed in the menu. The second key “start” is the tag that is put in front of the generated text. The third key “end” is the tag that is put immediately after the generated text.
あなたに生成されたテキストのまわりで使用するタグの選択を提供するハイライトの中のメニューも修正することができます。
"Resources"フォルダ内に「tags.plist」と呼ばれているファイルがあります。Apples Property List Editor、テキストエディタまたはどんなXMLエディタででもこのファイルに加えたり、削除したり編集することがができます。
タグエントリーは下のように各エントリーあたり3個のキーがあるライブラリに基づいています。
最初のキーはメニューに表示される「tag」です。下の図で「Blockquote」の文字を表示します。日本語でも表示することができます。
2番目の主要な「start」は、選択したテキストの最初に置かれるタグです。 3番目の主要な「end」は、同じく選択されたテキストの最後に置かれるタグです。
これは"tags.plist"のサンプルエントリーです:
注意: 「始め」と「終わり」タグを編集するときには、有効なXML構文でテキストを必ずフォーマットしてください。
そうしないと、High-Lightをメニューを解析することができなくなります。
Frequently Asked Questions(よくある質問)
Q: When I check the page in the “Code” view in RapidWeaver I see warnings about empty … tags. Why does this happen?
A: This happens when you are using source-highlight v2.x and have deselected the option “Apply inline color CSS”. The reason is that source-highlight v2.x with default definitions creates a … tag around whitespace when it converts the text to HTML. This does not happen with source-highlight v.1.11 so this is a regression in version 2.x. For that reason I have decided, at least for now, to leave this without adding a “workaround” for it in High-Light. This may change in the future.
Q: I found the following text on one of my pages where I have used High-Light:
#######################################################
WARNING: High-Light was unable to convert the text
according to the applied language: C++
#######################################################
A: The high-light language applied to the text was not found in the current configuration of High-Light. This can happen if you mark the text when High-Light is configured with source-highlight v2.x and you have since switched to v1.x which supports less languages. The same thing can happen if you switch between the dynamic and static menu for source-highlight v2.x. Or if you have manually edited the “tags.plist”. The solution is to mark the text and apply the High-Light formatting again on that page.
Q: Why is there no option available to wrap the output inside
…tags?
A: That has been disabled because the styled text areas in RW does not handle
 tags properly. There is no way to properly render the text inside those tags. The text will either change to be on one line only or it will get
 tags added at the end of each line inside the tag. Maybe this will change in the future but for now it is disabled. If you still want this option you can always manually add such an option to the “tags.plist” according to the “Advanced usage” chapter.

Copyright

High-Light
Copyright © 2007 Roger Nilsson
Some internal parts are Copyright © 2007 André Pang

GNU source-highlight
Copyright © 1999-2007 Lorenzo Bettini