

Contents(機首による基本飛行)
- Cessna 172(セスナ172)
- Cirrus Vision SJ50(シーラスビジョンSJ50)
- F-22 Raptor(F-22ラプター)
- Boeing 747(ボーイング747)
- Glider(グライダー)
- Helicopter(ヘリコプター)
- Notes(注意事項)
- Review(レビュー)
- Space Shuttle(スペースシャトル)
- Beginning a Space Shuttle Mission Segment(スペースシャトルミッション·セグメントの開始)
- Launch(起動)
- ISS Dock(ISSのドッキング)
- Final Approach(アプローチ)
- Full Approach(フルアプローチ)
- Re-Entry(再入国)
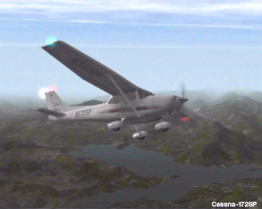
- 172で離陸を開始するには、 フラップを約3分の1のところまで下げます。これでより多くの浮力を発生させ、飛行機をよりすばやく離陸させることが出来ます。
- 次に、ブレーキをはずすために、赤色の BRAKES(ブレーキ)ボタンをタップします。ブレーキがOFFになるとスタートすることが出来ます。
- さらに、画面の上部の THROT スライダを一番上までドラッグします。これで、フルスロットルになります。
- 対気速度が約65ノットに達すると、地面から機首を上げて上昇を開始。飛行機の抗力を低減するためにフラップを上げる。
- 最も効率的に上昇するには、航空機の速度が76ノットになるまで機首を上げる。これは、フルスロットルで航空機の機首が10度くらいで上昇する時です。
- しばらく登った後に、水平になって飛行することが出来ます(例えば、約2000フィート)。
- この時点で、最大の約4分の3までスライダーを絞り、ゆっくりとゼロピッチになるように機首を下げます。
- 最終的には、滑走路に引き返すことになります。これを行うには、左または右にiPad/iPhoneをわずかに傾けます。
- 滑走路が見えるようになるまで回してください。それが遠くにある間に、航空機が滑走路に沿って平行になるのが理想的です。アプローチには、最小でも90ノット以上の対気速度を維持するようにしてください。
- 飛行機が滑走路に近づくにつれて、徐々にスロットルを下げるか、またはフラップを追加することによって、その速度を減少させる。
- それが滑走路に着陸すると、この段階的な減速は、完全なゼロパワーとフラップで、 70ノット弱に飛行機をコントロールする必要があります。
- 滑走路への浅いグライドパスに従ってくださいーつまり、 3と5度の間の機首を下げたポイントです。
- 飛行機が地面に到達する直前に、穏やかなタッチダウンのために約7度まで機首を引き上げる。
- 地上の航空機で、ブレーキをかけるために BRAKES ボタンをタップします。
- 飛行が終了したら、 [設定]メニューを開きます(第2章で説明したように)、新しいフライトを選択します。
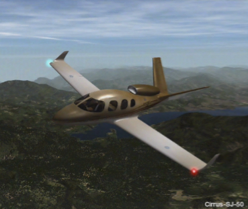
このジェットの飛行操作は、技術的には他のハイエンドの一般の航空のものとほとんど同じです。このシーラス航空機の離陸速度は80ノットです。(第3章)
ブレーキをオフにするには、画面の左下に BRAKES ボタンをタップします。
離陸準備のために、フラップを約 1/3 下にドラッグします。これは、航空機により多くの揚力を与えるためにフラップを下げます。しかしあまりにも下げ過ぎると多くの抗力を加えることになるので、フラップを完全に下まで入れないでください。着陸時にのみフルフラップが使用されます。
フラップを下げたら、スロットルを一番上までドラッグします。これは、航空機にフルパワーを与えます。
滑走路上でまっすぐ走るように操縦するには、45度くらいで装置を持って、iPad/iPhoneを左右に傾けてまっすぐ進むようにコントロールしてください。(自然な上昇のために)。そして、滑走路から離れて上昇するために、航空機がおよそ80ノットに達したとき、機首を上げるため、機首を10度上げてください。
航空機が数フィート上がったあと、機首を(ほぼ)横ばいにするために下に少し後退させてください、しかし、滑走路に降下しないようにしてください。
飛行機をしばらくの間、水平に加速させる(たとえば、 100ノットに達するまで)、そして、上昇を再開してください。
このように横ばいにすることは、航空機に速度の「クッション」を提供します。それは本格的に上昇し始めたとき、失速しないように対気速度を上げるためです。
一旦パワーが十分に設定されると、飛行機の機首の上下ピッチングを十分制御できるようになります。
航空機の機首の設定があまりにも高すぎる場合は、それが失速するまで、その速度はどんどん低下していきます。上昇するときシーラス·ビジョンでは、おおよそ130ノットの速度が望ましいです。
車輪を上げるためにギアボタンを押す、飛行機が空中で安全になったら、完全にフラップを上げるため、フラップのスライダをドラッグします。
飛行機が上昇するように約10度の機首を保持し続ける。上昇には、ギアとフラップの両方がアップされている必要があり、パワーはフルのままにしてください。飛行するときは、必ず失速を回避するための絶対的な最小値として約80ノットを超える飛行機の速度を保つこと。
パワーを追加したり、この速度を維持するためには、機首を下げることが必要な場合があります。
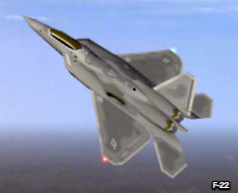
まず、ブレーキをオフにするために、画面の左下の BRAKES ボタンをタップします。
なぜなら、ラプターでは利用できるパワーが大きいため、離陸するときフラップを必要としません。
スロットルを一番上までドラッグします。これで、航空機にフルパワーを与えます。
約45度ピッチくらいでディバイスを持って、滑走路の中央に沿って操縦するために、iPad/iPhone左右を傾けてくコントロールしてださい。
クラフトは、 (そのHUDの左側にスクロールテープで示される)は約120ノットに達すると、機首を上げるために戻ってあなたに向かってデバイスを傾け、そして離れてあなたが行く。
航空機がおよそ120ノットに達するとき、機首を上げるために、自分の方へ装置を少し傾けて飛行していきます。
この飛行機は、強力なパワーがあり、それはロールおよびピッチ制御を支援するために、独立した各エンジンの推力を使用していることに注意してください。
フルアフターバーナーのとき、エンジンは各々35,000ポンドのスラスト(推力)を発生します。
(フルアフターバーナーとはジェットエンジンの排気に対してもう一度燃料を吹きつけて燃焼させ、高推力を得る)
およそ合計24,000ポンドのスラストを出す F-16 と、それを比較してください。
ラプターのエンジンが飛行制御を上下に推力を1ベクターますので、滑走路上では、速くスティックを引き戻すことはエンジンのパワーで地面に尾が当たる原因になります。そして、機首は上へ極端に高くなります。
過去のユーザーは、ラプターは、おそらくこのような短い距離で離陸することは不可能であるとコメントしている。
もちろん、飛行機は、まだ本当に離陸していません—それは、アスファルト上でその後部を引きずりながら走路を滑っています。
航空機がいつ実際に、上昇しているかについて決定するために、高度計を見てください。
一旦うまくいったならば、操縦するために、左右に装置を傾けてください。車輪を上げるためにGEARボタンをタップ、フラップ・スライダーがトップ(一番上)であることを確認してください。
飛行機が上昇するように約30度程度の機首を上げる。上昇には、ギアとフラップの両方が起動する必要があります。
この飛行機が生み出す驚異のパワーを考えると、スロットルはアフターバーナーモードから抜け出すために、少し戻すのがいいでしょう。
もう一度、航空機の機器が示した対気速度は正確な対気速度と異なる場合があることを覚えておいてください。これは特に高い高度で重要になります、そこでは、航空機の胴体の上の対気速度測定装置に当たっている空気はほとんどないからです。
Let’s go through the basics of takeoff and flight in the F-22 Raptor, an aircraft which will serve as a decent representation of the other fighters (like the F-14 and F-15) as well.
First, tap the BRAKES button on the lower left of the screen to turn the brakes off. Because of the excessive amount of power available in the Raptor, flaps are not required to take off.
Drag the throttle all the way to the top of its range of motion. This will give the aircraft full power.
Tilt the iPad/iPhone left and right to steer down the runway (being careful not to hit the plane in front of you), holding the device at about a 45 degree pitch (for a neutral elevator). When the craft reaches about 120 knots (indicated by the scrolling tape on the left side of its HUD), tilt the device back toward you to raise the nose, and away you go.
Keep in mind that this airplane is excessively powerful and that is also uses thrust vectoring—that is, it points its exhaust up and down on each engine independently to aid in roll and pitch control.
The engines produce more then 35,000 pounds of thrust each when in full afterburner. Compare that with the F-16 which puts out about 24,000 pounds of thrust total.
Because the Raptor’s engines vector the thrust up and down with the flight controls, yanking the stick back rapidly while on the runway will cause the engine's thrust to slam the tail into the ground and the nose will point excessively high upward.
Users in the past have commented that this is not possible, that the Raptor can not possibly take off in such a short distance. Of course, the plane has not really taken off yet—it's just sliding down the runway dragging its tail on the asphalt. Look at the altimeter to determine when the aircraft is actually in the air and climbing.
Once off the ground, tilt the device left and right to steer.
Hit the GEAR button to raise the landing gear and make sure the flaps slider is at the top of its range of motion.
Hold the nose up about 30 degrees or so as the plane climbs out. In the climb, both the gear and flaps should be up. Given the amazing power this airplane produces, the throttle can be brought back a bit in order to get out of afterburner mode.
Once again, remember that the craft's indicated airspeed may be different from its true airspeed due to the design of the instrument itself. This becomes especially important at high altitudes, where there is little to no air hitting against the airspeed measuring device on the body of the craft.
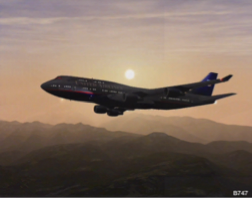
ボーイング747で、飛行をざっとやってみましょう。(X-PlaneのiPad/X-Plane HDEF 4Gに含まれる大型旅客機の良い代表例)
開始するには、ブレーキをオフに切り替えるには、BRAKESボタンをタップします。フラップを下三分の一程度までドラッグします。このようなフラップで引っ張ると、より迅速に地面から航空機を離陸させるために必要な揚力を提供します。次に、フルスロットルを与えるために、一番上にスロットルスライダをドラッグします。
航空機がおよそ160ノットに達したとき、航空機の機首を下げるために、装置を穏やかに、後ろに傾けてください。
それから地面から離れるために2、3秒の間、浅いピッチで上昇し続けてください(たとえば約5度)、そして、穏やかに、およそ15度まで飛行機の機首を上げてください。ギアを上げてください、そして、フラップを一番上に戻してください。それが上昇のとき、このようにニュートラルにフラップに戻すことは航空機にかかる圧力を最小にします。
希望の高度に達するまで上昇を続けます。そのとき機首を水平にして、スロットルを最大の約4分の3ににしてください。
機首を希望のピッチで保持するためにトリムコントロールを使用します(HUDビューでのみ現在使用可能)。 例えば、コントロールを少し引き下げて、機首を上げてください。 機首を押さえるには、コントロールを少し引きずり上げてください。
これは人間工学的に全くきちんとしたホイールを使用するのと同等です。パイロットは、機首を押し下げると徐々に増します。または、ダウンして、機首を引き上げます。
747の制御を維持するためには、常に最低でも140ノットの速度を維持するようにしてください。 170または180ノットの快適な速度を保持することが望ましいです。
今度は747の着陸について説明しましょう。滑走路へのアプローチは地図画面から Final ボタンを選択すれば容易に実施することができる( Settingsメニュー - 第2章にある)。これは数マイル離れた空港が正面になるよう航空機をセットします。
希望の空港が視界内にあり、航空機がそれに並んでいるときは、本格的にアプローチを開始する時間です。アプローチの鍵となるのは、徐々に空港のレベルまで下降しながら、徐々に航空機を減速することです。
理想的には、ちょうどその飛行機が着陸地点で失速速度以上に減速していることです。 これは、747においてタッチダウンの瞬間の直前に、約150ノットで移動しているように、その速度は徐々に減少させてアプローチさせなけばならないことを意味します。この速度を落とすためには、ゆっくりスロットルを後退させて、完全にフラップを引き下げることが必要です。スピードブレーキ(スポイラー)も、必要とされるかもしれません—それを引き下ろして、航空機の速度を減少させてください。
降下中に、 3度と5度の間に機首を下げてください。これは浅い、制御降下を提供します。航空機が着陸する直前に、約7度まで機首を引き上げる。これは、後輪が最初にタッチダウンさせ、非常に滑らかな着陸をもたらすでしょう。
一度、飛行を手動制御でマスターしたならば、第6章で説明され、どちらもILSを使用して、自動操縦や着陸で飛んでみてください:アプリ/ X線平面HDEF 4GのためのX線平面の高度な機能。
一旦飛ぶことが手動規制を使ってマスターしたならば、ILSを使用して、着陸を自動操縦で飛んでみてください。どちらも第6章で説明されている。Chapter 6: Advanced Features of X-Plane for iPad/X-Plane HDEF 4G.
Flying X-Plane's airliners is quite different from flying, say, the Cirrus Vision. The airliners are much, much heavier than the other planes, and thus require a great deal more lift to get off the ground. For pilots who are used to flying light planes, these behemoths will feel very sluggish.
Let's walk through flight in the Boeing 747, a good representative of the airliners included with X-Plane for iPad/X-Plane HDEF 4G.
To begin, tap the BRAKES button to toggle the brakes off. Drag the flaps about one third of the way down. Pulling in the flaps like this will provide some extra lift to get the aircraft off the ground more quickly. Next, drag the throttle slider all the way to the top of its range of motion, giving the craft full throttle.
When the aircraft reaches about 160 knots, gently tilt the device back in order to pull the craft's nose off the ground.
Keep it climbing at a shallow pitch (say, about 5 degrees) for a few seconds in order to get away from the ground, then gently raise the plane's nose up to about 15 degrees. Toggle the gear up, then bring the flaps back to the top of their range of motion. Setting the flaps back to neutral like this will minimize the drag on the craft as it climbs.
Continue climbing until the desired altitude is reached. At that point, level the nose off and bring the throttle down to about three quarters of its maximum.
Use the trim control (currently available only in the HUD view) to hold the desired pitch of the nose. For instance, to hold the nose up, drag the trim control down a bit. To hold the nose down, drag the control up a bit. This is ergonomically equivalent to using a real trim wheel, which the pilot rolls up to push the nose down, or down to pull the nose up.
In order to maintain control of the 747, be sure to always keep its speed above 140 knots as an absolute minimum. Holding a more comfortable speed of 170 or 180 knots is desirable.
Now let's discuss landing the 747. Approaches to the runway can be easily practiced by selecting the Final button from the Map screen (found in the Settings menu—see Chapter 2). This will set the aircraft lined up with the indicated airport while still a few miles away.
When the desired airport is in sight and the aircraft is lined up with it, it's time to begin the approach in earnest. The key to the approach is to gradually slow the craft down while also gradually descending to the level of the airport.
Ideally, the airplane will have slowed down to just above its stall speed at the point that it touches down. In the 747, this means its speed should be gradually decreasing on the approach so that the instant before it touches down, it is traveling at about 150 knots. In order to slow to this speed, it will be necessary to slowly back the throttle down and pull in full flaps (by dragging the flaps control to the bottom of its range of motion). The speedbrake may also be required—drag it down to decrease the aircraft's speed.
In the descent, pitch the nose downward between 3 and 5 degrees. This will provide a shallow, controlled descent. In the seconds before the aircraft touches down, raise the nose up to about 7 degrees. This will cause the back wheels to touch down first, yielding a very smooth landing.
Once flying has been mastered using the manual controls, try flying with the autopilot or landing using an ILS, both of which are described in Chapter 6: Advanced Features of X-Plane for iPad/X-Plane HDEF 4G.
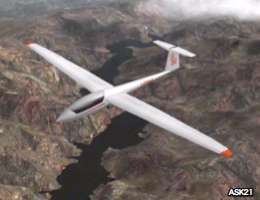
Schempp-ヒルトシーラス(Schempp-Hirth Cirrus)を飛ばすとき、一旦航空機がうまく飛行しだしたら、ギアを上げます。これで、ユーザーはすべてのパフォーマンスをグライダーに圧搾することができます。
曳航機は、飛行中にユーザーが好きな高さまでグライダーを引っ張りますが、その背後にちゃんとグライダーが飛行しているか保持する必要があります。画面の右下の隅にあるフックボタンをタップし、航空機との間のラインを解放するとグライダーは自由に舞い上がることができます。
もちろん、HOOK(フック)ボタンが押されるまで、2機の航空機を接続する牽引ロープが曳航機の後ろとグライダーの機首に付けられています。
X-Plane モデルの実このような状況の物理学なので、X-Plane はこの状況では、本当の物理学をモデル化するので、グライダーが左、右、上、または、下がるならば、それは曳航機の後ろにある航空機をその方向に引きずります。これは、誤って進んでいる飛行機を引っ張ったり、最終的にはストールやスピンが発生する可能性があります。それが起こるならば、ことは非常に難しくなります(おそらくクラッシュします)—曳航機はそれでグライダーを引くと、結果としてクラッシュの力学は..興味深い
グライダーのためのFAAのハンドブック(FAA handbook for gliders)によると、高度に曳航それは「低い牽引」位置にあるべきです。そこでは、グライダーが曳航機のすぐ下の位置になければなりません。または、ちょうど曳航機より上に、それは「高い牽引」位置になければなりません。慎重にこの位置を保持して、曳航機で回りに引きずらないように注意してください!
When starting out in one of the two unpowered gliders (the ASK 21 or the Cirrus), the simulator puts the craft on the runway behind the Cessna towplane. The towplane's engine is running, and it's ready to go. Releasing the glider's brakes (by tapping the BRAKE button) commands the towplane to take off, dragging the user's craft with it.
When flying the Schempp-Hirth Cirrus, the gear should be raised once the craft is off the ground. This enables the user to squeeze every last bit of performance from the glider.
The towplane, once in flight, will take the glider as high as the user likes, and while being carried up, the glider will have to hold formation behind it as it pulls the glider to altitude. Tapping the HOOK button located in the bottom right corner of the screen will release the line between the aircraft, allowing the glider to soar freely.
Notice, of course, that until the HOOK button has been pressed, the tow rope connecting the two aircraft is attached to the towplane's tail and the glider's nose. X-Plane models the real physics of this situation, so if the glider pulls left, right, up, or down, it will drag the towplane's tail in that direction. This could result in simply pulling the plane off course, or ultimately in dragging the plane into a stall or spin.
If that happens, things will get very complicated very quickly—the towplane (which will likely be crashing) will be dragging the glider with it! The dynamics of the resulting crash are... interesting.
According to the FAA handbook for gliders, a glider pilot should keep the glider in one of two positions when being towed to altitude. It should either be in a “low tow” position, wherein the glider is just below the wake from the towplane, or it should be in a “high tow” position, just above the wake from the towplane. Hold this position carefully to keep from dragging the towplane around!
グライダーのパイロットは空中で機体を保持するために山の斜面を流れる上昇気流を利用して、空気の上方への動きの流れの中に保持するように慎重に風や地形の斜面を見なければなりません。シミュレータでは良い25ノットの風をセットすると、ユーザーが、険しい山の風上の側に沿って飛ぶとき、10,000フィートまで自由なエレベーターに乗ることができます。これは、リッジリフトと呼ばれています。
グライダー特有の総エネルギーバリオメーターと呼ばれる機器があります。それがピーッと鳴っている場合、航空機は素敵な上昇気流を受けています。
その領域を旋回すると、グライダーは上昇気流に乗ることができます!バリオメーターが、普通の音を出している場合、それは、機体を降下させる状態であり、ユーザはその領域から抜け出す方法を見つけることができなかった場合、クラッシュが待っているということになります!
すぐに、グライダーを着陸させるために、滑走路まで旋回してください。
例えば、次の画像では、 speedbrakes(エアブレーキ)は完全に下がっている(右上)、グライダーは失速速度を上回ってちょうど滑走路に到達します。
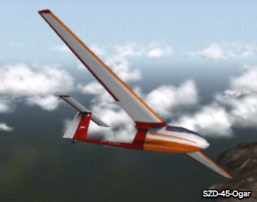
Taking off in the SZD-45 (the powered glider) is like taking off in any other plane—run the throttle all the way up, pull in a little bit of flaps, then pull back at around 50 knots. Then, once the glider reaches altitude (with the flaps up, of course), drag the throttle slider back down to idle and soar like any other glider!
A glider pilot must watch the wind and the slope of the terrain carefully to hold inside the upward-moving currents of air, using the lift of the air flowing up the mountain slope to hold the craft aloft.
With a good 25-knot wind set in the simulator, the user can get a nice, free elevator ride to 10,000 feet when flying along the windward side of a nice, steep mountain. This is called ridge lift.
Unique to the gliders is an instrument called the total energy variometer. If it is beeping, then the aircraft is in a nice updraft from the air following the terrain. Circling in that area will let the glider ride the climbing air to altitude! When the variometer is emitting a steady tone, the craft is in descending air—the glider has been blown to the wrong side of the mountain, and a crash will follow soon if the user does not find a way out of that area!
Now, to land the glider, simply circle down to runway level. The trick is to approach the runway with just enough speed to set the craft down safely. Remember, pulling the speedbrakes in can help slow the craft down, but if it doesn't have enough speed to reach the landing strip, the glider has no way of generating thrust. For instance, in the following image, the speedbrakes are fully engaged, and the glider will reach the runway just a hair above its stalling speed.
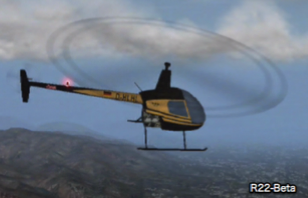
実際にはあらゆる種類の異なるヘリコプター・レイアウトを見ることができますが、我々は、標準的な構成だけをここで検討しますー ロビンソンR22 Betaのように尾部回転翼が後部にある単一のオーバーヘッドのローター、それが動作する方法は次のとおりです:まず、メインローターの飛行機の翼は、その重量をささえ、またはそのプロペラが空気を介してそれを引っ張ることとまったく同じ方法で、航空機をサポートするために必要な揚力を提供しています。
飛行機のプロペラとはかなり異なります、ヘリコプターのローターは飛行中の全過程で同じ回転数で回転します。飛行機はプロペラの推力を発生させるためにスピードアップするのに対し、ヘリコプターのローターによって生成されたリフト量は、メイン·ローター·ブレードのピッチを調整することによって制御されます。これは集合的なコントロールを使用して行われる。
ヘリコプターの唯一の操作上の回転数を400rpmであるとイメージしてください。機体が地面にいるとき、ロータは400 RPM 旋回し、ロータのブレードのピッチは、約ゼロである。これは、ロータがほぼゼロの揚力を与えていることを意味します。ブレードがゼロピッチを有するので、それらは非常に少ない抗力を有するので、空気を介してそれらを移動(回転)させることは非常に容易である。ゆうなれば、回転数で回転子を回すのに必要なその動作の電力はこの時点でかなり最小である。パイロットが飛ぶ準備ができたとき、今、collective(可変ピッチ?)と呼ばれるコックピットのハンドルを引き上げて開始します。これを行うと、ローターのブレードは、正のピッチに上がり、メインローターのすべてのブレードは、一度に一緒にこうなります。
もちろん、正のピッチを持っているので、それらは多くの浮力を出しています。現在、それらはより多くの仕事をしていることから、空気を介して回転するのがより困難であるという事実は明白です。
ブレードを回すのはもっとより難しいので、それらはゆっくり回転しますーもしこれが起こるのを許されるならば、それは破滅的です。そのローターが回っていないときは航空機は飛ぶことができない!これは補償します。ヘリコプターのフィードバックセンサは、ローターが必要とする400RPMを維持するためにスロットルで必要なとこまで増加させます。
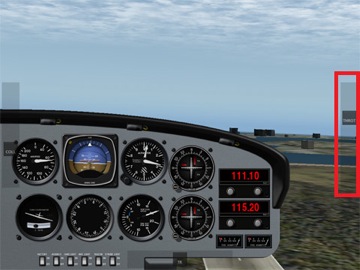
X-Planeでは、このスロットル調速機の影響は、画面の右側にスライダーで見ることができるHUDビューにある間、以下のスクリーンショットでハイライトとして。
X-Planeでは、以下の画面ショットの中でハイライトされているように、HUD表示でのスロットル調速機はスクリーンの右側のスライダーで見られることができます。
この補償は、テールローターの形式で行われます。実際のヘリコプターではフットペダルで制御されます。メイン・ローターのトルクを修正するために、パイロットは足で小さな変更を絶えずしていなければなりません。(メイン・ローターのブレードにするように、一括制御で尾部ローターのブレードのピッチも変える)エンジンにより、メイン・ローターに供給される力の量に応じて、このトルクそのものは絶えず変わっています。
X線平面は自動的にテールローターを安定させるためにしようとします。しかし、ほとんどの場合、それを手動で画面の下に見つかっTRスライダー、 (下のスクリーンショットを参照)を使用して、それを制御することをお勧めします。これは左のヘリコプターを回すために左に移動、右の右折に移動し、覚えています。これは、メインローターのコレクティブピッチが(エンジンによって供給される電力とロータが吸収したエネルギーを変化させる)が変更されているように前後に移動する必要があります。
機体は、空気中で、メインローターのコレクティブピッチ(可変ピッチ)が調整してあるなら(X-PlaneにおけるiPad/X-Plane HDEF 4Gでは画面の左側のスライドコントロールを使用)、現実の世界のヘリコプターのパイロットは、サイクルコントロールを使います(ジョイスティック)。現実の世界のヘリコプターのパイロットは、機体をアップダウン、右、左、または傾けてサイクル制御(ジョイスティック)を使用します。 これは、X-Planeでは、iPad/iPhone を左、右、前方、および後方に傾斜させることによって制御される。
サイクルコントロールは、このように働きます:もしサイクルが右へ移動されるならば(右に傾けている装置と一致する)、それから、ローターのブレードが、機体の前面にあるときそのピッチを増やし、それが機体の後にあるとき、そのピッチを減少させます。
言い換えると、それがかつてヘリコプターのまわりを走るたびに、ローターの刃は完全なサイクルを通してそのピッチを変えます。そして、絶えずより高いか低いピッチに行きます。
言い換えれば、いったんヘリコプターが走り回るときはいつも、ローターブレードは、絶えずより高いか低いピッチになり、フルサイクルでピッチを変えます。
もし、私たちが以前の例を使用するなら、これは、ローターがピッチを1つの状態からもう片方に変えることを意味します。そして行き帰りで、1分あたり400回(1秒あたり7回)、ローターは400RPMで回っています。
かなり印象的です、特に航空機は、これらの条件の下で一緒に滞在することを考慮して管理します!我々はコントロールが巡回スティック呼ぶ理由スティックを移動すると、 1サイクルを通してブレードピッチを送るということは、回転翼の回転毎です。
スティックを動かすことがローターのブレードの1サイクルのあらゆる回転を通してブレードピッチを送るという事実は、我々が操縦桿をサイクルと呼ぶ理由です。
よりサイクル的ものについて話しましょう。スティックが右に移動したときには、それがヘリコプターの前にあるその移動の一部である場合には、ロータのピッチを増加させる。(ここ意味不明)
驚くべきは、正しい? 一つは、私たちが右に移動したい場合、我々はそれによって左を持ち上げヘリコプターを右ロールさせる、ヘリコプターの左側に揚力を増大させることを想定している可能性があります。
これは、しかしながら、それがどのように作動するかではない、ジャイロの力がジャイロスコープの回転の方向に沿って90度適用されるという事実により、そしてそれはマシンの左の変化を定義するためにヘリコプターの正面でリフトを変えなければならない理由です。(ここ意味不明)
ここでは、これがどのように動作するか確認するために、自分で試すことができる驚くべき実験です。あなたの手の中に自転車の車輪の自由に回転する(低摩擦)バースツールに座る。あなたは、車軸の両側に1つずつ手でホイール静止を保持しながら、友人は、可能な限り迅速にタイヤをスピンさがある。今、あなたの友人が少し離れてバックアップした後は、ゆっくりと横方向(前後)とロールの軸を中心軸を回転させ、あなたが自転車の車輪に制御動作を行うことで、椅子にあなたのスピン運動を制御する方法で驚かれることでしょう。クール!
この件、自転車のホイールで実験をしているらしいのだが翻訳ができませんでした。意味がよくわからないです。
驚くべきことじは、他にもありますーヘリコプターのローターは、その飛行経路を変えるために、機体を直接引きません。右へ曲がるために、ヘリコプターはローターの全面で推力を増やさねければなりません。そして、それはローターの左側でも同じことです。一旦ローターが右に傾けられたならば、それは右に機体を引っ張ります。しかし、ローターはヘリコプターが右にロールすることを強制するものではありません。ローター自体の角度が変更されます。推力の方向の結果として生じる変化は、実際にヘリコプターの飛行経路を変えることになります。実際には、、メインローターの推力ベクトルは、2つの構成要素があり、垂直リフト(ヘリコプターの重さをサポート)と水平リフト(ヘリコプターが右に加速する原因)に分解することができる。
ヘリコプターのローターがその飛行経路を変えるために機体を直接引かないと、我々は言いました。多くのヘリコプターのローターは自由なぐらつきがあるためです。そのために、機体への接続は不安定でへなへなの状態であります。それは、少しの力もヘリコプターの胴体へ力を導くことができません(左と右と、前と後ろで)。操作することは、左に傾いているローターで、成し遂げられるだけです。そして、その方向にそれがもとで機体を上へ引き上げます。ヘリコプター本体は家畜のように、ローターのもとで鼻輪にそって引かれます。そして、ローターがやみくもに引っ張るその後に続くだけです。
まとめます、これは、ヘリコプターを飛ばすためのシーケンスです(現実の世界、ならびにX-Planeで):
1 。地上にいる間、総体的なハンドルは地上では平らである。これは、ロータのピッチが最小ドラッグ&ゼロリフトで、平らであることを意味します。 X-Planeでは、可変ピッチがフラット状態は、そのスライダーの一番上状態に対応している(画面の左側にあります)。ヘリコプターの自動スロットルはローターの回転数を強迫観念的に見ています。そして、必要に応じてスロットルが正確に設計回転数を保持するように調整します。地上では、コレクティブ(可変)ピッチはフラットで、ブレードは空気抵抗をほとんどさまたげないので、この速度を保持するために必要なパワーはかなり低い。
2 。ユーザーが離陸することを決定した場合、 ヘリコプターを引き上げるには、ピッチを上げることによってそれを行う。 X-Planeでは、これは、スクリーンの下の方へ向かってスライドバーを制御することによって行われる。
これは、メインローター上のブレードピッチを増加させます、したがって、その揚力を増大させるが、それはまた、ローターへたくさんの負荷を増やします。ローター回転数は、その動作速度を下回る状態で開始しますが、オートスロットルはこれを検知し、エンジンにいくら負荷がかかっても、それを正確に必要なロータ回転数に持っていき、それを維持し続けます
3 。より多くの可変ピッチは、ブレードが地面から航空機を調達するのに十分な揚力を作成するまで、引き込まれます。オートスロットルは関係なく、集団が昇降するどれだけその動作回転数で回転するローターを維持しないように力を加えること続けています。ローターが地面から機体を上げるのに十分な揚力を得るまで、ピッチはより多く引き上げられます。
4 。ヘリコプターがトルクとジャイロスコープの影響のために回らないようにするために、テールローターは活発に制御されます。パイロットや自然によって行われるどんな変化でも、他の2つのコントロールで入力を必要とします。このため、パイロットは継続的に小さな調整を絶えずしていなければなりません(コントロールスティックーデバイスの傾きで制御)。ピッチ(メインローターを調節するレバーーCOLLスライダーで制御される)、そして、反トルク・ペダル(テールローターピッチを合わせる—TRスライダーでコントロールされます)変化の原因になるのはこれらのコントロールのいずれかを変化させることにもとずいている。完璧に上昇するために、上記の情報を使用してください。それが習得されると、ローターを前方に傾けて機首を押し下げます。機体の重心より上にあるローターからの揚力は、ヘリコプターの機首を下げますし、そして、それが前へ飛んで、ローターからのリフトの前の構成要素は前に機体を引きあげます。
The following is a description of how helicopters are flown in the real world, along with the application of this in X-Plane. As you are about to see, flying a helicopter is very difficult and much more demanding than flying a fixed-wing airplane.
Though all manner of different helicopter layouts can be found in reality, we will discuss only the standard configuration here—a single overhead rotor with a tail rotor in the back, like the Robinson R22 Beta. Here's how it works: first, the main rotor provides the lift needed to support the aircraft, exactly in the same way that an airplane's wing supports its weight, or its propeller pulls it through the air.
Quite unlike an airplane propeller, though, a helicopter's rotor spins at the same RPM in all phases of flight. Whereas an airplane propeller speeds up in order to generate thrust, the amount of lift generated by a helicopter rotor is controlled by adjusting the pitch of the main rotor blades. This is done using the collective control.
Imagine the one and only operational RPM of a helicopter is 400 RPM. When the craft is sitting on the ground, the rotor is turning 400 RPM, and the pitch of the rotor’s blades is about zero. This means that the rotor is giving about zero lift. Because the blades have zero pitch, they have very little drag, so it is very easy to move them through the air. In other words, the power required to turn the rotor at its operational RPM is pretty minimal at this point.
Now, when the pilot is ready to go flying, he or she begins by pulling up on a handle in the cockpit called the collective. When this happens, the blades on the rotor go up to a positive pitch. All the blades on the main rotor do this together at one time—"collectively."
Of course, they are then putting out a lot of lift, since they have a positive pitch. Equally apparent is the fact that they are harder to drag through the air now, since they are doing a lot more work.
Since it is a lot harder to turn the blades, they start to slow down—if this were allowed to happen, it would be catastrophic, since the craft can’t fly when its rotor isn’t turning! To compensate for this, the helicopter's feedback sensors will increase the throttle as much as necessary in order to maintain the desired 400 RPM in the rotor. In X-Plane, the effect of this throttle governor can be seen in the slider on the right side of the screen while in the HUD view, as highlighted in the following screenshot.
So, increasing the collective pitch of the main rotor will increase the lift generated by it, thus pulling the helicopter off the ground. However, because of the main rotor's inertia and its increasing drag as its pitch increases, the force required from the engine to spin the rotor also increases.When the throttle governor increases power to meet this need, the torque delivered from the main rotor blades to the fuselage of the helicopter will change. This torque (and the fact that it is continually changing) must be compensated for in order to keep the craft flying straight.
This compensation comes in the form of the tail rotor, controlled with the foot pedals in a real helicopter. The pilot must continually be making small changes with his or her feet (changing the pitch of the tail rotor blades just like the collective control does to the main rotor blades) in order to correct for the torque of the main rotor. This torque itself is continually changing depending on the amount of power delivered to the main rotor by the engine.
X-Plane will try to stabilize the tail rotor automatically. However, in most cases, it is a good idea to manually control it using the TR slider, found at the bottom of the screen (see the screenshot below). Remember, move this left to turn the helicopter left, and move it right to turn right. This will need to be moved back and forth as the collective pitch of the main rotor is changed (which changes the power delivered by the engine and the energy absorbed by the rotor).
Incidentally, the tail rotor is geared to the main rotor so that they always turn in unison. If the main rotor loses 10% RPM, the tail rotor loses 10% RPM. The tail rotor, like the main rotor, cannot change its speed to adjust its thrust.
Like the main rotor, it must adjust its pitch, and it is the tail rotor’s pitch that is being controlled with the anti-torque pedals (that is, the TR slider in X-Plane for iPad/X-Plane HDEF 4G).
Once the craft is in the air and the collective pitch of the main rotor is being adjusted (in X-Plane for iPad/X-Plane HDEF 4G, using the sliding control on the left side of the screen),
the helicopter pilot in the real world will use the cyclic control (the joystick) to tilt the craft left, right, down, or up. In X-Plane, this is controlled by tilting the iPad/iPhone left, right, fore, and aft.
The cyclic control works like this: If the cyclic is moved to the right (corresponding to the device being tilted to the right), then the rotor blade will increase its pitch when it is in the front of the craft, and decrease its pitch when it is behind the craft.
In other words, the rotor blade will change its pitch through a full cycle every time it runs around the helicopter once, continually going to a higher or lower pitch.
If we use the example from before, this means that the rotor would change its pitch from one condition to the other, and back again, 400 times per minute (7 times per second), because the rotor is turning at 400 RPM.
Pretty impressive, especially considering that the craft manages to stay together under these conditions! The fact that moving the stick sends the blade pitch through one cycle every rotation of the rotor blades is why we call the control stick the cyclic.
Let's talk more about the cyclic. When the stick is moved to the right, the rotor increases pitch when it is in the part of its travel that is in front of the helicopter.
Surprising, right? One might have assumed that if we wanted to turn right, we would increase lift on the left side of the helicopter, thereby lifting the left and causing the helicopter to roll right.
This isn't how it works, though, due to the fact that gyroscopic forces are applied 90 degrees along the direction of rotation of the gyroscope, which is why the lift must be changed in front of the helicopter to enact a change on the left of the machine.
Here’s an amazing experiment that you can try on your own to see how this works. Sit on a free spinning (low friction) bar stool with a bicycle wheel in your hands. Have a friend spin the tire as quickly as possible while you hold the wheel stationary with one hand on each side of the axle. Now, after your friend backs away a bit slowly rotate the axle about the lateral (fore and aft) and roll axes and you will be surprised at how you can control your spinning motion on the stool by making controlled movements with the bicycle wheel. Cool!
Here’s something else that is surprising—the helicopter’s rotor doesn’t directly pull the aircraft to change its flight path. To turn right, the helicopter must increase the lift on the front of the rotor, which causes the left side of the rotor to come up (tilt to the right). But the rotor doesn’t force the helicopter to roll to the right; only the angle of the rotor itself is changed. The resulting change in the direction of lift is what actually changes the flight path of the helicopter. Once the rotor (and thus the helicopter's thrust vector) is tilted to the right, it will drag the craft off to the right. In fact, the thrust vector from the main rotor can be broken down into two components, vertical lift (which supports the weight of the helicopter) and horizontal lift (which causes the helicopter to accelerate to the right).
We said that the helicopter's rotor doesn't directly pull the craft to change its flight path. This is because the rotor on many helicopters is totally free-teetering; it has a completely "loose and floppy" connection to the craft. It can not conduct any force (left, right, fore, and aft) to the body of the helicopter. Maneuvering is only achieved by the rotor tilting left, right, fore, and aft, dragging the top of the craft underneath it in that direction. The helicopter body is dragged along under the rotor like livestock by a nose ring, blindly following wherever the rotor leads.
To summarize, this is the sequence for getting a helicopter to fly (in the real world, as well as in X-Plane):
1. While on the ground, the collective handle is flat on the ground. This means the rotor pitch is flat, with minimum drag and zero lift. In X-Plane, a flat collective corresponds to the collective control (found on the left side of the screen) being at the top of its range of motion.
The automatic throttle in the helicopter is obsessively watching the rotor’s RPM, adjusting the throttle as needed to hold exactly the design RPM (which varies from helicopter to helicopter). On the ground, with the collective pitch flat, there is little drag on the blades, so the power required to hold this speed is pretty low.
2. When the user decides to take off, s/he does so by raising the collective up by pulling it up from the floor of the helicopter. In X-Plane, this is done by easing the sliding bar collective control down toward the bottom of the screen. This increases the blade pitch on the main rotor and therefore increases its lift, but it also increases the drag on the rotor a lot. The rotor RPM begins to fall below its operational speed, but the auto-throttle senses this and loads in however much engine power it has to in order to keep the rotor moving at exactly the required RPM.
3. More collective is pulled in until the blades are creating enough lift to raise the aircraft from the ground. The auto-throttle continues adding power to keep the rotor turning at its operational RPM no matter how much the collective is raised or lowered.
4. The tail rotor is actively controlled to keep the helicopter from spinning due to torque and gyroscopic effects. Any change made by the pilot or nature will require input in the other two controls.
Thus, the pilot must continually be making small adjustments to the cyclic (the control stick—controlled with the device's tilt), collective (the lever to adjust main rotor pitch—controlled with the COLL slider) and anti-torque pedals (to adjust tail rotor pitch—controlled with the TR slider) to account for changes based on moving any of these controls.
Use the above information to hover perfectly. Once that is mastered, push the nose down to tilt the rotor forwards.
The lift from the rotor acting above the center of gravity of the aircraft will lower the nose of the helicopter, and the forward component of lift from the rotor will drag the craft forward as it flies along.
Notes(注釈)
このアプリケーションでは、スロットルが自動的にヘリコプターのために制御されていることに注意してください。それは、エンジンがどれくらい一生懸命に動いているかという視覚の指標だけとして、それは示されます。メイン・ローター(ピッチコントロール)からエンジンが提供することができるより多くの推力を命じないように注意してください、さもなければ、ローター回転数は崩壊します、そして、航空機の飛行は速く悪化します。
collective (可変ピッチ?)がピッチを増やすために衰弱することに注意すべきです。人間工学的に、本当のヘリコプターはcollective(可変?)と同様です、これはパイロットが可変ピッチを増やすために、それらに向けた可変ピッチ的ハンドルを引いて、実際のヘリコプターでの可変ピッチ的はに人間工学的に似ています。このように、X-Planeにおいて、総体的な支配は、それを増やすために、ユーザーの方へドラッグします(すなわち、スクリーン上で下に)。
Remember that in this application the throttle is automatically controlled for the helicopter.
It is shown only as a visual indicator of how hard the engine is working.
Be careful not to command more lift from the main rotor (with the collective control) than the engine is capable of providing or the rotor RPM will decay and the craft's flight will quickly deteriorate.
Note that the collective is dragged down to increase its pitch. This is ergonomically similar to the collective in real helicopters, where pilots pull the collective handle towards them to increase the collective. Thus, in X-Plane, the collective control is dragged towards the user (that is, down on the screen) to increase it.
Review(復習?)
X-Planeにおけるヘリコプターの飛行を確認するには、次の手順を実行します:
- メインロータのピッチを増加させるために、画面の左側にある collective スライダ(スクリーンの左側で見つかる)を、穏やかに下にドラッグします。これはロータによって発生する揚力を増加させます。これが行われると、画面の左側に示す絞りは、自動的に増加します。
- これは、スロットルガバナーが自動的にロータ荷重を増加するにつれて、望ましいのロータ回転数を維持するためにエンジン出力を増加させることによって引き起こされます(ローターのピッチを増やすことに起因する)。これは本当のヘリコプターでどのように動作するか、そして、その結果、それらがX-Planeでどのようにシミュレートされるかということです。
- TRスライダーは、左にヘリコプターを回すために、左側にドラッグします(テールローターを制御する)。それは、ヘリコプターを右にすることは、右に引かれます(または左へのトルクに対処するために)。
- デバイスは、右、左、前、後ろと傾斜させ、個々のそれぞれの方角に機体を移動させること。これは、本当のヘリコプターでスティック(サイクリックコントロール)からの入力と一致します。実際にサイクル的に起こっていることが、ヘリコプターの周りで回転して、ローターが投げさせられるということであることを覚えてください、その結果、推力ベクトルを変えます。この推力はヘリコプターが前方、右方、後方または左方向のどちらかに加速させるものです。
To review, helicopter flight in X-Plane follows these steps:
1. The collective slider, found on the left side of the screen, is dragged down gently in order to increase the pitch of the main rotor. This increases the lift generated by the rotor. As this is done, the throttle, shown on the left side of the screen, will automatically increase.
This is caused by the throttle governor automatically increasing the engine power to maintain the desired rotor RPM as the rotor load is increased (caused by increasing the rotor’s pitch). This is how the real helicopters work, and thus how they are simulated in X-Plane.
2. The TR slider (controlling the tail rotor) is dragged left to turn the helicopter left (or to counter rightward torque). It is dragged right to turn the helicopter right (or to counter leftward torque).
3. The device is tilted left, right, forward, and back to move the craft in each respective direction. This corresponds to input from the stick (the cyclic control) in a real helicopter.
Remember that what is actually happening with the cyclic is that the rotor is being made to roll and pitch around the helicopter, thereby changing the thrust vector. This thrust is what causes the helicopter to accelerate either forward, rightward, rearward or leftward.
スペースシャトルミッション·セグメント(部分)を開始
スペースシャトルのミッション·セグメントを開始するには、(第2章)「Settings」メニューの「Plane」タブで選択します。選択した宇宙船(シャトル)で、設定メニューの「Map」タブには、以下に示すよう画面に置き換えられます。シャトルを選択すると「Map」タブが「Mission」タブに変わります。(下ではMapタブになっているが)
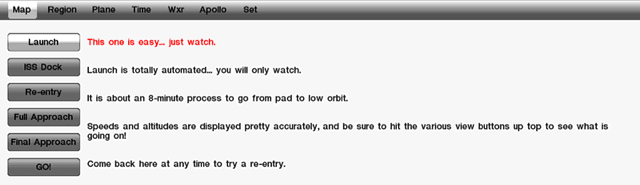
希望のミッション·セグメントをタップし、シミュレーションを開始するためのボタン「Go!」をタップします!
Launch(打ち上げ)
これはやさしいーただ見ていてください。
最初の任務部分は、発射段階です。ここでは打ち上げが実行されます、ユーザは単に見ているだけです。シャトルの速度、高度、飛行中の時間、および軌道まで時間、打ち上げ全体を表示します。
シミュレーターは、シャトルが軌道に到達するのにかかる時間の長さについて、正確に再現します( 8分半)。結局、この種の視覚化は通常ありえませんーシャトルはおよそ2分以内でカメラの範囲外になるので、我々は起動に乗って回る飛行を通常見ることはできません。しかし、スペースシャトルが軌道に乗って回る全ての経路は忠実に再生するので、それが本当に起こるのと同じくらいの早さで、それが本当に起こるように見ることができます。そして、スペースシャトルが宇宙に到達すると、気圧が何にも落ちないで、ゆっくり示された対気速度が0ノットに減少するのを見ることは魅力的です。(HUDで見るにはーこれを選ぶ方法は、第2章を見る)
さらに、HUD視界から発射を見てください、シャトルが最初の40秒程度の間どのように垂直に上昇するか注意してください、その後、それは、その背面にひっくりかえり始めます。宇宙船が発射の後、約330秒まで直立で入ってくる、その後、シャトルは300秒ほど(ほぼ5分)逆さまで上昇します。
固体ロケットブースターが燃え尽きると投棄された後、シミュレータも大局的に主エンジン燃焼の継続期間を置きます。外部燃料タンク(オレンジ色の中央円筒)がシャトルに比べてとても巨大であることを、視覚的に示しています。
This one is easy- just watch.
Tap the desired mission segment, then tap the Go! Button to begin the simulation.
The first mission segment is the launch phase. Here, the user can simply watch as the launch is run.
Displayed throughout the launch are the Shuttle’s speed, altitude, time into flight, and time until orbit. The simulator will accurately recreate how long it takes for the Shuttle to reach orbit (eight and a half minutes) and the maneuvers that it goes through on the way there. This kind of visualization isn’t normally possible—after all, the Shuttle is out of range of the cameras within about two minutes of launch, so we never see the whole flight to orbit. In Space Shuttle, though, the entire path to orbit is faithfully reproduced, so users can see what really happens, as fast as it really happens.
It is fascinating to watch the indicated air speed (found in the HUD view—see Chapter 2 on how to select this) slowly fall to zero knots as the Shuttle climbs into space and the air pressure drops to nothing.
Also, watch the take off from the HUD view and note how the shuttle only climbs vertically for the first 40 seconds or so, after which it begins to tip over on its back. The shuttle then climbs inverted for the next 300 seconds or so (nearly five minutes), until the spacecraft rolls upright at about 330 seconds after liftoff.
The simulator also puts into perspective the duration of the main engine burn after the solid rocket boosters burn out and are jettisoned. This shows visually why the external fuel tank (the orange-colored center cylinder) is so gigantic in comparison to the Shuttle.
ISS Dock(ISSドッキング)
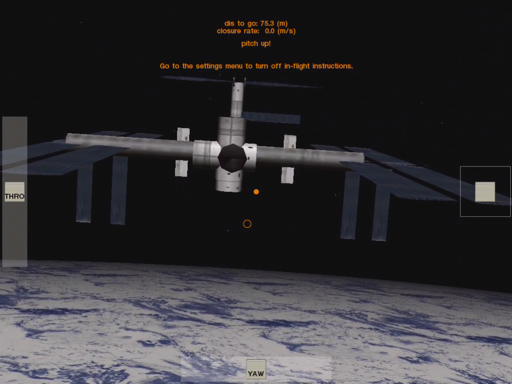
中央上にオレンジ色で以下の文字がでます。この指示に従ってコントロールをします。
上の例ではpitch up!の指示が出ています。
- pitch up!(iPadを手前に傾ける、down!はその逆)
- roll left!(iPadを左に傾ける、right!はその逆)
- yow left!(yowスライダーを左に、right!はその逆)
- Go to the settings menu to turn off in-flight instructions.(インフライト命令をオフにするには設定メニューに移動します。)
このミッションはかなり難しいです。
以下、翻訳文を掲載します。
このミッションのセグメントでは、ユーザは、地球を周回する国際宇宙ステーションとスペースシャトルをドッキングさせます。
これを行うには、ユーザーが一度にかなりの数のコントロールを監視する必要があります。
まず、シャトルのピッチおよびロールだけでなく、 その「YAW」(ヨー:前後左右)を、適切に3次元でハッチにシャトルをドッキング整列させるために使用しなければならない。(ピッチおよびロー:デバイスの傾きを使用して制御)(画面下部のYAWスライダーを使用して制御される)
ターゲットにピッチ、ロール、ヨーを維持しながら、ユーザーが慎重にシャトルを持っていくために、スロットルコントロール(画面の左側にある)を使用する必要があります。このスライダーは前いっぱいで最高へ(運動のその範囲の一番上)そして後ろいっぱいで最高(運動のその範囲の下)へ行きます。そして、それを離すことは 0(スクリーンの中央に)へそれをリセットします。それがISS(宇宙ステーション)に出あったとき、必ず毎秒1メートルの以下に機体の速度を保つようにしてください。
最終的に、それらがピッチ、ロール、ヨー、スロットルを維持しながら、宇宙ステーションとシャトルの本体を揃える並進スラスタ(画面右側のボックス内のコントロール)を使用します。反動推進エンジンがどこで機体を押す必要があるかについて、スクリーンの中央のオレンジ円と移動するオレンジ点が示します。単にきちんとシャトルと一列に並べるために、点と比較して円の方向に反動推進エンジン制御をドラッグしてください。
たとえば、円が点より上にあるならば、反動推進エンジン制御を上下にドラッグし、円が点の右にあるならば、反動推進エンジン制御を右側に、を引いてください。シャトルが正しいターゲットになると、オレンジ色のドットがオレンジ色の円の内側になります。それらが、必要とするところにこれらのコントロールのすべてを保ってください。そうすれば、ドッキングはおだやかになるでしょう。
In this segment of the mission, the user will dock the Space Shuttle with the International Space Station orbiting the earth.
To do this, the user must monitor quite a few controls at once. First, the Shuttle's pitch and roll (controlled using the device's tilt) as well as its yaw (controlled using the YAW slider at the bottom of the screen) must be used to properly align the shuttle with the docking hatch in three dimensions.
While keeping the pitch, roll, and yaw on target, the user must carefully use the throttle control (found on the left side of the screen) to bring the Shuttle in.
This slider goes from full forward (at the top of its range of motion) to full backward (at the bottom of its range of motion), and releasing it will reset it back to zero thrust (in the center of the screen).
Be sure to have the craft's velocity under 1 meter per second when it meets up with the ISS.
Finally, while keeping the pitch, roll, yaw, and throttle where they need to be, use the translational thrusters (the control in the box on the right side of the screen) to align the body of the Shuttle with the space station.
The orange circle in the center of the screen and the moving orange dot show where the translational thrusters need to push the craft.
Simply drag the thruster control in the direction of the circle relative to the dot to properly align the Shuttle.
For instance, if the circle is above the dot, drag the translational thruster control up, and if the circle is to the right of the dot, drag the thruster control right, etc. When the Shuttle is right on target, the orange dot will be inside the orange circle.
Keep all of these controls where they need to be and docking will be a breeze.
Re-Entry(再突入)
一旦、完全なアプローチをマスターしたならば、ミッションスクリーンから「Final Re-Entry」オプションをためしてください。これは航空機を、マッハ10で移動して、20万フィートから600マイルダウンレンジで開始します。これは本当の挑戦です。
注目に値するのは、シャトルが600マイル離れて、まっすぐ上に40マイルの所から開始し、マッハ10で移動しているという事実である。再突入の最後は、わずか幅二、三百フィート、そして長さ数千フィートの滑走路に、それは位置しています。
さらにもっと驚くべきは、これは機体エンジンからのパワーがない状態でおこなわれますー:それは慣性、ドラッグ、および慎重なフライトだけでそこに着陸します。コックピットディスプレイは、それを本当に可能にします!(パネルの上部にあるオレンジ色のヘルプテキストを見る)
Once the full approach has been mastered, try the "Final Re-Entry" option from the Missions screen. This will start the aircraft 600 miles downrange at 200,000 feet, moving at Mach 10. This is a true challenge.
Worth noting is the fact that the Shuttle starts out 600 miles away, 40 miles straight up, and moving at Mach 10.
By the end of the re-entry, it will be sitting on a runway that is only a couple hundred feet wide and a few thousand feet long.
Even more remarkable, this is done without a bit of power from the craft’s engines—it gets there on nothing but inertia, drag, and careful flight.
The cockpit displays (coupled with the orange help text at the top of the panel) do indeed make it possible!
Final Approach(最終進入)
最終的なアプローチ、ミッション·セグメントは最も簡単です。シャトルはエドワーズから8マイルの位置のファイナルアプローチからスタートします、そして、ユーザーはど任意のグライダーのように滑走路まで滑空する必要があります。(これはちょうどかなり苦しい滑空比で行われます)。 スピードブレーキ(エアーブレーキ)は機体の降下プロフィールを正しく得る必要があります。( SBRKスライダーはHUDビューの右上)
滑走路に近づくにつれてシャトルは約250ノットに減速する必要があり、 そして、滑走路のわきのVASIライトが白から赤まで背を向けて離れるまで、それは20度グライドパスあたりで降下していかなければなりません。
その時、機首を上げて、タッチダウンのためにアプローチの最終的なビットのためにその浅い3度のグライドパスをたどってください。最後の秒でブレーキを下げることを忘れないでください!
アプローチが正しく行われた場合、パイロットは20度下げの角度に従ってspeedbrakesが250ノットまで減速するように調整してください、滑走路のわきの明りが赤くなり始めるので、機首を上げ、車輪を降ろしてください、それの経路は滑走路の白のそばの明りの2つとそれらのうちの2つを赤くしておくことになっています(詳細、赤であれば、機体があまりにも低く、より多くの白であれば、それは高すぎです)。 機首高姿勢でタッチダウン、機首を下げ、ブレーキを踏むと、 滑走路の終了前で停止する。
それは、少なくとも、プロがそれをする方法です。
The final approach is the easiest of the mission segments. The Shuttle will be placed on an eight mile final approach to Edwards, and the user will have to glide down to the runway as in any glider (this one just happens to have a pretty poor glide ratio). The speedbrake (the slider in the upper right of the HUD view, labeled SBRK) will likely be required to get the craft’s descent profile just right.
The Shuttle should be slowed to about 250 knots as it approaches the runway, and it should be descending on about a 20 degree glide path until the VASI lights beside the runway turn from white to red. At that point, raise the nose (this is called the “pre-flare”) and follow that shallow 3 degree glide path in for the final bit of the approach for touchdown. Don’t forget to lower the brakes at the last second!
If the approach is flown correctly, the pilot will follow a 20 degree angle down, adjust the speedbrakes to slow to 250 knots, raise the nose as the lights beside the runway start to turn red, lower the landing gear, follow a path in that keeps two of the lights beside the runway white and two of them red (if more are red, the craft is too low, and if more are white, it’s too high), touch down in a nose-high attitude, lower the nose, hit the brakes, and be stopped well before the end of the runway.
That is, at least, how the pros do it.
Full Approach(フルアプローチ)
最終的なフルアプローチは、より大きな挑戦を提供します。機体は83000フィートでから開始され、着陸まで40マイルダウンレンジ、マッハ2.5、で移動します。このアプローチは少しトリッキーです:
パイロットは余剰エネルギーを取り除くために、スラロームですべっている間、パイロットは望ましい迎え角を持つために前後に機首を上げ下げする必要があります(このため、適切な抗力プロフィールを維持します)。
シャトルはマッハ2で、成層圏で前後にスラロームしながらすべっています。そして、正常な速度と高度でエドワーズの上に到着し着陸するためにまさに正常なエネルギー量を消そうとします。
スクリーン上の指示は、ユーザーにそれを案内し助けるために、飛行の間コックピットで表示されます。
これは、以下のスクリーンショットでマークされたオレンジ色のテキストである。(英語で表示されているので理解できない)
The full approach provides a greater challenge than the final. It starts the aircraft off at 83,000 feet and moving at Mach 2.5, 40 miles downrange of landing. This approach is a bit trickier: The pilot will need to raise or lower the nose to hold the desired angle of attack (thus keeping a proper drag profile) while slaloming back and forth to get rid of surplus energy. The Shuttle will be slaloming back and forth through the stratosphere at Mach 2, trying to dissipate just the right amount of energy to arrive over Edwards at the right speed and altitude to land.Onscreen instruction is given during the flight in the cockpit view to help guide the user through it. This is the orange text marked in the following screenshot.
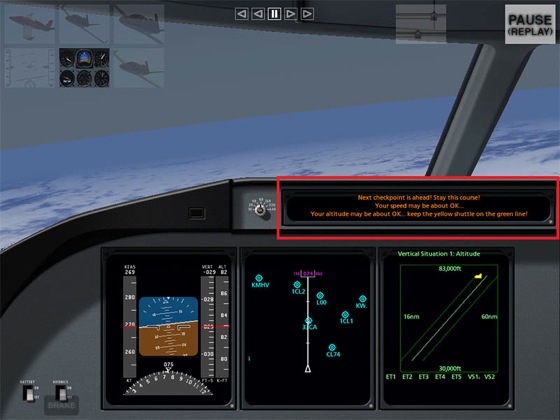
アプローチが進行すると、右端EFIS画面の小さな黄色のシャトルがエドワーズに向かう緑色のラインを滑空します。
機体が、その線の下に入った場合は、それはが少なすぎるエネルギーを有しています(それは低すぎるか遅すぎるかのどちらかであるという意味)。機首を引き上げ、低高度の厚い空気中のエネルギーで節約するために、翼を水平にします。
機体が緑の線の上にある場合、それはあまりにも多くの速度や高度を持っています。余分なエネルギーを消失させるためにスピードブレーキ(エアーブレーキ)と左右にスラローム(スキーのように)します。(スピードブレーキ:HUDスクリーンの中心の右側で見つかる)
これは、スペースシャトルが、エネルギーを消費するために実際にすることです。ユーザーがこれを管理することができた場合は、彼または彼女は、実際の探査機のパイロットのように非常に多くなり飛んでいる。ユーザがこれに対応できるなら、その人は、本当の宇宙船パイロットが飛ぶように飛べるでしょう。
As the approach progresses, the little yellow shuttle in the far right EFIS screen will glide down the green line to Edwards.
If the craft gets below that line, it has too little energy (meaning it is it is either too low or too slow).
Pull the nose up and level the wings in order to conserve energy in the thick air of low altitude. If the craft gets above the green line, it has too much speed or altitude.
Bring out the speedbrakes (found in the center right of the HUD screen) and slalom left and right (like a skier) to lose the extra energy. This is what the real Space Shuttle does to dissipate energy. If the user can manage this, he or she is flying very much like the real Orbiter pilots would.