
http://wiki.x-plane.com/Chapter_6:_Advanced_Features_of_X-Plane_for_iPad/X-Plane_HDEF_4G
X-Plane for iPad manual
Chapter 7: The Apollo Add-On
第7章:アポロ アドオン
About the Add-On(アドオンについて)
The X-Plane Apollo add-on is a realistic simulation of the lunar landing and docking operations of the Apollo 11 mission. In fact, it is the most complete, realistic simulation of a lunar landing available for the iPad or iPhone 4, with a wide range of missions to try.
Users can start off docked with the command module in a lunar orbit, and then separate from the command module to start the journey down to the lunar surface. After that, the lander must go through a full de-orbit burn and orbital transfer, going from lunar orbit down to the touch-down phase of the flight. All of this, of course, happens in real time with the actual weight, thrust, fuel capacity, and fuel burn of the real Apollo 11 lander.
Following the de-orbit burn and orbit transfer, users enter the most challenging phase of the flight—the powered descent. During this phase of the mission, users must keep their tail pointed in the direction of flight, running full thrust to slow the craft from orbital speed to a standstill. This phase of the flight is actually where pilots spend most of their time.
After the powered descent comes the vertical descent and landing. This is accompanied by the sounds taken from the real lander, right down to the radio call-outs made by mission control as Neil and Buzz worked their way down in 1969.
Once users have aced the landing, they can cruise around on the moon in the rover! This is a realistic simulation of the 4-wheel drive (with a separate motor for each wheel), surprisingly speedy rover that was used for the Apollo 15, 16, and 17 missions—this is a lot of fun to drive in the 1/6th gravity conditions on the moon! No wonder the astronauts drove it 17 miles in one day.
After roving around in the off-off-off-road simulator, users can launch the lander back up toward the command module (waiting in orbit) and dock with it.
Additionally, a huge number of historic pictures are included in the app, spanning from images of the control room back on Earth to the launch to the touch down on the moon and everything in between.
X線平面アポロアドオンはアポロ11ミッションの月面着陸とドッキング操作の現実的なシミュレーションである。実際に、それは試して任務の広い範囲でのiPadやiPhone 4で利用可能に月面着陸の中で最も完全な、現実的なシミュレーション、である。
ユーザーは、月の軌道上でのコマンド·モジュールにドッキングオフ起動し、月面までの旅を開始するには、コマンドモジュールから分離することができます。その後、着陸飛行のタッチダウン段階まで月周回軌道から行く、脱軌道は燃え完全かつ軌道変換を通過する必要があります。このすべては、もちろん、実際の重量、推力、燃料容量、および実際のアポロ11の着陸船の燃料消費とリアルタイムで行われます。
デ軌道やけどや軌道転送後、ユーザーは、飛行パワード系の最も困難な段階に入る。ミッションのこの段階では、ユーザーが自分の尾が静止する軌道速度から工芸品を遅らせるために、完全な推力を実行し、飛行の方向に向けておく必要があります。パイロットは自分の時間の大半を過ごす場所飛行のこの段階では、実際にある。
パワード降下、垂直降下し、着陸を付属していた後。これは、右下のニールとバズは、 1969年にダウンして自分の道を働いたとして、ミッション·コントロールによって行われたラジオコールアウトに、実際の着陸船から撮影音を伴っている。
ユーザーが着陸を出し抜かれた後、彼らはローバーの月のクルーズの周りのことができます!これは、 4輪駆動(各車輪ごとに個別のモーター付き) 、アポロ15 、 16のために使用された、驚くほどスピーディローバー、および17の現実的なシミュレーションでのミッション - これは1で運転する多くの楽しみがある/月に第6回重力条件!どうりで宇宙飛行士は1日でそれを17マイルを運転していません。
オフオフオフロードシミュレータで周りのロービングした後、ユーザーは、 (軌道上で待機している)コマンド·モジュールに向けてバックアップ着陸船を起動することができ、それにドッキング。
また、歴史的な写真の膨大な数は、バック、地球上の打ち上げに至るまで、月へのタッチとの間のすべての制御室の画像から及ぶ、アプリに含まれています。
Purchasing the Add-On(アドオンを購入する)
Prior to purchasing the Apollo add-on, whenever users open the Apollo tab in the settings menu and try to launch one of the mission segments, X-Plane will display the following message:
前に購入するアポロアドオン、ユーザーは設定メニューでアポロタブを開いて、ミッション·セグメントの1を起動しようとするたび、 X線平面は、次のメッセージが表示されます。
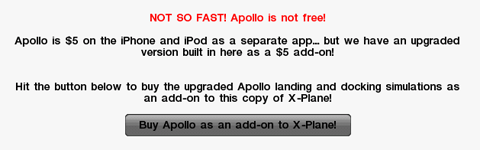
Tap the Buy Apollo as an add-on to X-Plane! button to purchase the upgrade.
アドオンX線平面のように購入アポロをタップ!アップグレードを購入するためのボタン。
Controls in Apollo(アポロのコントロール)
Controls in the Apollo add-on fall into one of three categories—a mission segment either has:
▪A)は制御(すなわち、ユーザ)が分離、降下火傷、打ち上げミッションのセグメントのように、時計ません、
▪B)飛行制御(パワー降下のように、垂直降下、およびコマンドモジュールのドッキングミッション·セグメント)、
▪C)または媒体対照()月面ローバミッション·セグメントのように。
Flight Controls(フライトコントロール)
Flight controls in Apollo are as follows.
次のようにアポロ飛行コントロールがあります。
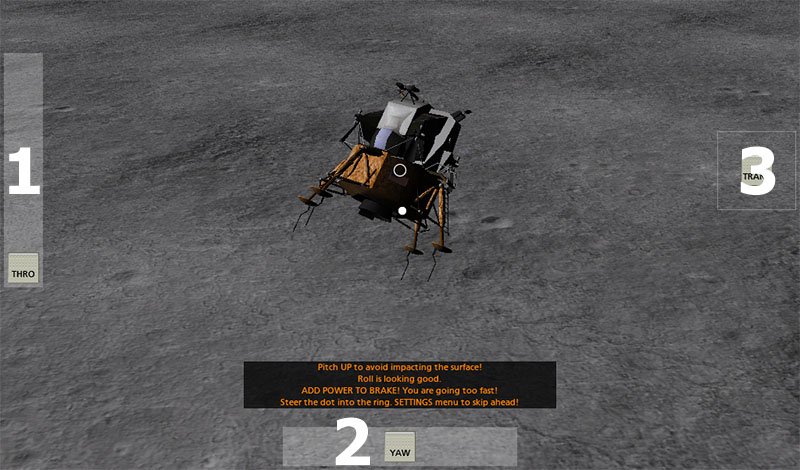
First, there is the throttle control (labeled 1 in the image above). For the descent phases of the mission, this goes from zero to full forward, corresponding to the bottom and top of the screen, respectively. For the command module docking, though, it goes from full backward to full forward, with zero thrust found in the center of its range.
Next is the yaw control (labeled 2 in the image above). When in the center, it does not affect the craft's motion. When dragged left, it pushes the lander's nose to the left, and when dragged right, it pushes the nose right.
The translational thrusters (whose control is labeled 3 in the previous image) serve to push the lander's entire body up, down, left, or right. Drag this control in the direction that the craft should move.
Finally, the lander's pitch and roll are controlled as in other X-Plane aircraft—tilt the iPad/iPhone forward to pitch the nose down, tilt it back to pitch the nose up, and tilt it left or right to roll the craft in the corresponding direction.
まず、 (上の画像の1)スロットル制御があります。ミッションの下降相では、これはそれぞれ、画面の下部及び上部に対応する、完全な前方ゼロから進む。コマンドモジュールのドッキングのために、しかし、それはその範囲の中心にあり、ゼロ推力で、フル転送するために完全な下位から行く。
次の日(上の画像の2)ヨーコントロールです。ときは中央にある、それはクラフトの運動に影響を与えません。左にドラッグすると、左に着陸の鼻を押すと、右ドラッグしたときには、右鼻を押す。
(そのコントロール前の画像に3と表示されている)の翻訳スラスタは着陸船の全体のダウンボディアップ、左、または右にプッシュするのに役立つ。クラフトが動くべき方向に、このコントロールをドラッグします。
最後に、着陸船のピッチとロールは、他のX線平面、機首を下にピッチ機首をピッチに戻ってそれを傾け、それが左またはでクラフトをロールする権利傾けて前進のiPad / iPhoneを航空機傾斜のように制御されている対応方向。
Vehicle Controls(媒体対照)
Controlling the lunar rover is quite intuitive. Simply tilt the device forward to accelerate, tilt it back to brake, and tilt it left or right to turn in that direction.
月面探査車を制御することは、非常に直感的です。単純に、加速戻っブレーキにそれを傾け、それを左またはその方向に回す権利傾けることを楽しみにデバイスを傾けてください。
Selecting a Mission Segment(ミッション·セグメントを選択する)
Each mission segment can be selected by entering the Settings menu (using the same button as ever in the upper left of the screen), tapping the desired mission segment, and tapping the Go! button.
各ミッション·セグメントは、(画面の左上のように、これまでと同じボタンを使用して)、設定メニューに入る目的のミッション·セグメントをタップし、[移動]をタップして選択することができます!ボタンを押します。
Flying in Apollo(アポロを飛んで)
Separation(分離)
This is the segment of the mission that the application will enter when first starting up. All the user has to do is hit the SEPARATE button, and the path to touching down on the moon has begun!
これは、最初の起動時にアプリケーションが入るミッションのセグメントです。すべてのユーザーは、別のボタンを押している関係していて、月面にタッチダウンパスが始まった!
Descent Burn(降下バーン)
Following the separation from the command module is the descent burn, a 30 second firing of the engines that starts the lander toward the surface of the moon.
After beginning this portion of the mission, the rockets will automatically ignite for thirty seconds. At the end of that, the craft will be approximately 345,000 feet above the surface of the moon. Users can either choose to wait as the lander slowly makes its way down, or they can go back into the menu and select Powered Descent to skip over the wait. If users choose to wait through the unpowered portion of the descent, the sim will automatically enter the powered phase at about 45,000 feet.
コマンドモジュールから分離した後、降下火傷、月の表面に向けて着陸を開始し、エンジンの30秒焼成です。
ミッションのこの部分を開始した後、ロケットは自動的に30秒間点火する。それの最後には、クラフトは約345000フィート月の表面の上になります。ユーザーは、着陸船はゆっくりとその方法を作るように待つことを選択するか、または彼らは戻って、メニューに入り、待機をスキップするパワード下降を選択することができます。ユーザーは、降下の電力が供給されていない部分を通って待つことを選択した場合、 SIMは自動的に約45000フィートで電力供給フェーズに入ります。
Powered Descent(アトスディセント)
The objective of the powered descent phase is to slow from an orbital horizontal speed of about 3,600 miles per hour (relative to the surface of the moon) to a horizontal speed appropriate for landing—zero. This is achieved by pointing the lander's tail in the direction of the craft's motion and holding full power.
During this phase, be sure to keep the throttle slider all the way up. Use the white circle (found in the center of the screen) and the white dot to line the craft up with its direction of motion. For instance, when the white dot is above the circle, pitch the craft down so that the circle will move to meet the dot. When the dot is to the right of the circle, roll left to meet it.
Once the craft's orbital velocity has been burned off, it enters the vertical descent portion of the mission.
パワード降下フェーズの目的は、上陸ゼロに適した水平速度(月面に対して)毎時約3600マイルの軌道水平速度から減速するである。これは、クラフトの運動方向に着陸船の尾を指しているとフルパワーを保持することによって達成される。
このフェーズでは、スロットルスライダをついていくようにしてください。その運動方向とクラフトを整列する(画面の中央にある)白丸と白のドットを使用してください。白い点が円の上にあるときに円はドットを満たすために移動するように、たとえば、ダウンクラフトピッチ。ドットが円の右側にあるときに、ロールは、それを満たすために残した。
宇宙船の軌道速度が焼失されると、ミッションの垂直降下部に入る。
Vertical Descent(垂直降下)
The vertical descent phase is where the craft descends the last 4,000 or so feet down to the surface of the moon. During this time, the lander's fore-aft and left-right velocities should be zero—that is, it should have no motion relative to the surface except its descent.
The goal here is to touch down very, very gently, with no ground speed at all and a level attitude for the lander. Use the tilt of the device to control pitch and roll, use the YAW slider to control motion left and right, and use the translational thrusters (labeled TRANS) to change left-right and fore-aft velocity. For instance, if, in the upper center of the screen, the simulator is indicating a positive fore-aft speed, drag the TRANS control down and hold it there a few seconds. If the sim is indicating a negative left-right speed, drag the TRANS control right, and so on.
In addition to all this, users must contend with the limited amount of fuel remaining. Use it wisely!
Upon touching down, the simulator will score the landing based on angular tilt, descent rate, ground speed, and the terrain hilliness.
クラフトは、月の表面に至るまでの最後の4000かそこらの足を下降どこ垂直降下相である。この間、着陸船の前後左右速度がゼロつまりする必要があります、それは、その下降を除いて表面への動きの相対的があってはなりません。
ここでの目標は、まったくの対地速度および着陸のためのレベルの態度で、非常に、非常に優しくタッチダウンすることです。 、ピッチとロールを制御し、左運動と右を制御するヨースライダーを使用し、左右と前後の速度を変更する(トランスラベル)の翻訳スラスタを使用するには、デバイスの傾きを使用してください。例えば、 、場合、画面の上部中央には、シミュレータはダウンTRANSコントロールをドラッグし、そこに数秒間それを保持する、正の前後の速度を示す情報である。 SIMは負の左右の速度を表示している場合は、その上でTRANS制御権をドラッグします。
すべてこれに加えて、ユーザーは、燃料が残っている限られた量と競合しなければならない。賢くそれを使用してください!
タッチダウン時には、シミュレータは、角度、傾斜、降下率、対地速度、および地形hillinessに基づいて着陸を獲得します。
Rove Around!(アラウンドローブ!)
In this portion of the mission, the user is put behind the wheels of a lunar rover like the ones used for the last three Apollo missions. Tilt the iPad/iPhone forward to accelerate, back to brake, and left or right to steer.
See the Lunar Rover Wikipedia page for a video of the real rover!
ミッションのこの部分では、ユーザーは、最後の3アポロ計画で使用されるもののような月面探査車の車輪の後ろに置かれている。戻ってブレーキに、加速し、左または操縦する権利を楽しみにアプリ/ iPhoneを傾けます。
実際のローバの映像のために月面ローバーウィキペディアのページを参照してください!
Launch(打ち上げ)
For the launch stage of the mission, all the user has to do is press the Launch button. This starts the craft on its way into orbit, eventually climbing 65 miles above the moon's surface.
ミッションの立ち上げ段階では、すべてのユーザーが関係しているキーを押して[起動]ボタンです。これは最終的に65マイル月面上に登って、軌道上にその方法でクラフトを開始します。
Command Module Dock(司令船ドック)
When docking with the command module, the goal is to be perfectly aligned with the docking hatch with very little velocity when the lander touches the command module. This is achieved by closely monitoring:
After docking, the simulator will give a score based on the angular tilt, position, closure rate, and lateral speed of the craft at the time of docking.
コマンド·モジュールとドッキングすると、目標は完全ランダーはコマンド·モジュールに触れる非常に少ない速度でドッキングハッチに整合している。これは、密接に監視することによって達成される。
ときにドッククラフトのみかろうじて前進していることを保証するために、スロットル制御を▪ 、
▪ヨー制御、着陸船は、コマンドモジュールと整合することを確保するため、
ランダーが整列されていることを確実にするために、ピッチとロールのコントロールを▪適切ときにドックし、
▪翻訳スラスタは、クラフトのハッチは、コマンドモジュールのハッチにまで満たしていることを確認します。
翻訳のスラスタ制御(トランスラベル)については(それが左にドラッグされた場合、それは左のクラフトをプッシュするために、右側からの推力が追加されます) 、ドラッグする方向に移動させるために推力追加することに注意してください。にも注意し、スロットルコントロールが可能性が高いだけどこかのスライダ範囲の中央の推力タップの小さなバーストを必要とすること、それは簡単に停止して、スラスタに電力を供給します。
ドッキング後は、シミュレータは、角度傾斜、位置、閉鎖率、およびドッキング時の工芸の横速度に基づいてスコアを与える。
Chapter 7: The Apollo Add-On
第7章:アポロ アドオン
| Contents |
| 1 About the Add-On |
| 2 Purchasing the Add-On |
| 3 Controls in Apollo |
3.1 Flight Controls
3.2 Vehicle Controls
4 Selecting a Mission Segment 5 Flying in Apollo
5.1 Separation
5.2 Descent Burn
5.3 Powered Descent
5.4 Vertical Descent
5.5 Rove Around!
5.6 Launch
5.7 Command Module Dock
About the Add-On(アドオンについて)
The X-Plane Apollo add-on is a realistic simulation of the lunar landing and docking operations of the Apollo 11 mission. In fact, it is the most complete, realistic simulation of a lunar landing available for the iPad or iPhone 4, with a wide range of missions to try.
Users can start off docked with the command module in a lunar orbit, and then separate from the command module to start the journey down to the lunar surface. After that, the lander must go through a full de-orbit burn and orbital transfer, going from lunar orbit down to the touch-down phase of the flight. All of this, of course, happens in real time with the actual weight, thrust, fuel capacity, and fuel burn of the real Apollo 11 lander.
Following the de-orbit burn and orbit transfer, users enter the most challenging phase of the flight—the powered descent. During this phase of the mission, users must keep their tail pointed in the direction of flight, running full thrust to slow the craft from orbital speed to a standstill. This phase of the flight is actually where pilots spend most of their time.
After the powered descent comes the vertical descent and landing. This is accompanied by the sounds taken from the real lander, right down to the radio call-outs made by mission control as Neil and Buzz worked their way down in 1969.
Once users have aced the landing, they can cruise around on the moon in the rover! This is a realistic simulation of the 4-wheel drive (with a separate motor for each wheel), surprisingly speedy rover that was used for the Apollo 15, 16, and 17 missions—this is a lot of fun to drive in the 1/6th gravity conditions on the moon! No wonder the astronauts drove it 17 miles in one day.
After roving around in the off-off-off-road simulator, users can launch the lander back up toward the command module (waiting in orbit) and dock with it.
Additionally, a huge number of historic pictures are included in the app, spanning from images of the control room back on Earth to the launch to the touch down on the moon and everything in between.
X線平面アポロアドオンはアポロ11ミッションの月面着陸とドッキング操作の現実的なシミュレーションである。実際に、それは試して任務の広い範囲でのiPadやiPhone 4で利用可能に月面着陸の中で最も完全な、現実的なシミュレーション、である。
ユーザーは、月の軌道上でのコマンド·モジュールにドッキングオフ起動し、月面までの旅を開始するには、コマンドモジュールから分離することができます。その後、着陸飛行のタッチダウン段階まで月周回軌道から行く、脱軌道は燃え完全かつ軌道変換を通過する必要があります。このすべては、もちろん、実際の重量、推力、燃料容量、および実際のアポロ11の着陸船の燃料消費とリアルタイムで行われます。
デ軌道やけどや軌道転送後、ユーザーは、飛行パワード系の最も困難な段階に入る。ミッションのこの段階では、ユーザーが自分の尾が静止する軌道速度から工芸品を遅らせるために、完全な推力を実行し、飛行の方向に向けておく必要があります。パイロットは自分の時間の大半を過ごす場所飛行のこの段階では、実際にある。
パワード降下、垂直降下し、着陸を付属していた後。これは、右下のニールとバズは、 1969年にダウンして自分の道を働いたとして、ミッション·コントロールによって行われたラジオコールアウトに、実際の着陸船から撮影音を伴っている。
ユーザーが着陸を出し抜かれた後、彼らはローバーの月のクルーズの周りのことができます!これは、 4輪駆動(各車輪ごとに個別のモーター付き) 、アポロ15 、 16のために使用された、驚くほどスピーディローバー、および17の現実的なシミュレーションでのミッション - これは1で運転する多くの楽しみがある/月に第6回重力条件!どうりで宇宙飛行士は1日でそれを17マイルを運転していません。
オフオフオフロードシミュレータで周りのロービングした後、ユーザーは、 (軌道上で待機している)コマンド·モジュールに向けてバックアップ着陸船を起動することができ、それにドッキング。
また、歴史的な写真の膨大な数は、バック、地球上の打ち上げに至るまで、月へのタッチとの間のすべての制御室の画像から及ぶ、アプリに含まれています。
Purchasing the Add-On(アドオンを購入する)
Prior to purchasing the Apollo add-on, whenever users open the Apollo tab in the settings menu and try to launch one of the mission segments, X-Plane will display the following message:
前に購入するアポロアドオン、ユーザーは設定メニューでアポロタブを開いて、ミッション·セグメントの1を起動しようとするたび、 X線平面は、次のメッセージが表示されます。
Tap the Buy Apollo as an add-on to X-Plane! button to purchase the upgrade.
アドオンX線平面のように購入アポロをタップ!アップグレードを購入するためのボタン。
Controls in Apollo(アポロのコントロール)
Controls in the Apollo add-on fall into one of three categories—a mission segment either has:
- a)no control (i.e., the user watches, as in the separation, descent burn, and launch mission segments),
- b)flight controls (as in the powered descent, vertical descent, and command module docking mission segments),
- c)or vehicle controls (as in the lunar rover mission segment).
▪A)は制御(すなわち、ユーザ)が分離、降下火傷、打ち上げミッションのセグメントのように、時計ません、
▪B)飛行制御(パワー降下のように、垂直降下、およびコマンドモジュールのドッキングミッション·セグメント)、
▪C)または媒体対照()月面ローバミッション·セグメントのように。
Flight Controls(フライトコントロール)
Flight controls in Apollo are as follows.
次のようにアポロ飛行コントロールがあります。
First, there is the throttle control (labeled 1 in the image above). For the descent phases of the mission, this goes from zero to full forward, corresponding to the bottom and top of the screen, respectively. For the command module docking, though, it goes from full backward to full forward, with zero thrust found in the center of its range.
Next is the yaw control (labeled 2 in the image above). When in the center, it does not affect the craft's motion. When dragged left, it pushes the lander's nose to the left, and when dragged right, it pushes the nose right.
The translational thrusters (whose control is labeled 3 in the previous image) serve to push the lander's entire body up, down, left, or right. Drag this control in the direction that the craft should move.
Finally, the lander's pitch and roll are controlled as in other X-Plane aircraft—tilt the iPad/iPhone forward to pitch the nose down, tilt it back to pitch the nose up, and tilt it left or right to roll the craft in the corresponding direction.
まず、 (上の画像の1)スロットル制御があります。ミッションの下降相では、これはそれぞれ、画面の下部及び上部に対応する、完全な前方ゼロから進む。コマンドモジュールのドッキングのために、しかし、それはその範囲の中心にあり、ゼロ推力で、フル転送するために完全な下位から行く。
次の日(上の画像の2)ヨーコントロールです。ときは中央にある、それはクラフトの運動に影響を与えません。左にドラッグすると、左に着陸の鼻を押すと、右ドラッグしたときには、右鼻を押す。
(そのコントロール前の画像に3と表示されている)の翻訳スラスタは着陸船の全体のダウンボディアップ、左、または右にプッシュするのに役立つ。クラフトが動くべき方向に、このコントロールをドラッグします。
最後に、着陸船のピッチとロールは、他のX線平面、機首を下にピッチ機首をピッチに戻ってそれを傾け、それが左またはでクラフトをロールする権利傾けて前進のiPad / iPhoneを航空機傾斜のように制御されている対応方向。
Vehicle Controls(媒体対照)
Controlling the lunar rover is quite intuitive. Simply tilt the device forward to accelerate, tilt it back to brake, and tilt it left or right to turn in that direction.
月面探査車を制御することは、非常に直感的です。単純に、加速戻っブレーキにそれを傾け、それを左またはその方向に回す権利傾けることを楽しみにデバイスを傾けてください。
Selecting a Mission Segment(ミッション·セグメントを選択する)
Each mission segment can be selected by entering the Settings menu (using the same button as ever in the upper left of the screen), tapping the desired mission segment, and tapping the Go! button.
各ミッション·セグメントは、(画面の左上のように、これまでと同じボタンを使用して)、設定メニューに入る目的のミッション·セグメントをタップし、[移動]をタップして選択することができます!ボタンを押します。
Flying in Apollo(アポロを飛んで)
Separation(分離)
This is the segment of the mission that the application will enter when first starting up. All the user has to do is hit the SEPARATE button, and the path to touching down on the moon has begun!
これは、最初の起動時にアプリケーションが入るミッションのセグメントです。すべてのユーザーは、別のボタンを押している関係していて、月面にタッチダウンパスが始まった!
Descent Burn(降下バーン)
Following the separation from the command module is the descent burn, a 30 second firing of the engines that starts the lander toward the surface of the moon.
After beginning this portion of the mission, the rockets will automatically ignite for thirty seconds. At the end of that, the craft will be approximately 345,000 feet above the surface of the moon. Users can either choose to wait as the lander slowly makes its way down, or they can go back into the menu and select Powered Descent to skip over the wait. If users choose to wait through the unpowered portion of the descent, the sim will automatically enter the powered phase at about 45,000 feet.
コマンドモジュールから分離した後、降下火傷、月の表面に向けて着陸を開始し、エンジンの30秒焼成です。
ミッションのこの部分を開始した後、ロケットは自動的に30秒間点火する。それの最後には、クラフトは約345000フィート月の表面の上になります。ユーザーは、着陸船はゆっくりとその方法を作るように待つことを選択するか、または彼らは戻って、メニューに入り、待機をスキップするパワード下降を選択することができます。ユーザーは、降下の電力が供給されていない部分を通って待つことを選択した場合、 SIMは自動的に約45000フィートで電力供給フェーズに入ります。
Powered Descent(アトスディセント)
The objective of the powered descent phase is to slow from an orbital horizontal speed of about 3,600 miles per hour (relative to the surface of the moon) to a horizontal speed appropriate for landing—zero. This is achieved by pointing the lander's tail in the direction of the craft's motion and holding full power.
During this phase, be sure to keep the throttle slider all the way up. Use the white circle (found in the center of the screen) and the white dot to line the craft up with its direction of motion. For instance, when the white dot is above the circle, pitch the craft down so that the circle will move to meet the dot. When the dot is to the right of the circle, roll left to meet it.
Once the craft's orbital velocity has been burned off, it enters the vertical descent portion of the mission.
パワード降下フェーズの目的は、上陸ゼロに適した水平速度(月面に対して)毎時約3600マイルの軌道水平速度から減速するである。これは、クラフトの運動方向に着陸船の尾を指しているとフルパワーを保持することによって達成される。
このフェーズでは、スロットルスライダをついていくようにしてください。その運動方向とクラフトを整列する(画面の中央にある)白丸と白のドットを使用してください。白い点が円の上にあるときに円はドットを満たすために移動するように、たとえば、ダウンクラフトピッチ。ドットが円の右側にあるときに、ロールは、それを満たすために残した。
宇宙船の軌道速度が焼失されると、ミッションの垂直降下部に入る。
Vertical Descent(垂直降下)
The vertical descent phase is where the craft descends the last 4,000 or so feet down to the surface of the moon. During this time, the lander's fore-aft and left-right velocities should be zero—that is, it should have no motion relative to the surface except its descent.
The goal here is to touch down very, very gently, with no ground speed at all and a level attitude for the lander. Use the tilt of the device to control pitch and roll, use the YAW slider to control motion left and right, and use the translational thrusters (labeled TRANS) to change left-right and fore-aft velocity. For instance, if, in the upper center of the screen, the simulator is indicating a positive fore-aft speed, drag the TRANS control down and hold it there a few seconds. If the sim is indicating a negative left-right speed, drag the TRANS control right, and so on.
In addition to all this, users must contend with the limited amount of fuel remaining. Use it wisely!
Upon touching down, the simulator will score the landing based on angular tilt, descent rate, ground speed, and the terrain hilliness.
クラフトは、月の表面に至るまでの最後の4000かそこらの足を下降どこ垂直降下相である。この間、着陸船の前後左右速度がゼロつまりする必要があります、それは、その下降を除いて表面への動きの相対的があってはなりません。
ここでの目標は、まったくの対地速度および着陸のためのレベルの態度で、非常に、非常に優しくタッチダウンすることです。 、ピッチとロールを制御し、左運動と右を制御するヨースライダーを使用し、左右と前後の速度を変更する(トランスラベル)の翻訳スラスタを使用するには、デバイスの傾きを使用してください。例えば、 、場合、画面の上部中央には、シミュレータはダウンTRANSコントロールをドラッグし、そこに数秒間それを保持する、正の前後の速度を示す情報である。 SIMは負の左右の速度を表示している場合は、その上でTRANS制御権をドラッグします。
すべてこれに加えて、ユーザーは、燃料が残っている限られた量と競合しなければならない。賢くそれを使用してください!
タッチダウン時には、シミュレータは、角度、傾斜、降下率、対地速度、および地形hillinessに基づいて着陸を獲得します。
Rove Around!(アラウンドローブ!)
In this portion of the mission, the user is put behind the wheels of a lunar rover like the ones used for the last three Apollo missions. Tilt the iPad/iPhone forward to accelerate, back to brake, and left or right to steer.
See the Lunar Rover Wikipedia page for a video of the real rover!
ミッションのこの部分では、ユーザーは、最後の3アポロ計画で使用されるもののような月面探査車の車輪の後ろに置かれている。戻ってブレーキに、加速し、左または操縦する権利を楽しみにアプリ/ iPhoneを傾けます。
実際のローバの映像のために月面ローバーウィキペディアのページを参照してください!
Launch(打ち上げ)
For the launch stage of the mission, all the user has to do is press the Launch button. This starts the craft on its way into orbit, eventually climbing 65 miles above the moon's surface.
ミッションの立ち上げ段階では、すべてのユーザーが関係しているキーを押して[起動]ボタンです。これは最終的に65マイル月面上に登って、軌道上にその方法でクラフトを開始します。
Command Module Dock(司令船ドック)
When docking with the command module, the goal is to be perfectly aligned with the docking hatch with very little velocity when the lander touches the command module. This is achieved by closely monitoring:
- the throttle control, to ensure that the craft is only barely moving forward when it docks,
- the yaw control, to ensure that the lander is aligned with the command module,
- the pitch and roll controls, to ensure that the lander is aligned properly when it docks, and
- the translational thrusters, to ensure that the craft's hatch meets up with the command module's hatch.
After docking, the simulator will give a score based on the angular tilt, position, closure rate, and lateral speed of the craft at the time of docking.
コマンド·モジュールとドッキングすると、目標は完全ランダーはコマンド·モジュールに触れる非常に少ない速度でドッキングハッチに整合している。これは、密接に監視することによって達成される。
ときにドッククラフトのみかろうじて前進していることを保証するために、スロットル制御を▪ 、
▪ヨー制御、着陸船は、コマンドモジュールと整合することを確保するため、
ランダーが整列されていることを確実にするために、ピッチとロールのコントロールを▪適切ときにドックし、
▪翻訳スラスタは、クラフトのハッチは、コマンドモジュールのハッチにまで満たしていることを確認します。
翻訳のスラスタ制御(トランスラベル)については(それが左にドラッグされた場合、それは左のクラフトをプッシュするために、右側からの推力が追加されます) 、ドラッグする方向に移動させるために推力追加することに注意してください。にも注意し、スロットルコントロールが可能性が高いだけどこかのスライダ範囲の中央の推力タップの小さなバーストを必要とすること、それは簡単に停止して、スラスタに電力を供給します。
ドッキング後は、シミュレータは、角度傾斜、位置、閉鎖率、およびドッキング時の工芸の横速度に基づいてスコアを与える。