

下の画像で、上のボタンがfloat_wnd_set_imgui_builder()で作成したもの、下の日本語がfloat_wnd_set_ondrow()で作成したもの。同じウインドウに共存して表示することができる。
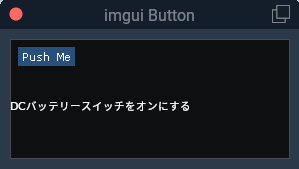
functionを別々にしたもの。
wnd = float_wnd_create(280, 120, 1, true)
float_wnd_set_title(wnd, "imgui Button")
float_wnd_set_imgui_builder(wnd, "button_demo")
float_wnd_set_ondraw(wnd, "on_draw")
float_wnd_set_onclose(wnd, "closed_demo")

function button_demo(wnd, x, y)
    imgui.Button("Push Me")
end
function on_draw(wnd, x, y)
	draw_string(x, y + 50, "DCバッテリースイッチをオンにする", "white")
end
float_wnd_set_imgui_builder()の中にfloat_wnd_set_ondrow()を入れても同じように動作する。
wnd = float_wnd_create(280, 120, 1, true)
float_wnd_set_title(wnd, "imgui Button")
float_wnd_set_imgui_builder(wnd, "button_demo")
float_wnd_set_ondraw(wnd, "on_draw")
float_wnd_set_onclose(wnd, "closed_demo")
function button_demo(wnd, x, y)
imgui.Button("Push Me")
function on_draw(wnd, x, y)
draw_string(x, y + 50, "DCバッテリースイッチをオンにする", "white")
end
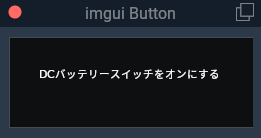
endこれはあくまで、float_wnd_set_imgui_builder()があってfloat_wnd_set_ondrow()が動作するようで、逆にするとウインドウは表示されるが中身が表示されなくなる。
ondrawで作成したフォントが左下が起点になる問題
左下が起点になると、ウインドウを広げると左はいいが天地のテキストが下を基準に移動してしまう。上から起点にする必要がある。以下のようにウインドウを広げても左上が起点になっているのでテキストは移動しない。

float_wnd_get_geometryを使うことで左右上下の位置を取得できるので「y + (winTop – winBottom)」でyの位置を上からにすることが出来る。
wnd = float_wnd_create(280, 220, 1, true)
float_wnd_set_title(wnd, "imgui Button")
float_wnd_set_ondraw(wnd, "on_draw")
float_wnd_set_onclose(wnd, "closed_demo")
-- xとyはウィンドウの原点、つまり左下、 xは右に増加し、yは上に増加する。
function on_draw(wnd, x, y)
--以下により左上が原点になる(winRight, winBottomを指定すると右下が原点?)
--winLeftとwinRightで左右のウインドウ幅を取得している。左が原点なのでこれは使わず「x」が使用されている。
--天地の場合、上を原点にするので「winTop - winBottom」で天地幅を取得して「y」に天が原点になるように設定されている。white yellow magenta grey green red cyan
winLeft, winTop, winRight, winBottom = float_wnd_get_geometry(wnd)
draw_string(x + 30, y + (winTop - winBottom) - (20 * 2), "DCバッテリースイッチをオンにする", "white")
-----------------------------------------
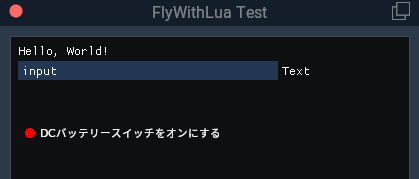
endinputと日本語も使える
require("graphics")

local winLeft, winTop, winRight, winBottom = 0, 0, 0, 0 -- float_wnd_get_geometry (fw & os)
local line_number_1                        = true

function build_demo(demo_wnd, x, y)
	-- imguiでできる最も簡単なことは、テキストを描画することです。
	imgui.TextUnformatted("Hello, World!")

	local changed, newText = imgui.InputText("Text", "input", 20)
	if changed then
		text = newText
	end
	------------/////////draw関数ウインドウ///////////----------------------------------------------
	function on_draw()
		winLeft, winTop, winRight, winBottom = float_wnd_get_geometry(demo_wnd) --テキスト位置を設定するので重要

		if line_number_1 == true then
			graphics.set_color(1, 0, 0, 1)                                           --赤
		else
			graphics.set_color(0, 1, 0, 1)                                           --黄緑
		end
		graphics.draw_filled_circle(x + 20, y + (winTop - winBottom) + 3 - (20 * 5), 5) --円
		draw_string(x + 30, y + (winTop - winBottom) - (20 * 5), "DCバッテリースイッチをオンにする",
			"white")
	end                                                                              -- function on_draw

	------------/////////draw関数ウインドウ///////////----------------------------------------------
end

function on_click(demo_wnd, x, y, state)
	--ボタンダウンのマウスイベントのみを気にします
	if (state == 1) then
		if (x >= 2 and x <= 27 and y >= winTop - winBottom - 44 - (20 * 0) and y <= winTop - winBottom - 30 - (20 * 0)) then
			--logMsg("in setTitle statement")
			if line_number_1 == true then --つまり黄緑マルが表示されていたら
				line_number_1 = false --赤マルを表示
			else
				line_number_1 = true --そうでないなら黄緑マルを表示
			end
		end
	end -- IF state
end  -- function on_click

-- width, height, decoration style as per XPLMCreateWindowEx. 1 for solid background, 3 for transparent
--demo_wnd = float_wnd_create(800, 600, 1, true)
demo_wnd = float_wnd_create(400, 400, 1, true)
float_wnd_set_title(demo_wnd, "FlyWithLua Test")
float_wnd_set_ondraw(demo_wnd, "on_draw")
float_wnd_set_imgui_builder(demo_wnd, "build_demo")
float_wnd_set_onclick(demo_wnd, "on_click")
float_wnd_set_onclose(demo_wnd, "on_close")