

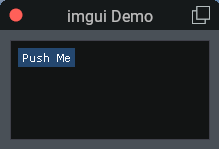
単純にボタンを表示する。
重要! ボタンには名前を入れないと動作しない、それと同じ名前を入れても同じように動作しない。同じ名前の最初の1つだけは動くが、その後のボタンは動作しないので注意が必要。
1つだけ作成した場合は問題なく動作しているように見えるが複数ボタンを作成すると問題に成る。
imgui.Button(“Button One”, 100, 100) –最後の数字はボタンの大きさ
この float_wnd_set_imgui_builder() による「imgui.Button」ボタンは同じ名前を使用すると最初のボタンは機能してもその後のボタンは動作しない。
画像を入れる「imgui.ImageButton」は画像へのリンクをそのまま入れても動作しない。一度画像リンクを最初に宣言して、その変数名をimgui.ImageButtonに入れる必要がある。
また、これも同じ変数名を他のボタンに使うと機能しないので注意が必要である。最初に取り敢えず沢山のボタンを作成するとき手を抜いて同じ名前で作成する場合があると思うが動作しない場合は、この名前の状態を確認する必要がある。
Button関数は、指定されたラベルでボタンを作成する。 ボタンが離された瞬間にtrueを返します。
つまり、この関数には何もしないでもこの機能が含まれているということになる。
-- imgui を表示するためのデフォルト設定スクリプト
button_wnd = float_wnd_create(200, 100, 1, true)
float_wnd_set_title(button_wnd, "imgui Button")
float_wnd_set_imgui_builder(button_wnd, "button_demo")
float_wnd_set_onclose(button_wnd, "closed_demo")
--ポジションが抜けている

function button_demo(wnd, x, y)
    imgui.Button("Push Me")
end
function build_demo(wnd, x, y) は function build_demo(demo_wnd, x, y) でなくても良い。ウインドウが複数作成する場合のハンドルになるのかな?チョット不明だが、同じでなくても動作する。
目次
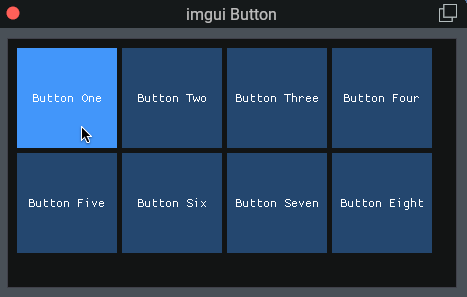
ボタンサイズ変更と並べ方
ボタンの大きさの設定
imgui.Button(“Stop Engine”,150,75) — 最後の数値で横幅、縦幅を設定することができる。
-- imgui を表示するためのデフォルト設定スクリプト
button_wnd = float_wnd_create(450, 250, 1, true)
float_wnd_set_title(button_wnd, "imgui Button")
float_wnd_set_imgui_builder(button_wnd, "button_demo")
float_wnd_set_onclose(button_wnd, "closed_demo")

--button_pressed = 0

function button_demo(wnd, x, y)
    --	imgui.PushItemWidth(50)
    imgui.SetCursorPosY(10)    --ウインドウの端から縦に移動する距離
    imgui.SetCursorPosX(10)    --ウインドウの端から横に移動する距離
	if imgui.Button("Button One", 100, 100) then

	end
	imgui.SameLine()    --横に並べる
	imgui.SetCursorPosX(((100 + 5) * 1) + 10)    --ウインドウの端から横に移動する距離

	if imgui.Button("Button Two", 100, 100) then

	end

	imgui.SameLine()
	imgui.SetCursorPosX(((100 + 5) * 2) + 10)

	if imgui.Button("Button Three", 100, 100) then

	end

	imgui.SameLine()
	imgui.SetCursorPosX(((100 + 5) * 3) + 10)

	if imgui.Button("Button Four", 100, 100) then

	end
    --2段目
	imgui.SetCursorPosY(((100 + 5) * 1) + 10)   --2番目の行を縦に移動する距離
    imgui.SetCursorPosX(10)
	if imgui.Button("Button Five", 100, 100) then

	end
	imgui.SameLine()
	imgui.SetCursorPosX(((100 + 5) * 1) + 10)

	if imgui.Button("Button Six", 100, 100) then

	end

	imgui.SameLine()
	imgui.SetCursorPosX(((100 + 5) * 2) + 10)

	if imgui.Button("Button Seven", 100, 100) then

	end

	imgui.SameLine()
	imgui.SetCursorPosX(((100 + 5) * 3) + 10)

	if imgui.Button("Button Eight", 100, 100) then

	end
end

function closed_demo(wnd)
    -- Tこの関数は、ユーザーがウィンドウを閉じるときに呼び出されます。
    -- ウィンドウが既に破棄されているため、この関数では imgui 関数の描画または呼び出しは許可されない。
end
for文で3つのボタンで円の色を変える
クリックしたボタンの横の色を変える。
demo_wnd = float_wnd_create(150, 100, 1, true)
float_wnd_set_title(demo_wnd, "imgui Demo")
float_wnd_set_imgui_builder(demo_wnd, "build_demo")
float_wnd_set_onclose(demo_wnd, "closed_demo")
makeGreen1 = false
makeGreen2 = false
makeGreen3 = false
function build_demo(wnd, x, y)
for i = 1, 3, 1 do
if imgui.Button("Push Me" .. i) then
if i == 1 then
makeGreen1 = not makeGreen1 --falseの否定になるのでtrueを返す(trueとfalseを繰り返す)
makeGreen2 = false
makeGreen3 = false
end
if i == 2 then
makeGreen1 = false --falseの否定になるのでtrueを返す(trueとfalseを繰り返す)
makeGreen2 = not makeGreen2
makeGreen3 = false
end
if i == 3 then
makeGreen1 = false --falseの否定になるのでtrueを返す(trueとfalseを繰り返す)
makeGreen2 = false
makeGreen3 = not makeGreen3
end
end
end
-- 変数を使用してテキストの色を変更します
if makeGreen1 then --makeRedはtrueなのでグリーンを表示
imgui.DrawList_AddCircleFilled(85, 18, 8, 0xFF00FF00) -- グリーンの円を作成
else
imgui.DrawList_AddCircleFilled(85, 18, 8, 0x50FFFFFF) -- グレーの円を作成
end
if makeGreen2 then --makeRedはtrueなのでグリーンを表示
imgui.DrawList_AddCircleFilled(85, 41, 8, 0xFF00FF00) -- グリーンの円を作成
else
imgui.DrawList_AddCircleFilled(85, 41, 8, 0x50FFFFFF) -- グレーの円を作成
end
if makeGreen3 then --makeRedはtrueなのでグリーンを表示
imgui.DrawList_AddCircleFilled(85, 63, 8, 0xFF00FF00) -- グリーンの円を作成
else
imgui.DrawList_AddCircleFilled(85, 63, 8, 0x50FFFFFF) -- グレーの円を作成
end
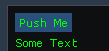
endボタンのテキストを変化させる
クリックするとボタンのテキストの色を変える。
-- ウインドウの作成
wnd = float_wnd_create(400, 200, 1, true)
float_wnd_set_title(wnd, "Buttons")        --wnd変数をセット
float_wnd_set_imgui_builder(wnd, "im_on_build") --関数を読み込みセットする

makeRed = false
------------------------------------------------------------------------
--ボタンを作成するための関数
function im_on_build(wnd, x, y)
		---------------------------------------------------------------------
        -- 次の関数はボタンのテキストの色を変更します:
        -- 一般的なテキストの色も同時に変更できます。
        ---------------------------------------------------------------------
        -- 変数を使用してテキストの色を変更します(これを最初に記述すべし)
        if makeRed then
            imgui.PushStyleColor(imgui.constant.Col.Text, 0xFF0000FF)
        else
            imgui.PushStyleColor(imgui.constant.Col.Text, 0xFF00FF00)
        end
        -- ボタンのテキストの色を変える
        if imgui.Button("Push Me") then
            -- Button関数は、指定されたラベルを持つボタンを作成します。 ボタンが離された瞬間にtrueを返します。
            -- つまり、ifステートメントを使用してボタンの背後にあるアクションを実行する必要があるかどうかを確認します。
            -- ボタンを変数に切り替えましょう:
            makeRed = not makeRed
        end
        -- テキストの色を変える
        imgui.TextUnformatted("Some Text")
        imgui.PopStyleColor()
end
inguiのボタンの色そのものを変更することもできる
このサイトに詳しい:https://maku77.github.io/sass/color-constants.html
imgui.Button(およびimgui.ImageButton)の色は、次の3つの方法で制御できる。
上からデフォルトの色、マウスを置いたときの色、アクティブになったときの色。
imgui.PushStyleColor(imgui.constant.Col.Button, 0x00404040)
imgui.PushStyleColor(imgui.constant.Col.ButtonHovered, 0x40404040)
imgui.PushStyleColor(imgui.constant.Col.ButtonActive, 0x80404040)
さらに、ボタンのテキストの色は、以下の方法で設定できます。「x」の後の最初の2桁には、アルファチャンネルまたは透明度の値が含まれています。(それが完全に正確かどうかはわかりません。)0x00で始まる値は、完全に透明であるため、ディスプレイから隠されます。
imgui.PushStyleColor(imgui.constant.Col.Text, 0x00FFFFFF)
ボタンをクリック保持したときにアクションをトリガー
ボタンを押した状態を維持するとテキストが点滅する。
------------------------------------------------------------------------
-- ウインドウの作成
wnd = float_wnd_create(400, 200, 1, true)
float_wnd_set_title(wnd, "Buttons")        --wnd変数をセット
float_wnd_set_imgui_builder(wnd, "im_on_build") --関数を読み込みセットする

makeRed = false
------------------------------------------------------------------------
--ボタンを作成するための関数
function im_on_build(wnd, x, y)
		---------------------------------------------------------------------
        -- 次の関数はボタンのテキストの色を変更します:
        -- 一般的なテキストの色も同時に変更できます。
        ---------------------------------------------------------------------
        -- 変数を使用してテキストの色を変更します(これを最初に記述すべし)
        if makeRed then
            imgui.PushStyleColor(imgui.constant.Col.Text, 0xFF0000FF)
        else
            imgui.PushStyleColor(imgui.constant.Col.Text, 0xFF00FF00)
        end
        -- ボタンのテキストの色を変える
        if imgui.Button("Push Me") then
            -- Button関数は、指定されたラベルを持つボタンを作成します。 ボタンが離された瞬間にtrueを返します。
            -- つまり、ifステートメントを使用してボタンの背後にあるアクションを実行する必要があるかどうかを確認します。
            -- ボタンを変数に切り替えましょう:
            makeRed = not makeRed
        end
        -- テキストの色を変える
        imgui.TextUnformatted("Some Text")
        imgui.PopStyleColor()
        ---------------------------------------------------------------------
        -- ボタンが離されたときだけでなく、ボタンがクリックされているときにアクションをトリガーする場合:
        -- ボタンが押されている間、テキストが点滅する。
        imgui.Button("Click and hold")
        if imgui.IsItemActive() then
            makeRed = not makeRed
        end
endボタンをクリックしたときの動作、ボタンをダウンしたら文字が点灯、離したら消灯する。imgui.IsMouseDown(0)の「0」を外したり、それ以外の数値を入れると動作しない。
imgui.IsItemHovered()だけのときは、マウスをボタンに乗せると文字が表示される。
imgui.IsMouseDown(0)だけのときは、マウスをボタンをダウンしたときだけ文字が表示される
ちなみにUpも出来そうだが動作しない。
imgui.Button(‘Button’)
if imgui.IsItemHovered() and imgui.IsMouseDown(0) then
imgui.TextUnformatted(“ABC”)
end
画像を入れたボタンを作成
ボタンに画像を入れる。png画像がバックが抜けるので見た目がいい。
このボタンの下にはボタンをクリックするごとにカウントアップする数値が表示される。
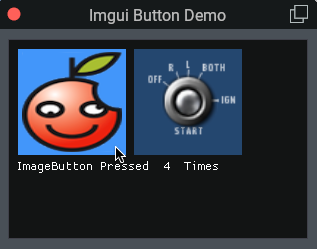
このプログラムのように、ウインドウの作成を下の方に作成することもできる。
img_id = float_wnd_load_image(SCRIPT_DIRECTORY .. "/Apple.png")
img_id2 = float_wnd_load_image("./Resources/bitmaps/cockpit/buttons/starter/but_starter_BC.png")
button_pressed = 0
function ibd_on_build(ibd_wnd, x, y)
imgui.SetCursorPosY(10)
imgui.SetCursorPosX(10)
if imgui.ImageButton(img_id, 100, 100) then
button_pressed = button_pressed + 1
end
imgui.SameLine()
if imgui.ImageButton(img_id2, 100, 100) then
button_pressed = button_pressed + 2
end
imgui.TextUnformatted("ImageButton Pressed " .. button_pressed .. " Times")
end
ibd_wnd = nil
ibd_wnd = float_wnd_create(300, 200, 1, true)
float_wnd_set_title(ibd_wnd, "Imgui Button Demo")
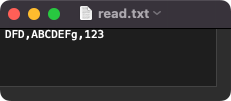
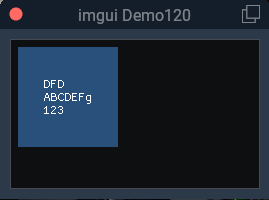
float_wnd_set_imgui_builder(ibd_wnd, "ibd_on_build")ボタンにテキストを複数行入れる
テキストは「, 」区切りで保存している。
上のテキストを下にスクリプトで実行するとセンター揃えにならない。
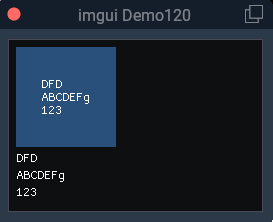
上の図のようにボタンと外に直接テキストを表示するスクリプト。
demo_wnd = float_wnd_create(250, 150, 1, true)
float_wnd_set_title(demo_wnd, "imgui Demo120") --ウィンドウのタイトル
float_wnd_set_imgui_builder(demo_wnd, "build_demo")

-- imguiウインドウ内で実行するスクリプト -------------------------------------------------
function build_demo(wnd, x, y)
    local file = io.open(SCRIPT_DIRECTORY .. "read.txt", "r")
    for line in file:lines() do
        txtLine_1, txtLine_2, txtLine_3 = string.match(line, "(.-)%,(.-)%,(.+)")

        -- ボタンにテキストを入れる場合
        button_A = txtLine_1.."\n"..txtLine_2.."\n"..txtLine_3
    	imgui.Button(button_A, 100, 100)

        imgui.TextUnformatted(txtLine_1)    --直接ウインドウ内に記述する場合
        imgui.TextUnformatted(txtLine_2)
        imgui.TextUnformatted(txtLine_3)
    end
    file:close() -- 最後にf:closeでファイルを閉じる
end
ボタンだけだが、こんな入れ方もある。for文の外に入れている。
demo_wnd = float_wnd_create(250, 150, 1, true)
float_wnd_set_title(demo_wnd, "imgui Demo120") --ウィンドウのタイトル
float_wnd_set_imgui_builder(demo_wnd, "build_demo")

-- imguiウインドウ内で実行するスクリプト -------------------------------------------------
function build_demo(wnd, x, y)
    local file = io.open(SCRIPT_DIRECTORY .. "read.txt", "r")
    for line in file:lines() do
        txtLine_1, txtLine_2, txtLine_3 = string.match(line, "(.-)%,(.-)%,(.+)")
    end
    file:close() -- 最後にf:closeでファイルを閉じる

    -- ボタンにテキストを入れる場合
    button_A = txtLine_1.."\n"..txtLine_2.."\n"..txtLine_3
    imgui.Button(button_A, 100, 100)
end
line(行)を使うと、テキストを取得した行数に応じて自動的にボタンを作成
テキストを改行して保存した場合。
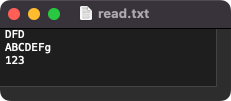
ボタン内は1行しか表示できないが、センター揃えになる。
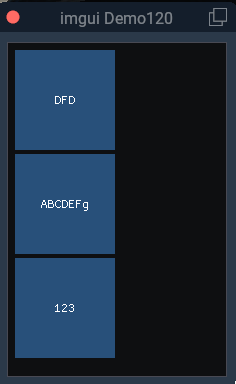
for文内にボタンを入れると作成されたテキストと同じ数のボタンが自動的に作成される。
demo_wnd = float_wnd_create(250, 150, 1, true)
float_wnd_set_title(demo_wnd, "imgui Demo120") --ウィンドウのタイトル
float_wnd_set_imgui_builder(demo_wnd, "build_demo")

-- imguiウインドウ内で実行するスクリプト -------------------------------------------------
function build_demo(wnd, x, y)
    local file = io.open(SCRIPT_DIRECTORY .. "read.txt", "r")
    for line in file:lines() do
    -- ボタンにテキストを入れる場合
    imgui.Button(line, 100, 100)
    end
    file:close() -- 最後にf:closeでファイルを閉じる
end
for do文でボタンの距離を離して設定する
繰り返し処理では、そのままではボタンは少し離れた状態で下又は横に自動的に並べられる。これを以下のように一定間隔で離して表示したい場合がある。

12行目、imgui.SetCursorPosX(Button_Distance[I]) の横送りをこのように設定することでできる。
------------------------------------------------------------------------
-- ウインドウの作成
wnd = float_wnd_create(400, 200, 1, true)
float_wnd_set_title(wnd, "Buttons")        --wnd変数をセット
float_wnd_set_imgui_builder(wnd, "im_on_build") --関数を読み込みセットする
------------------------------------------------------------------------
--ボタンを作成するための関数
function im_on_build(wnd, x, y)
  text = {"ABC","BVC","GFD"}
  Button_Distance = {10,110,210}
	for i = 1, #text do
    imgui.SetCursorPosX(Button_Distance[i])
		if imgui.Button(text[i]) then

		end
		imgui.SameLine()
	end
end
ボタンの色を変更する

imgui.Button(およびimgui.ImageButton)の色は、次の3つの方法で制御できます。
「x」の後の最初の2桁には、アルファチャンネルまたは透明度の値が含まれてる。これでいくと0x00で始まる値は、完全に透明であるとうことになるので色は表示されないということになる。
後ろから6桁、0000FFは赤色、その前の00は透明度100%、40は透明度60%、80は透明度20%で数値が大きい程、透明度が低くなる。最初の0xは16進数であるという意味。
imgui.PushStyleColor(imgui.constant.Col.Button, 0x000000FF) 透明なので表示されない
imgui.PushStyleColor(imgui.constant.Col.ButtonHovered, 0x400000FF) 透明度60%
imgui.PushStyleColor(imgui.constant.Col.ButtonActive, 0x800000FF) 透明度20%
赤色を50%の透明度でボタンの色を設定した場合。

-- ウインドウの作成
wnd = float_wnd_create(400, 200, 1, true)
float_wnd_set_title(wnd, "Buttons")             --wnd変数をセット
float_wnd_set_imgui_builder(wnd, "im_on_build") --関数を読み込みセットする

--ボタンを作成するための関数
function im_on_build(wnd, x, y)
    imgui.PushStyleColor(imgui.constant.Col.Button, 0x500000FF)       --赤色

    -- ボタンのテキストの色を変える
    if imgui.Button("Push Me") then

    end
    imgui.PopStyleColor()
end
次のボタンテキストとボタンそのものの色を同時に変更する場合、いかのように「imgui.PopStyleColor()」を2つ分入れる必要がある。こうしないとエラーになる。
imgui.PushStyleColor(imgui.constant.Col.Button, 0x500000FF) –ボタンの色
imgui.PushStyleColor(imgui.constant.Col.Text, 0xFF0000FF)–テキストの色
if imgui.Button(“ABC”) then
end
imgui.PopStyleColor()
imgui.PopStyleColor()
ボタンテキストの色を変更する
さらに、ボタンのテキストの色は、以下の方法で設定できます。
imgui.PushStyleColor(imgui.constant.Col.Text, 0x10FFFFFF) 透明度0%
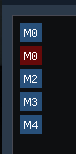
for do文で特定のボタンだけに色を付ける
1つだけなら以下のようにできるが範囲を指定してする方法がわからない。
-- ウインドウの作成
wnd = float_wnd_create(400, 200, 1, true)
float_wnd_set_title(wnd, "Buttons")             --wnd変数をセット
float_wnd_set_imgui_builder(wnd, "im_on_build") --関数を読み込みセットする

memory_button_label_1 = { "M0", "M1", "M2", "M3", "M4" }

--ボタンを作成するための関数
function im_on_build(wnd, x, y)
    for i = 1, #memory_button_label_1 do
        if i == 2 then
            goto continue
        end
        if imgui.Button(memory_button_label_1[i]) then
        end
        ::continue::
        if i == 2 then
            imgui.PushStyleColor(imgui.constant.Col.Button, 0x500000FF)
            if imgui.Button(memory_button_label_1[1]) then

            end
            imgui.PopStyleColor()
        end
    end
end
同じボタン名でIDを作成する場合
ボタンは一般的にボタン名で区別しているので、特別に指定したい場合はボタンにIDを付与することによって解決する。

キャプション文字列はウィンドウ内で一意(同じ)である必要があります。
同じキャプションを持つ複数のウィジェットが必要な場合は、##を追加し、その後に非表示のキャプション拡張の一意のIDを続けます。17行目がそれになる。これは##を付けることによって「Button」とだけ表示される。
imgui.Button(“Button##1”)
別のバリアント:ループ内からウィジェットを作成する場合は、PushIDとPopIDを使用してカスタムID名前空間を作成することができる。
-----------------------------------------------------------------------
-- ウインドウの作成
wnd = float_wnd_create(600, 400, 1, true)
float_wnd_set_title(wnd, "ボタンの基本") --wnd変数をセット
------------------------------------------------------------------------
-- ボタンを描画するための関数宣言
float_wnd_set_imgui_builder(wnd, "im_on_build") --関数を読み込みセットする

left_limit = 30
------------------------------------------------------------------------
--ボタンを作成するための関数
function im_on_build(wnd, x, y)
    -- キャプション文字列はウィンドウ内で一意(同じ)である必要があります。
    -- 同じキャプションを持つ複数のウィジェットが必要な場合は、##を追加し、
    -- その後に非表示のキャプション拡張の一意のIDを続けます。

    imgui.Button("Button##1")
    imgui.Button("Button##2")

    imgui.Separator()     --分離線

    -- 別のバリアント:ループ内からウィジェットを作成する場合は、
    -- PushIDとPopIDを使用してカスタムID名前空間を作成します
    for i = 1, 5 do
        imgui.PushID(i)
        imgui.Button("Button")
        imgui.PopID()
    end
end
以上。