X-Plane コクピットの自作に挑戦!
X-Plane Teensy&キーボードボタン
Teensyでキーボードボタンと同じようにプッシュボタンを使用してX-Planeのスイッチ類をコントロールします。コードはここから頂きました。Teensy付属のスケッチを少し変更した分で、実際的なコードになっています。但し、これ一番下の「 } 」が抜けていますので注意。
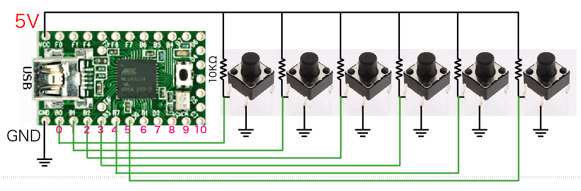
Teensyではこキーボードボタンでは、残念ながら6つのボタンしか使用できません。
まず、Arduinoのメニューからツール>Teensy2.0を指定、ツールメニューのUSB TyoeではKeyboard+Mouse+Joustickを選択して、書き込み。これでUSBキーボードとして認識されます。
XPlaneを起動、ジョイスティック&機器からどれか下の左の赤枠のように、ボタンを選択してTeensyの「0」ピンに繋いでだプッシュボタンを押すと「W」となります。
これで、TeensyからX-Planeのあらゆるコマンドをボタンでコントロールできるようになります。いいですね〜(笑顔)。
と、思ったのですが、残念ながらこれ6つしか登録ができないのです。Keyboard.set_key1〜Keyboard.set_key6までで、Keyboard.set_key7になるとスケッチでオレンジから黒に文字が変化して使用できないのがわかります。
以上こんな方法もあるということで……(悲)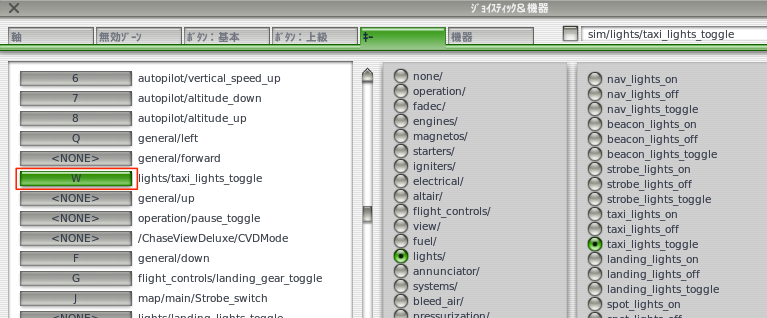
コードは下の赤のところがそれに当たります。
if (button0.fallingEdge()) {
Keyboard.set_key1(KEY_W);
Keyboard.send_now();
}
※他のボタンは以下のとうり
pin 0 = W
pin 1 = A
pin 2 = S
pin 3 = D
pin 4 = space
pin 5 = E
これ以下は、いくら登録しても実行されません。従って以下のコードではKeyboard.set_key6までしか実行されません。
USB_keyboard.ino
/* Buttons to USB Keyboard Example

   You must select Keyboard from the "Tools > USB Type" menu

   This example code is in the public domain.
*/


#include <Bounce.h>

// Create Bounce objects for each button.  The Bounce object
// automatically deals with contact chatter or "bounce", and
// it makes detecting changes very simple.
Bounce button0 = Bounce(0, 10);
Bounce button1 = Bounce(1, 10);  // 10 = 10 ms debounce time
Bounce button2 = Bounce(2, 10);  // which is appropriate for
Bounce button3 = Bounce(3, 10);  // most mechanical pushbuttons
Bounce button4 = Bounce(4, 10);
Bounce button5 = Bounce(5, 10);  // if a button is too "sensitive"
Bounce button6 = Bounce(6, 10);  // to rapid touch, you can
Bounce button7 = Bounce(7, 10);  // increase this time.
Bounce button8 = Bounce(8, 10);
Bounce button9 = Bounce(9, 10);


void setup() {
  // Configure the pins for input mode with pullup resistors.
  // The pushbuttons connect from each pin to ground.  When
  // the button is pressed, the pin reads LOW because the button
  // shorts it to ground.  When released, the pin reads HIGH
  // because the pullup resistor connects to +5 volts inside
  // the chip.  LOW for "on", and HIGH for "off" may seem
  // backwards, but using the on-chip pullup resistors is very
  // convenient.  The scheme is called "active low", and it's
  // very commonly used in electronics... so much that the chip
  // has built-in pullup resistors!
  pinMode(0, INPUT_PULLUP);
  pinMode(1, INPUT_PULLUP);
  pinMode(2, INPUT_PULLUP);
  pinMode(3, INPUT_PULLUP);
  pinMode(4, INPUT_PULLUP);
  pinMode(5, INPUT_PULLUP);
  pinMode(6, INPUT_PULLUP);  // Teensy++ LED, may need 1k resistor pullup
  pinMode(7, INPUT_PULLUP);
  pinMode(8, INPUT_PULLUP);
  pinMode(9, INPUT_PULLUP);
  Mouse.begin();
}

void loop() {
  // Update all the buttons.  There should not be any long
  // delays in loop(), so this runs repetitively at a rate
  // faster than the buttons could be pressed and released.
  button0.update();
  button1.update();
  button2.update();
  button3.update();
  button4.update();
  button5.update();
  button6.update();
  button7.update();
  button8.update();
  button9.update();

  // Check each button for "falling" edge.
  // Type a message on the Keyboard when each button presses
  // Update the Joystick buttons only upon changes.
  // falling = high (not pressed - voltage from pullup resistor)
  //           to low (pressed - button connects pin to ground)
  if (button0.fallingEdge()) {
    Keyboard.set_key1(KEY_W);
    Keyboard.send_now();
  }
  if (button1.fallingEdge()) {
    Keyboard.set_key2(KEY_A);
    Keyboard.send_now();
  }
  if (button2.fallingEdge()) {
    Keyboard.set_key3(KEY_S);
    Keyboard.send_now();
  }
  if (button3.fallingEdge()) {
    Keyboard.set_key4(KEY_D);
    Keyboard.send_now();
  }
  if (button4.fallingEdge()) {
    Keyboard.set_key5(KEY_SPACE);
    Keyboard.send_now();
  }
  if (button5.fallingEdge()) {
    Keyboard.set_key6(KEY_E);
    Keyboard.send_now();
  }
  //if (button6.fallingEdge()) {
   // Keyboard.set_key(KEY_Q);
  //}
  if (button7.fallingEdge()) {
    Keyboard.set_modifier(MODIFIERKEY_SHIFT);
  }
  if (button8.fallingEdge()) {
    Mouse.set_buttons(1,0,0);
  }
  if (button9.fallingEdge()) {
     Mouse.set_buttons(0,0,1);
  }

  // Check each button for "rising" edge
  // Type a message on the Keyboard when each button releases.
  // For many types of projects, you only care when the button
  // is pressed and the release isn't needed.
  // rising = low (pressed - button connects pin to ground)
  //          to high (not pressed - voltage from pullup resistor)
  if (button0.risingEdge()) {
    Keyboard.set_key1(0);
    Keyboard.send_now();

  }
  if (button1.risingEdge()) {
    Keyboard.set_key2(0);
    Keyboard.send_now();
  }
  if (button2.risingEdge()) {
    Keyboard.set_key3(0);
    Keyboard.send_now();
  }
  if (button3.risingEdge()) {
   Keyboard.set_key4(0);
    Keyboard.send_now();
  }
  if (button4.risingEdge()) {
   Keyboard.set_key5(0);
    Keyboard.send_now();
  }
  if (button5.risingEdge()) {
    Keyboard.set_key6(0);
    Keyboard.send_now();
  }
  //if (button6.risingEdge()) {
    //Keyboard.set_key6(0);
  //}
  if (button7.risingEdge()) {
    Keyboard.set_modifier(0);
  }
  if (button8.risingEdge()) {
    Mouse.set_buttons(0,0,0);
  }
  if (button9.risingEdge()) {
    Mouse.set_buttons(0,0,0);
  }
}
- 低価格コクピットの自作
- DataRefEditor
- プルアップとプルダウン
- Nav1の周波数の設定をロータリーエンコーダで行う
- スロットルコントロール
- イグニッションキーコントロール
- 針路バグコントロール
- 針路バグとエレベータトリムの切り替え
- 回転動作を粗いと微細で設定 & 3つのモードの切り替え
- ギアのアップダウンコントロール
- ロータリーエンコーダの色々な数値の設定
- トグルスイッチコントロール
- ロータリースイッチコントロール
- Teensy&キーボードボタン
- Teensy&ジョイスティックボタン
- プッシュスイッチでトグルを実現
- プッシュスイッチでLEDをONにしたままにする
- Teensy & I2C接続キャラクターLCDモジュール
- 7セグで数字を表示
- X-Plane LED ON/OFF
- マウスホイールの活用
- B 737-800
- B747-400
- B 777 Worldliner
- SiteMap
Contents