

Functions(関数)
関数は、スクリプトで複数回使用できる一連のコマンドです。
定義すると、関数はコマンドを介して実行するか、イベントを介してトリガーできます。
関数の定義
基本的な関数宣言には、関数キーワードとそれに続く関数名と括弧 (()) が含まれる。
関数の本体はコードのブロックになるため、endキーワードで閉じる必要がある。
local function testFunc()
end
()とendの間は、コマンドと他のコードが関数本体を構成する場所になる。
これらのコマンドは、関数が呼び出されたときに実行される。
local function testFunc()
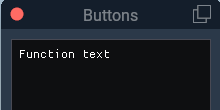
imgui.TextUnformatted(“Function text”) — 関数内容を記述
end
関数の呼び出し
関数が定義されると、それを呼び出すことで実行できます(関数だけでは何も自己実行しません)。
関数を呼び出すには、その名前に続けて括弧 (()) を入力します。
local function testFunc()
imgui.TextUnformatted(“Function text”) — 関数内容を記述
end
testFunc() — これで関数を実行
実際に使ったスクリプト例
-- ウインドウの作成
wnd = float_wnd_create(200, 100, 1, true)
float_wnd_set_title(wnd, "Buttons")             --wnd変数をセット
float_wnd_set_imgui_builder(wnd, "im_on_build") --関数を読み込みセットする

--自作関数
local function testFunc()
	imgui.TextUnformatted("Function text")   -- 関数内容を記述
end

--ウインドウを表示
function im_on_build(wnd, x, y)
	testFunc() -- これで関数を実行
end

-- window close
function polo_onclose(polo_wnd)
	float_wnd_destroy(polo_wnd) --消し去る
end
関数パラメーター
関数は、渡されるデータのパラメーターを利用できる。
関数を宣言するときは、括弧内に1つ以上のパラメーター名を含めることができる。
–「num1」と「num2」はパラメーター。
local function testFunc(num1, num2)
end
パラメータを指定して関数を呼び出す場合は、関数に渡す値を指定します。
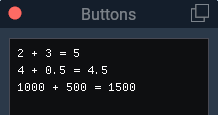
たとえば、次の関数は、各呼び出し中に渡された2つの数値を受け取り、それらを加算して結果を出力します。
local function testFunc(num1, num2)
local result = num1 + num2
imgui.TextUnformatted(num1 .. ” + ” .. num2 .. ” = ” .. result)
end
testFunc(2, 3) — num1, num2に2と3を入れる
testFunc(4, 0.5) — num1, num2に4と0.5を入れる
testFunc(1000, 500) — num1, num2に1000と500を入れる
実際に使ったスクリプト例
-- ウインドウの作成
wnd = float_wnd_create(200, 100, 1, true)
float_wnd_set_title(wnd, "Buttons")             --wnd変数をセット
float_wnd_set_imgui_builder(wnd, "im_on_build") --関数を読み込みセットする

--自作関数
local function  testFunc(num1, num2)
	local result = num1 + num2
	imgui.TextUnformatted(num1 .. " + " .. num2 .. " = " .. result)
end

--ウインドウを表示
function im_on_build(wnd, x, y)
	testFunc(2, 3)   -- num1, num2に2と3を入れる
	testFunc(4, 0.5) -- num1, num2に4と0.5を入れる
	testFunc(1000, 500) -- num1, num2に1000と500を入れる
end

-- window close
function polo_onclose(polo_wnd)
	float_wnd_destroy(polo_wnd) --消し去る
end
関数パラメーターは常に関数に対してローカルであり、関数のスコープとその降順のスコープでのみ使用される。
予想よりも多くのパラメーターを指定してLua関数を呼び出すと、超過したパラメーターは無視される。
逆に、関数が提供するよりも多くのパラメーターを予期している場合、欠落しているすべてのパラメーターに値nilが入ることに成る。
戻り値
関数はパラメータを受け入れるだけでなく、呼び出し元のコマンドにデータを返す(返送する)こともできる。
これは戻り値を通じて行われる。 上記の例に基づいて、次の関数は合計を出力する代わりに返す。
local function testFunc(num1, num2)
local result = num1 + num2
return result
end
Do not put any commands following a return command as doing so will generate an error.
When a function returns a value, it can be assigned to a variable or used wherever a variable can be used. The following code illustrates this concept:
エラーが発生するため、returnコマンドの後にコマンドは置かないこと。
関数が値を返すときは、変数に割り当てるか、変数を使用できる場所であればどこでも使用できる。
以下のコードは、この概念を示している。
local function testFunc(num1, num2)
local result = num1 + num2
return result
end
— 関数を呼び出し、戻り値を変数に格納します
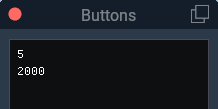
local result1 = testFunc(2, 3)
imgui.TextUnformatted(result1)
local result2 = testFunc(1000, 1000)
imgui.TextUnformatted(result2)
実際に使ったスクリプト例
合計値が返される。
-- ウインドウの作成
wnd = float_wnd_create(200, 100, 1, true)
float_wnd_set_title(wnd, "Buttons")             --wnd変数をセット
float_wnd_set_imgui_builder(wnd, "im_on_build") --関数を読み込みセットする

--自作関数
local function testFunc(num1, num2)
	local result = num1 + num2
	return result
end

--ウインドウを表示
function im_on_build(wnd, x, y)
	local result1 = testFunc(2, 3)    --num1 + num2を返しているのでその中に値を入れる
	imgui.TextUnformatted(result1)
	local result2 = testFunc(1000, 1000) --num1 + num2を返しているのでその中に値を入れる
	imgui.TextUnformatted(result2)
end

-- window close
function polo_onclose(polo_wnd)
	float_wnd_destroy(polo_wnd) --消し去る
end
Unlike some programming languages, Lua even lets you return multiple values from a function:
一部のプログラミング言語とは異なり、Luaでは関数から複数の値を返すこともできます。
local function testFunc(num1, num2)
local sum = num1 + num2
local difference = num1 – num2
return sum, difference
end
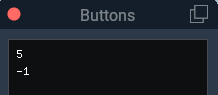
local sum, difference = testFunc(2, 3)
imgui.TextUnformatted(sum)
imgui.TextUnformatted(difference)
実際に使ったスクリプト例
合計と差の2つが返される
-- ウインドウの作成
wnd = float_wnd_create(200, 100, 1, true)
float_wnd_set_title(wnd, "Buttons")             --wnd変数をセット
float_wnd_set_imgui_builder(wnd, "im_on_build") --関数を読み込みセットする

--自作関数
local function testFunc(num1, num2)
	local sum = num1 + num2
	local difference = num1 - num2
	return sum, difference
end

--ウインドウを表示
function im_on_build(wnd, x, y)
	local sum, difference = testFunc(2, 3)
	imgui.TextUnformatted(sum)
	imgui.TextUnformatted(difference)
end

-- window close
function polo_onclose(polo_wnd)
	float_wnd_destroy(polo_wnd) --消し去る
end
その他の関数テクニック
イベントトリガー関数
関数は常にコマンドで呼び出す必要はありません。イベントを通じて呼び出すこともできる。
匿名関数
関数は匿名で作成できる。つまり、名前を割り当てる必要はない。
これは、たとえばdelay() 呼び出しや PlayerAdded イベント接続など、別の関数またはイベントの結果から関数を呼び出す必要がある場合に役立ちます。
delay(2, function(exactTimeElapsed)
imgui.TextUnformatted(exactTimeElapsed)
end)
local Players = game:GetService(“Players”)
Players.PlayerAdded:Connect(function(player)
imgui.TextUnformatted(player.Name .. ” joined the game!”)
end)
無名関数は、それを含む関数またはdelay()や:Connect() などのイベントの終了)の前に終了クロージャを必要とすることに注意してください。
テーブル内の関数
関数はLuaデータ型であるため、テーブルに格納できる。
この手法は、モジュールのテーブルにさまざまな関数が含まれているModuleScriptで一般的に使用される。
local MathModule = {}
function MathModule.testFunc(num1, num2)
local sum = num1 + num2
return sum
end
function MathModule.subtracTestFunc(num1, num2)
local difference = num1 – num2
return difference
end
return MathModule
Once contained in the module’s table, these functions can be called by any script which accesses the ModuleScript via require():
モジュールのテーブルに含まれると、require() を介してModuleScriptにアクセスするスクリプトからこれらの関数を呼び出すことができる。
local ReplicatedStorage = game:GetService(“ReplicatedStorage”)
— モジュールが必要
local MathModule = require(ReplicatedStorage:WaitForChild(“MathModule”))
local sum = MathModule.addNumbers(2, 3)
imgui.TextUnformatted(sum)
local difference = MathModule.subtractNumbers(2, 3)
imgui.TextUnformatted(difference)
ondrowでボタン関数を作成
float_wnd_set_ondrawにはボタンの関数が無いので関数を作成して使用する。
実際に使う場合は、同じパターンで使う以外はいいが、パラメーターに色々入れるとなると結局は元の関数をそのまま使った方が早い場合がある。
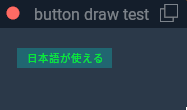
9行目から30行目までがボタン関数になる。36行でそのボタン関数を使用してボタンを作成している。
この場合、ボタンの高さの変更は関数内の27行の最後のpos_top数字を変更する必要がある。これを変更するとテキストの上下位置がおかしくなるので、それも29行目のpos_topで変更する必要がある。
--初期設定
local polo_wnd = nil									-- window handle
local winLeft, winTop, winRight, winBottom = 0,0,0,0	-- float_wnd_get_geometry
local dWidth, dHeight = 0,0

-- functions ------------------------------------------------------------------
-- ここで作成した関数を下で使うことになる。
-- ボタンボックスを描画します-テキストの左の開始、テキストの右の終了、テキストの高さ、テキスト、ボタンの色
local function button_draw(pos_left,pos_top,text_left,pos_right,text_value,text_color)
	dWidth, dHeight = float_wnd_get_dimensions(polo_wnd)--ウインドウの幅と高さを取得
	winLeft, winTop, winRight, winBottom = float_wnd_get_geometry(polo_wnd)--ウインドウの左位置、上位置、右位置、下位置を取得

	local x1 = winLeft	--ウインドウの左からの位置
	local x2 = winLeft	--ウインドウの左からの位置
	local y1 = winTop	--ウインドウの上からの位置
	local y2 = winTop	--ウインドウの上からの位置

	local r,g,b = 0,0,0		--	何も指定にしない場合のボタンテキストカラー
    --色をテキストで指定できるようにするため
	if (text_color == "green") then
		r,g,b = 0,1,0	-- green
	elseif (text_color == "yellow") then
		r,g,b = 1,1,0	-- gray
	end

	graphics.set_color( 0, 1, 1, 0.2 )
	graphics.draw_rectangle(x1 + pos_left + 0, y1 - pos_top - 0, x2+pos_right + 0, y2 - pos_top - 20)   --長方形
	--graphics.draw_rectangle(x+10, y-0, x+50, y-30)
	draw_string(x1 + pos_left + text_left, y1 - pos_top - 13, text_value, r,g,b)
end -- function button_draw
-- 実際のウインドウをここで作成
function polo_ondraw(polo_wnd, x, y)--xとyはウィンドウの原点、つまり左下、xは右に向かって増加し、yは上に向かって増加
	-- draw box around window
	XPLMSetGraphicsState(0,0,0,1,1,0,0)
    --ボタンの左から、上からの位置、テキスト先頭の位置、ボタンの長さ。
	button_draw(10, 10, 10, 105, "日本語が使える", "green")
end	-- function polo_ondraw

-- window close
function polo_onclose(polo_wnd)
	float_wnd_destroy(polo_wnd) --消し去る
end

--if(not polo_wnd) then
polo_wnd = float_wnd_create(171, 62, 1, false)
float_wnd_set_title(polo_wnd, "button draw test")
float_wnd_set_position(polo_wnd, 180, 150)
float_wnd_set_ondraw(polo_wnd, "polo_ondraw")
float_wnd_set_onclose(polo_wnd, "polo_onclose")
imgui_builderでボタン関数を作成
簡単に2つのパラメーターを設定して作成しているが、他にも位置、ボタンカラー、画像などの色んなパラメーターを設定できるが、ボタンの場合は基本のボタンをそのまま入れたほうが簡単かも。
7〜16行目までが自作の関数になり、20、21行がその関数を使ってボタンを作成している。
7行目に(button_label,text_label)と2つのパラメーターを宣言している。
------------------------------------------------------------------------
-- ウインドウの作成
wnd = float_wnd_create(400, 200, 1, true)
float_wnd_set_title(wnd, "Buttons")             --wnd変数をセット
float_wnd_set_imgui_builder(wnd, "im_on_build") --関数を読み込みセットする
------------------------------------------------------------------------
local function button_draw(button_label,text_label)
  if imgui.Button(button_label, 120, 65) then

  end
  --local text = text_label
  local text_size = imgui.CalcTextSize(text_label)  --テキストのサイズを取得
  --68はボタンの中心位置、テキストサイズを半分にして引くとボタンに対してテキストが中心になる。
  imgui.SetCursorPos(68 - (text_size / 2), imgui.GetCursorPosY())--パラメーターは、Xの位置と、Yの位置
  imgui.TextUnformatted(text_label)
end

--ボタンを作成するための関数
function im_on_build(wnd, x, y)
  button_draw("Button-1","Edit-1")
  button_draw("Button-2","Edit-2")
end
-- window close
function polo_onclose(polo_wnd)
  float_wnd_destroy(polo_wnd) --消し去る
end