

枠の上にマウスが乗ったら枠の色を変化させる
単純に枠の上にマウスが乗ったら枠の色を変えるということ。
8行目のMOUSE_XとMOUSE_Yで枠の中にマウスが入るスペースを設定するだけで、マウスの動きを取得することができる。その下にマウスが乗った時の色と外れた時の色を指定。
13行目で枠を作成、その下がテキストを枠の中に入るようにポジションを設定。
function on_draw(fwl_wnd, x, y)
-- 以下により左上が原点になる(winRight, winBottomを指定すると右下が原点?)
-- winLeftとwinRightで左右のウインドウ幅を取得している。左が原点なのでこれは使わず「x」が使用されている。
-- 天地の場合、上を原点にするので「winTop - winBottom」で天地幅を取得して「y」に天が原点になるように設定されている。
winLeft, winTop, winRight, winBottom = float_wnd_get_geometry(fwl_wnd)
---------------------------------------------------------------------------------------------------
-- マウスオンでバック帯表示----------
if (MOUSE_X >= x + 20 and MOUSE_X <= x + 230 and MOUSE_Y >= y + winTop - winBottom - 4 - (20 * 2) and MOUSE_Y <= y + winTop - winBottom +10 - (20 * 2)) then
graphics.set_color(0, 1, 1, 0.5)
else
graphics.set_color(0, 1, 1, 0.2)
end
graphics.draw_rectangle(x + 20, y + (winTop - winBottom) + 12 - (20 * 2), x + 230, y + (winTop - winBottom) - 6 - (20 * 2))
draw_string(x + 30, y + (winTop - winBottom) - (20 * 2), "DCバッテリースイッチをオンにする", "white") --テキスト、white yellow magenta grey green red cyan
------------------------------------------------------------------------------
-- マウスオンでバック帯表示----------
if (MOUSE_X >= x + 20 and MOUSE_X <= x + 230 and MOUSE_Y >= y + winTop - winBottom - 4 - (20 * 3) and MOUSE_Y <= y + winTop - winBottom + 10 - (20 * 3)) then
graphics.set_color(0, 1, 1, 0.5)
else
graphics.set_color(0, 1, 1, 0.2)
end
graphics.draw_rectangle(x + 20, y + (winTop - winBottom) + 12 - (20 * 3), x + 230, y + (winTop - winBottom) - 6 - (20 * 3))
draw_string(x + 30, y + (winTop - winBottom) - (20 * 3), "STANDBY POWERをAUTOにする", "white") --テキスト
------------------------------------------------------------------------------
-- マウスオンでバック帯表示----------
if (MOUSE_X >= x + 20 and MOUSE_X <= x + 230 and MOUSE_Y >= y + winTop - winBottom - 4 - (20 * 4) and MOUSE_Y <= y + winTop - winBottom + 10 - (20 * 4)) then
graphics.set_color(0, 1, 1, 0.5)
else
graphics.set_color(0, 1, 1, 0.2)
end
graphics.draw_rectangle(x + 20, y + (winTop - winBottom) + 12 - (20 * 4), x + 230, y + (winTop - winBottom) - 6 - (20 * 4))
--テキスト-------------------------------
draw_string(x + 30, y + (winTop - winBottom) - (20 * 4), "GRD PWRをONスイッチをオンにする", "white") --テキスト
------------------------------------------------------------------------------
end -- function on_draw
---------------------------------------------------------------------------------------------
-- 単色の背景の場合は1、透明の場合は3
fwl_wnd = float_wnd_create(280, 120, 1, true)
float_wnd_set_title(fwl_wnd, "FlyWithLua Test")
float_wnd_set_position(fwl_wnd, 100, 200)
float_wnd_set_ondraw(fwl_wnd, "on_draw")
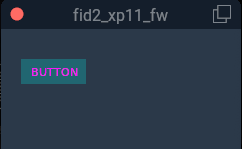
float_wnd_set_onclose(fwl_wnd, "on_close")枠のクリックで何か動作させる
枠をクリックでテキストの色を変える
枠をクリックするとテキストの色が変わる。更にクリックで元に戻るトグルになる。
float_wnd_set_onclickを使うのがポイント。
local click_ON = 0	--初期設定はマゼンタ

-- XPLM CreateWindowEx による幅、高さ、装飾スタイル。 1 は無地の背景、3 は透明の場合
wnd3 = float_wnd_create(220, 100, 1, false)
float_wnd_set_title(wnd3, "fid2_xp11_fw")
float_wnd_set_position(wnd3, 600, 500)
float_wnd_set_ondraw(wnd3, "on_draw3")
float_wnd_set_onclick(wnd3, "on_click3")
float_wnd_set_onclose(wnd3, "on_close3")

-- ここでウインドウを作成、原点は左下、x は右に増加し、y は上に増加。
function on_draw3(wnd3, x3, y3)
	XPLMSetGraphicsState(0, 0, 0, 1, 1, 0, 0)

	graphics.set_color( 0, 1, 1, 0.2 )  --四角の色
	graphics.draw_rectangle(x3 + 10, y3 + 55, x3 + 75, y3 + 80)--四角、左下が起点

	if (click_ON == 0) then
		draw_string(x3 + 20, y3 + 64, "BUTTON", "magenta")
	else
		draw_string(x3 + 20, y3 + 64, "BUTTON", "yellow")
	end

end

-- スペース範囲を設定、クリックで1になる。左下が原点。
function on_click3(wnd3, x3, y3, state)
	-- 上の四角のスペースと同じ位置を設定する。
	if (state == 1 and x3 >= 10 and x3 <= 75 and y3 >= 55 and y3 <= 80) then
		click_ON = 1 - click_ON -- これでトグルになる。
	end
end

function on_close(wnd3)end