
X-Plane コクピットの自作に挑戦!
X-Plane スロットルのコントロール
Arduinoでスロットルサーボのスケッチを選択
Arduinoで「スケッチの例」メニューから「ThrottleServo」を選択。
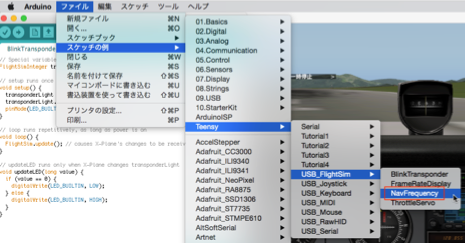
この画面は「NavFrequency」になっていますが、「ThrottleServo」はその下です。
ThrottleServoのスケッチを最初から簡単に説明します(Arduionではプログラムのことをスケッチという)
#include <Servo.h>

Servo motor;                      // an RC Servo motor
FlightSimFloat throttle;          // access to X-Plane's throttle
const int motorPin = 2;
const int potentiometerPin = A0;  // Analog 0: Teensy = 23, T++ = 38
int previousAnalog = -100;
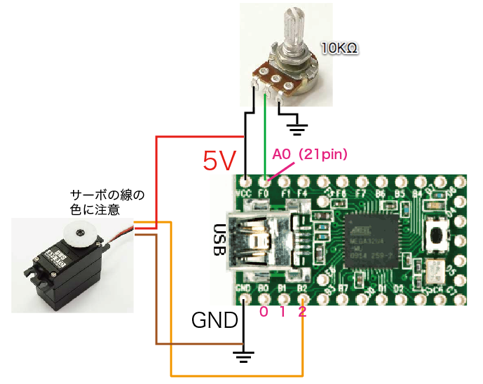
5行目からの const int motorPin = 2; はサーボは2番ピンを指定しています。
6行目の const int potentiometerPin = A0; はボリュームを繋ぐピンですが、A0はTeensy 2.0では21番ピンになります。
Teensyに書き込みます。

ここまで完了すれば、後は配線を済ませて、X-Planeを起動するだけです(セスナ172SPを使用していますが、どの機体でも同じです)。
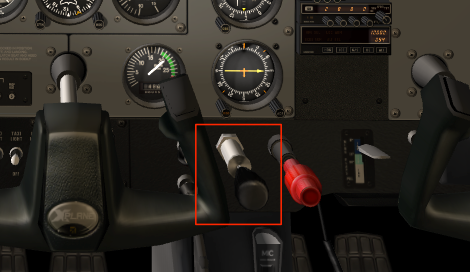
X-Planeが起動し、間違いなく設定できていたら、ボリュームを回すと、下の画面のレバーが移動して実際にスロットルをコントロールします。
6行目の const int potentiometerPin = A0; はボリュームを繋ぐピンですが、A0はTeensy 2.0では21番ピンになります。
Teensyに書き込みます。
ここまで完了すれば、後は配線を済ませて、X-Planeを起動するだけです(セスナ172SPを使用していますが、どの機体でも同じです)。
X-Planeが起動し、間違いなく設定できていたら、ボリュームを回すと、下の画面のレバーが移動して実際にスロットルをコントロールします。
ThrottleServo.ino
#include <Servo.h>

Servo motor;                      // an RC Servo motor
FlightSimFloat throttle;          // access to X-Plane's throttle
const int motorPin = 2;
const int potentiometerPin = A0;  // Analog 0: Teensy = 23, T++ = 38
int previousAnalog = -100;

// setup runs once, when Teensy boots.
//
void setup() {
  motor.attach(motorPin);
  throttle = XPlaneRef("sim/flightmodel/engine/ENGN_thro[0]");
  throttle.onChange(viewThrottle);
  Serial.begin(9600);
  Serial.println("Throttle Demo");
}

// loop runs repetitively, as long as Teensy is powered up
//
void loop() {
  // normally the first step in loop() should update from X-Plane
  FlightSim.update();

  // when human motion chances the port, change throttle
  int analog = analogRead(potentiometerPin);

  // "more than 6" allows for some noise
  if (analog < previousAnalog - 6 || analog > previousAnalog + 6) {
    throttle = analog / 1023.0;
    previousAnalog = analog;
    int angle = throttle * 70.0 + 30.0;
    motor.write(angle);
    Serial.print("(Analog)  Throttle = ");
    Serial.println(throttle);
  }
}

// When X-Plane changes the throttle....
//
void viewThrottle(float val)
{
  int angle = val * 70.0 + 30.0;
  motor.write(angle);
  Serial.print("(X-Plane) Throttle = ");
  Serial.println(throttle);
}
- 低価格コクピットの自作
- DataRefEditor
- プルアップとプルダウン
- Nav1の周波数の設定をロータリーエンコーダで行う
- スロットルコントロール
- イグニッションキーコントロール
- 針路バグコントロール
- 針路バグとエレベータトリムの切り替え
- 回転動作を粗いと微細で設定 & 3つのモードの切り替え
- ギアのアップダウンコントロール
- ロータリーエンコーダの色々な数値の設定
- トグルスイッチコントロール
- ロータリースイッチコントロール
- Teensy&キーボードボタン
- Teensy&ジョイスティックボタン
- プッシュスイッチでトグルを実現
- プッシュスイッチでLEDをONにしたままにする
- Teensy & I2C接続キャラクターLCDモジュール
- 7セグで数字を表示
- X-Plane LED ON/OFF
- マウスホイールの活用
- B 737-800
- B747-400
- B 777 Worldliner
- SiteMap
Contents