 Macな暮らし
Macと気ままな暮らし、コーヒーとiTunesのカントリーを聞きながら。
Macな暮らし
Macと気ままな暮らし、コーヒーとiTunesのカントリーを聞きながら。

ボタンやロゴをきれいに作成できるソフト。無料ではあるが思った以上にその出来映えにビックリ!

Art Text 2 Lite
Art Text 2 Liteはロゴやアプリケーションのアイコン、およびボタン等ウェブ用のグラフィックスを作成するためのレイヤーベースで設計されたアプリケーションです。アートテキストライトを使えば、PhotoshopやIllustratorなどの専門的な知識がなくても結果が得られます。
Art Text 2 Liteを使用するためのいくつかのアイデア入手可能です:
●宣伝パンフレットやチラシ用キャッチー見出し。 Keynoteのプレゼンテーション用
●ユニークなタイトル
●今後のiPhone / iPadアプリケーション用アイコン
●新しいビジネスベンチャーのためのロゴ
●クライアントのサイトのWebグラフィックス✧カスタマイズ可能なテンプレート✧アートテキストLite内のテンプレートギャラリーは35。完全にカスタマイズ可能なテンプレートが付属しています(フルで300バージョン)の見出し、ボタン、アイコン、およびロゴのため。ベクタグラフィックスと✧作業は✧28のベクトルアイコン(完全版で590)と図形のライブラリを使用すると、ウェブのための会社のロゴやグラフィックを設計するための完全なパレットを提供します。
フルバージョンはたったの$ 19.99です。
http://www.belightsoft.com/resources/ATGettingStartedGuide.pdfスタートアップガイドはここ(まずはこれから)
http://www.belightsoft.com/resources/ATUsersManual.pdf英語のマニュアルはここ
http://www.belightsoft.com/products/arttext/screencasts.php ビデオで詳しく説明してある(非常に分かりやすのでオススメ)
http://www.belightsoft.com/resources/ATUsersManual.pdf英語のマニュアルはここ
http://www.belightsoft.com/products/arttext/screencasts.php ビデオで詳しく説明してある(非常に分かりやすのでオススメ)
BeLight Software Art Text User’s Manual
Version 2 July 2010
(C) 2010 BeLight Software, Ltd. All rights reserved.
BeLight Software, Ltd. reserves the right to improve, enhance and revise its products without notice.
The information in this document is furnished for informational use only, is subject to change without notice, and should not be constructed as a commitment by BeLight Software, Ltd. BeLight Software assumes no liability for any errors or inaccuracies that may appear in this document.
All trademarks, product and/or brand names mentioned in this publication, are the sole property of their respective owners.
Written by Nick Shubin. Thanks to Irina Stepanovska for help with the creation of this publication.
Art Text End User License Agreement 3
Art Text End User License Agreement
THIS LICENSING AGREEMENT (“AGREEMENT”) IS A LEGAL AGREEMENT BETWEEN YOU, EITHER AN INDIVIDUAL OR A SINGLE ENTITY, AND BELIGHT SOFTWARE (“LICENSOR”). IF YOU DO NOT AGREE TO EACH AND EVERY TERM, YOU ARE TO CLICK “DISAGREE” BUTTON AND NOT TO OPEN, USE OR INSTALL THE SOFTWARE AND YOU MUST DELETE THE SOFTWARE FROM YOUR COMPUTER AND/OR ANY OTHER DATA STORAGE DEVICE.
1. GENERAL The software and documentation accompanying this License whether on disk, on any other media (collectively the “Software”) are licensed to you by BeLight Software (“Licensor”) for use only under the terms of this License, and Licensor reserves all rights not expressly granted to you. The rights granted herein do not include any other patents or intellectual property rights.
Title and intellectual property rights in and to any content displayed by or accessed through the Software belong to the respective content owner. This License does not grant you any rights to use such content.
2. LICENSE Licensor hereby grants to You, and You accept, a non-exclusive license to install and use Software and Documentation, only as authorized in this license. You agree that You will not assign, sub license, transfer, pledge, lease, rent, or share Your rights under this license. You may not reverse engineer, decompile or disassemble the Licensed Software for any purpose whatsoever.
3. TRANSFER You may not distribute copies of the Software to any third party, nor may you use, rent, loan, sublicense, or lease the Software to third parties. You may, however, transfer all your rights to use the Software to another person or legal entity provided that: (a) You also transfer this Agreement, the Software and all other software bundled or pre-installed with the Software, including all copies, Updates and prior versions, to such person or entity; (b) You retain no copies, including backups and copies stored on a computer; and (c) the receiving party accepts the terms and conditions of this Agreement and any other terms and conditions upon which You legally obtained license to the Software. Notwithstanding the foregoing, You may not transfer pre-release or not for resale copies of the Software.
4. ILLEGAL USE You are not to use the Software, whether directly or indirectly, for any illegal purpose under the laws or ordinances of Federal, State, or local governments. It is Your sole responsibility to know and understand the laws and/or ordinances that govern the use of the Software. In the event that You violate any Federal, State or local law or ordinance by direct or indirect use of the Software, You shall take full legal responsibility for such illegal use. You shall hold Licensor harmless and without fault and otherwise indemnify Licensor for any damage, cost or liability incurred by Licensor as a result of any use, whether or not such use is within the scope of the license set forth herein.
4 Art Text User’s Manual
5. UPDATES You may continue to use the previous version of the Software on your computer after You receive the Update to assist You in the transition to the Update, provided that: the Update and the previous version are installed on the same computer; the previous version or copies thereof are not transferred to another party or computer unless all copies of the Update are also transferred to such party or computer; and You acknowledge that any obligation BeLight Software may have to support the previous version of the Software may be ended upon availability of the Update.
6. LICENSOR’S RIGHTS You acknowledge and agree that the Software and Documentation consists of proprietary, published and unpublished property of Licensor. You further acknowledge and agree that all right, title, and interest in and to the Software and Documentation are and shall remain with Licensor. This license conveys to You the right to install and use the Software and Documentation in accordance with the terms of this license. All rights not expressly granted here are reserved by BeLight Software. The Licensor will not transmit your personal information to any third party without your express consent.
7. TERMINATION This license is effective upon Your installing the software on any machine, and shall continue until terminated. You may terminate this Agreement at any time. The Licensor may immediately terminate this License Agreement if you breach any representation, warranty, agreement or obligation contained or referred to in this License Agreement. Upon termination, you must dispose of the Software and all copies or versions of the Software by destroying the Software.
8. LIMITED WARRANTY BeLight Software provides a thirty (30) day money-back guarantee on the Software. If, during this period, you are dissatisfied with the Software for any reason, BeLight Software will refund your money if you return the Software and all copies to the place of purchase within thirty (30) days of the date of the original purchase. THE FOREGOING IS THE SOLE AND EXCLUSIVE WARRANTY OFFERED BY BELIGHT SOFTWARE. BELIGHT SOFTWARE DISCLAIMS ALL OTHER WARRANTIES, EXPRESS OR IMPLIED, INCLUDING BUT NOT LIMITED TO THE IMPLIED WARRANTIES OF MERCHANTABILITY AND FITNESS FOR A PARTICULAR PURPOSE, WITH REGARD TO THE LICENSED SOFTWARE AND ALL ACCOMPANYING MATERIALS. BELIGHT SOFTWARE AND ITS AGENTS DO NOT AND CANNOT WARRANT THE PERFORMANCE OR RESULTS YOU MAY OBTAIN BY USING THE SOFTWARE.
9. LIMITATION OF LIABILITY IN NO EVENT WILL BELIGHT SOFTWARE OR ITS AGENTS BE LIABLE TO YOU FOR ANY DAMAGES, CLAIMS OR COSTS WHATSOEVER OR ANY CONSEQUENTIAL, INDIRECT, INCIDENTAL DAMAGES, OR ANY LOST PROFITS OR LOST SAVINGS. BELIGHT SOFTWARE’S AGGREGATE LIABILITY AND THAT OF ITS AGENTS UNDER OR IN CONNECTION WITH THIS AGREEMENT SHALL BE LIMITED TO THE AMOUNT PAID FOR THE SOFTWARE, IF ANY.
Table of Contents 5
10. FEES You may register your copy of the Software by purchasing a License Code for the download version at: http://www.belightsoft.com/buy/ You may not distribute the License Code. By clicking “Agree”, you acknowledge that you have paid the Licensor all applicable license fees for the Software.
11. SEVERABILITY Should any term of this license be declared void or unenforceable by any court of competent jurisdiction, such declaration shall have no effect on the remaining terms hereof.
12. GENERAL PROVISIONS This License Agreement is personal between You and BeLight Software. It is not transferable and any attempt by You to rent, lease, sublicense, assign or transfer any of the rights, duties or obligations hereunder. YOU ACKNOWLEDGE THAT YOU HAVE READ THIS AGREEMENT, UNDERSTAND IT AND AGREE TO BE BOUND BY ITS TERMS AND CONDITIONS. YOU FURTHER AGREE THAT IT IS THE COMPLETE AND EXCLUSIVE STATEMENT OF THE AGREEMENT BETWEEN YOU AND BELIGHT SOFTWARE WHICH SUPERSEDES ANY PROPOSAL OR PRIOR AGREEMENT, ORAL OR WRITTEN, AND ANY OTHER COMMUNICATIONS BETWEEN YOU AND BELIGHT SOFTWARE OR BELIGHT SOFTWARE’S AGENT(S) RELATING TO THE LICENSED SOFTWARE.
If you have any questions regarding this Agreement or if you wish to request any information from BeLight Software please use the address and contact information included with this product to contact BeLight Software.
© 2010 BeLight Software, Ltd. All Rights Reserved. BeLight Software and Art Text are trademarks of BeLight Software, Ltd. Mac, the Mac logo, Mac OS X, iPhoto, and Macintosh are trademarks of Apple Computer, Inc. All other trademarks, registered trademarks, product and/or brand names are the sole property of their respective owners.
6 Art Text User’s Manual
Contents
Chapter 1: Introduction.................................. 9
Welcome to Art Text .............................................................. 9 System Requirements............................................................ 9 Installing and Removing Art Text ............................................. 9 Updating Art Text .................................................................10 Registration.........................................................................10 Technical Support.................................................................11 Useful Web Resources...........................................................11 Conventions Used in this Document ........................................12
Chapter 2: Getting Started ........................... 13 Setting up the Program after Installation ............................... 13 Quick Start Guide....................................................................15
Step 1: Opening a New Document..........................................15 Step 2: Setting Up the Image Size..........................................15 Step 3: Changing Text or Choosing an Image...........................16 Step 4: Applying Effects........................................................17 Step 5: Applying Transformation ............................................19 Step 6: Adding More Text or Graphic Objects ...........................20 Step 7: Organizing Layers in Your Document............................20 Step 8: Adding the Background..............................................22 Step 9: Saving Your Document...............................................23 Step 10: Exporting the Final Image ........................................23
The Effects Guide....................................................................24 Using Styles............................................................................28
Chapter 3: Art Text Interface ....................... 31 The Art Text Workspace..........................................................31 Program Settings....................................................................33 Art Text Menus ....................................................................... 35 Art Text Keyboard Shortcuts...................................................40
Chapter 4: Working with Documents ............ 43 Using Templates ..................................................................... 43 Creating, Opening and Saving Documents .............................. 44 Document Size........................................................................45
Chapter 5: Working with Layers ................... 47 Introduction to Layers and Objects ........................................47 Object Size and Location.........................................................48
Object Size..........................................................................48
Table of Contents 7
8
Art Text User’s Manual
Object Location....................................................................48
Managing Layers.....................................................................49
The Layers Panel..................................................................50
The Layer Bar ......................................................................52
The Layer Content Window.....................................................54
Editing Text .........................................................................54 Choosing a Shape ................................................................55 Choosing an Icon .................................................................55 Choosing a Custom Vector Image ...........................................56 Choosing an Image File.........................................................56
Merging Layers ....................................................................... 57
Join Layers..........................................................................58 Union Layers .......................................................................59 Subtract Layers....................................................................60 Intersect Layers...................................................................61
Splitting Layers ......................................................................62 Blending Layers......................................................................64 The Editor of Vector Shapes....................................................70
The Library of Custom Images ...............................................70 The Interface of the Editor.....................................................71 Points and Paths ..................................................................72 Drawing a Shape..................................................................74 Adding Anchor Points............................................................74 Deleting Anchor Points..........................................................74 Changing the Type of Anchor Points ........................................74 Moving Anchor Points............................................................74
Chapter 6: Graphic Tools and Effects ............ 75 Basics ..................................................................................... 75 The Fill Effect..........................................................................76 Applying Textures...................................................................78 Applying Materials..................................................................80 The Editor of Materials............................................................83
Materials Based on Shaders...................................................84 Parameters of Light Sources ..................................................86 Materials Based on Images....................................................87
The Stroke Effect .................................................................... 88 The Shadow Effect..................................................................89 The Glow Effect.......................................................................90 Transformations ..................................................................... 91
Geometric Transformations....................................................92 Spline Transformations..........................................................93 The Set Size Controls............................................................94
Chapter 7: Exporting .................................... 95 Exporting................................................................................95 Transparent Background ........................................................96
Chapter 1: Introduction
Welcome to Art Text
The Art Text application is intended for creating unique textual graphics by applying effects to text and vector shapes. Your work can be saved in the native Art Text format or in common graphic file formats.
Images created in Art Text can be used in publishing materials, on web pages, or in other applications.
In Art Text, you will find: • 2D effects (shadow, blur, stroke) • 3D effects (adjustable color, shape, light) • Transformation (geometric deformation of text or images)
The program is supplied with well tuned styles that can be applied to your original text or graphics.
The retail version of Art Text includes additional fonts.
System Requirements
• Apple Macintosh computer with PowerPC or Intel processor • Mac OS X v10.4.11 or later • 100 MB of available disk space
Installing and Removing Art Text
To install, double-click the Art Text installer in Finder. Then drag the Art Text icon into the Applications folder.
If you wish to remove the program from your computer please complete the following steps:
• Quit Art Text. • Delete the “Art Text 2” application from the Applications folder; • Delete “com.belightsoft.arttext2.plist” file from
“~/Library/Preferences/”, • Delete the “Art Text” folder from
“~/Library/Application Support/BeLight Software/”. Here “~“ is user’s home folder.
Chapter 1: Introduction 9
10 Art Text User’s Manual
Updating Art Text
From time to time, the software developer releases new versions of the product.
To change your copy to a new version, you just need to install an update. Before launching the update installer, make sure that the application and the supporting files are at the default location. Usually they are if you have followed the installation procedure and didn’t change paths or transfer files manually. The default file location can be found in the “Installing and Removing Art Text” section.
To check for the latest update, visit the Art Text Updates web page:
http://www.belightsoft.com/arttext/update
Registration
If you have already purchased Art Text from BeLight Software or its resellers, you will find the license code either on the back of the disc envelope (boxed retail edition) or in the purchase confirmation e-mail (retail or standard edition via download).
To register Art Text: 1. Open the application. 2. Bring up the License dialog by choosing Art Text > License... in the
menu. 3. Enter your name and license code.
It’s recommended that you keep the e-mail or the disc package containing your license code in a safe place in case you need to register the application after re-installation or update.
The unregistered version of Art Text is fully operational. The only limitation is that it adds the “Trial” text over the resulting image. To eliminate this text, you need to register your copy of the software.
You can purchase a license code on the developer’s web site:
http://www.belightsoft.com/buy/
Technical Support
The developer of Art Text offers free technical support. By E-mail:
support@belightsoft.com
Technical support form on BeLight’s website:
http://www.belightsoft.com/support/
Forum on BeLight’s website:
http://www.belightsoft.com/forum/
When reporting a problem, please make sure to specify: • The version of Art Text you are using. • The version of Mac OS X installed on your computer. • Your previous actions that could have lead to the problem. • If the problem persists, describe how to reproduce it.
• When necessary, illustrate your report with screenshots (press Cmd-Shift-3 to save a screenshot on your Desktop).
Useful Web Resources
Art Text Page:
http://www.belightsoft.com/arttext/
Information about Art Text, links to the Download, Latest Update, Buy, and FAQ sections.
BeLight Software Web site:
http://www.belightsoft.com
Check it out for updates, new product announcements, and special offers.
BeLight Software Technical Support:
http://www.belightsoft.com/support
Visit this link if you have questions about the software.
Chapter 1: Introduction 11
12 Art Text User’s Manual
Conventions Used in this Document
• Bold Text is used for names of menu items, shortcuts, buttons, radio buttons, edit boxes, check boxes and other controls.
• Text in Italics is used for names of windows, dialog boxes, panels, tabs and other elements of the program interface. Such text formatting is used for names of programs, files, folders and web links.
It is also used for chapter and section references, and to introduce important remarks.
• For menu items hierarchy, the “>” symbol is used. A record File > Open is equivalent to “the Open item under the File menu”.
• A shortcut (shortkey) is one or several keys which are pressed together. Cmd-S means you should hold down the Command (Apple) key while pressing the S key, then release them.
• Ctrl-click is a click holding the Ctrl key down. Right-click is a click by the right button of a two-button mouse. Both actions are equivalent.
• Context (contextual or shortcut) menu is a pop-up menu which contains options that vary depending on the object (image, text, etc.) you have clicked on. To open the context menu, right-click or Ctrl-click on the object.
Chapter 2: Getting Started 13
Chapter 2:
Getting Started
Setting up the Program after
Installation
The information below covers the most important settings to start your work with Art Text.
1. Register the program if you have purchased a license code. Otherwise, the program will work in the demo mode.
To do this, choose Art Text > License... from the menu to open the registration dialog box. Input your name and your license code.
After successful registration, the program will offer you online registration. You can register or skip registration.
By registering online, you are sending your data to the developer’s data base. This makes it possible to send your license code back to you in case it gets lost. The online registration does not turn the program from the demo to the registered mode.
14 Art Text User’s Manual
2. Set up the program Preferences (Art Text > Preferences...).
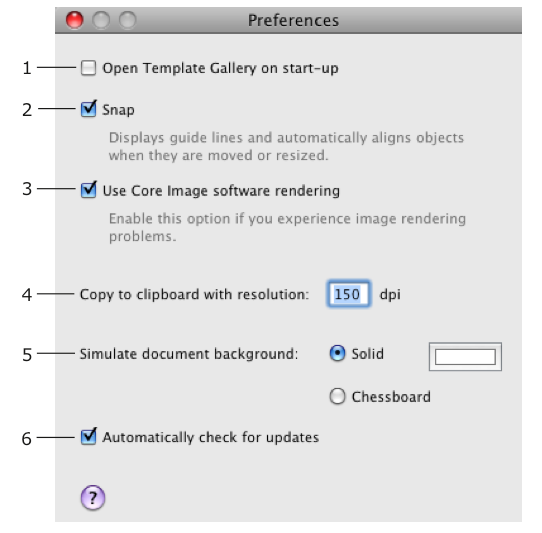
1 – Deselect the Open Template Gallery on start-up check box if you don’t use the built-in templates.
2 – Keep the Snap option enabled. Text and images will align to each other when you move them around.
3 – Keep the Use Core Image software rendering option disabled. In this case, rendering is quicker because the graphic card (not the CPU) does this job.
4 – The resolution of an image pasted in the clipboard. It is important when your work is finished and you are going to copy it to another program. Leave this parameter alone for now.
5 – Choose your preferable background. Working with white background is better for beginners as the preview area looks like an ordinary page. The chessboard background lets you see transparent parts of your design.
6 – Specifies whether the program automatically checks for updates. To check for updates manually, choose Art Text > Check for Updates...
More details can be found in Chapter 3, “Art Text Interface” > “Program Settings”.
Chapter 2: Getting Started 15
Quick Start Guide
This guide describes some possible steps of using Art Text. Steps described below and their order are not obligatory. Some of them can be skipped, performed several times, or in another order.
For a better understanding of the location and names of program controls, it is recommended that you look through “The Art Text Workspace” section.
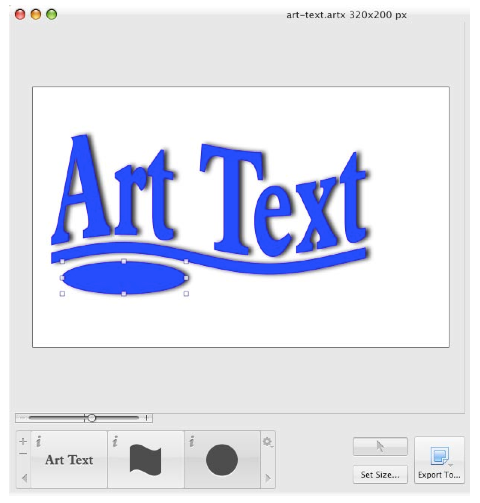
Step 1: Opening a New Document
To open a blank Art Text document, choose File > New. For learning purposes, you can load a template from the built-in collection
(File > Template Gallery) and then modify it. Step 2: Setting Up the Image Size
Set up the final image size (what will be exported to a file or another program). To do this, click the Set Size button in the main window. The white or chessboard-like background shows the image edges. Objects or their parts outside the image area will be trimmed at export.
You can change the image size at any time later.
16 Art Text User’s Manual
Step 3: Changing Text or Choosing an Image
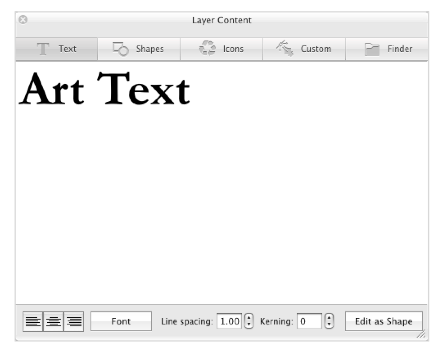
By default the “Art Text” text is displayed on the canvas. To change text or replace it with an image, double-click the “Art Text” icon in the bottom panel (Layer bar). This will bring up the Layer Content panel displaying the Text tab.
To choose a shape or icon, switch to the corresponding tab.

Once you have changed the layer content (text or image), close the panel. The icon in the Layer bar will change correspondingly.
Chapter 2: Getting Started 17
Step 4: Applying Effects
The color and fill related settings can be found in the Effects tab (4) of the right panel. You can choose color or gradient fill (1), texture library (2), or materials (3). You can also apply stroke (7), shadow (8), or glow (9) effects. The Geometry tab (5) is described below.

18 Art Text User’s Manual
Browse through the library of pre-designed styles (6). A style is a set of effects that can be applied at once. Styles are located in a separate tab.
You can preview them applied to your text or icon. To do this, deselect the Use Text from Templates check box at the bottom.

Chapter 2: Getting Started 19
Step 5: Applying Transformation
To change the shape of text or icon, open the Geometry tab in the right panel. It displays thumbnails of geometric transformations. Choose one by clicking on it and adjust the amount of distortion using the slider(s) below.
Handles on the corners and sides of the object frame can be moved with the mouse. Drag them to resize or change the shape (spline transformations only).

20 Art Text User’s Manual
Step 6: Adding More Text or Graphic Objects
Each new text or image should be located in a new layer. Icons of layers are shown in the Layer bar at the bottom of the main window.

To add a new layer, click the “+” button in the Layer bar. Unnecessary layers can be removed using the “–” button.
A new layer will contain the default text. Step 3 describes how to change it. Steps 4 and 5 describe how to apply effects to the content of new layers.
Step 7: Organizing Layers in Your Document
Note that depending on your design idea, this step can be performed after adding new layers, but before applying or adjusting any effects.
Two controls in Art Text are responsible for layers: Layer bar and Layers panel. The Layer bar is located at the bottom of the main window.
Chapter 2: Getting Started 21
The Layer bar displays icons of layers with layer content. When a layer is active, the icon is highlighted. When you apply effects or change their settings, the active layer is affected.
To add a new layer, click the “+” button. To remove the active layer, click the “-” button.
Layers overlap each other. The icon of the top layer is to the right in the Layer bar. The bottom layer is to the left. Drag an icon left of right in the bar to change the layer order.
The Layers panel displays names of all the layers in the document. You can drag them in the list to change the layer order. The panel lets you rotate layers and change their opacity and blend mode.
To open the panel, choose Window > Show Layers Panel from the menu.
22 Art Text User’s Manual
Step 8: Adding the Background
To add a background image or colored background:
1. Add a new layer.
2. Move its icon in the Layer bar to the leftmost position.
3. Double click the icon to open the Layer Content panel.
4. Open the Shapes tab of the panel.
5. Click on a rectangle and close the panel.
6. To choose a plain color or gradient, open the Fill tab in the Effects section.

Chapter 2: Getting Started 23
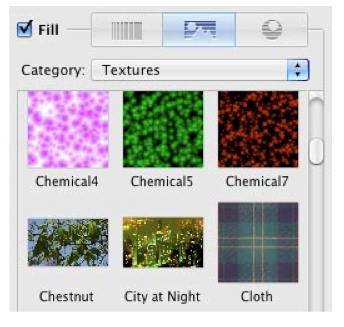
To choose an image, open the Texture tab in the Effects section. Click the Category drop-down list and choose a library section. Then click on an image. To select an image located on the hard drive, choose the Finder item in the Category drop-down. Select a folder containing images.
Step 9: Saving Your Document
To save your document, choose File > Save in the menu.
Step 10: Exporting the Final Image
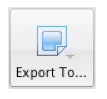
To export your work, click the Export To... button in the main window. Then choose the destination: the clipboard or a graphic file.
The resolution of the image pasted into the clipboard can be set in the program Preferences (Cmd-,).
When you are exporting to a file, choose the graphic format, resolution, and type a file name. Some formats have more export options.
24 Art Text User’s Manual
The Effects Guide
Below are represented graphic effects that can be applied in Art Text.
Color fill
Relates information: Chapter 6, “Graphic Tools and Effects” > “The Fill Effect”

Gradient fill
Relates information: Chapter 6, “Graphic Tools and Effects” > “The Fill Effect”

Stroke
Relates information: Chapter 6, “Graphic Tools and Effects” > “The Stroke Effect”

Texture
Relates information: Chapter 6, “Graphic Tools and Effects” > “Applying Textures”

Material
Relates information: Chapter 6, “Graphic Tools and Effects” > “Applying Materials”

Image-based material
Relates information: Chapter 6, “Graphic Tools and Effects” > “Applying Materials”

Chapter 2: Getting Started 25
26 Art Text User’s Manual
Transformation
Relates information: Chapter 6, “Graphic Tools and Effects” > “Transformations”

Spline transformation
Relates information: Chapter 6, “Graphic Tools and Effects” > “Transformations”

Shadow
Relates information: Chapter 6, “Graphic Tools and Effects” > “The Shadow Effect”

Chapter 2: Getting Started 27
Glow
Relates information: Chapter 6, “Graphic Tools and Effects” > “The Glow Effect”

28 Art Text User’s Manual
Using Styles
A style is a set of effects that can be applied at once. Styles are located in the Styles tab of the right side panel. Choose View > Styles Panel to open it.
Styles are grouped into categories. You can choose a category in a pop-up menu at the top. You can add custom styles to the library.
To apply a style, select it in the side panel. The selected style will be applied to the active layer.
Parameters of applied effects can be saved as a custom style. This is useful when you need to create several pieces of text or several images with the same effects.
To add a new style, click the “+” button.
To remove a custom style, select it in the list and click the “-” button. Built-in styles cannot be removed.
The Use content from style option lets you choose whether to show the selected style with the default content or with your own. Note that the default content was selected as the best for demonstrating the style.
Chapter 2: Getting Started 29

30 Art Text User’s Manual
Chapter 3: Art Text Interface
Chapter 3: Art Text Interface
The Art Text Workspace
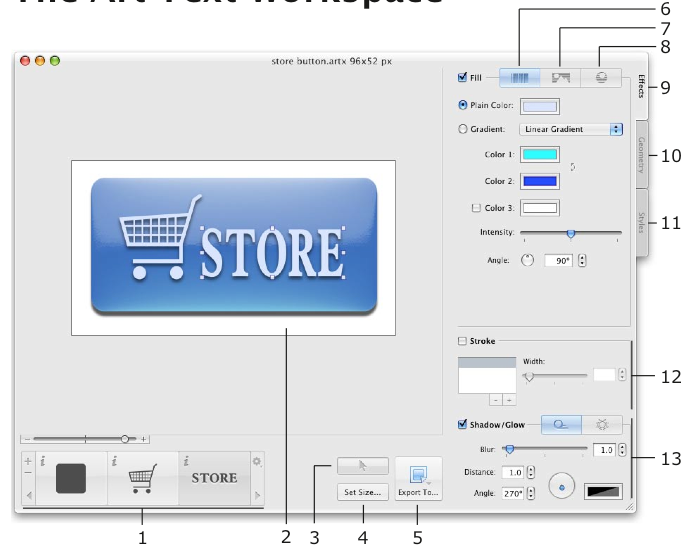
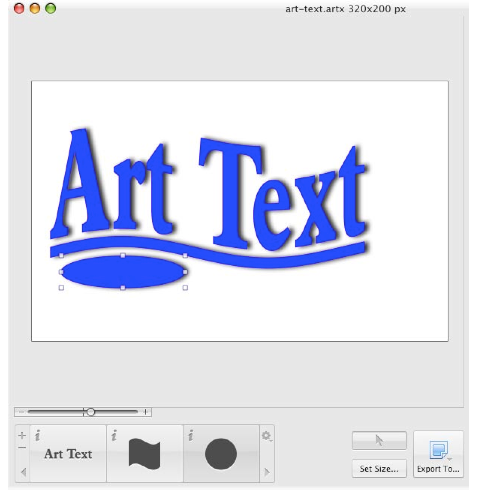
1 – The Layer bar displays icons of all layers in your document. It lets you add and delete layers, change their stacking order, and change the layer content.
2 – Canvas. This is the area where you preview the image.
3 – The “Hide/Show Layer Border” button. Handles on the border are used for resizing objects.
4 – The Set Size button. Click it to change the document size (dimensions of the final image).
5 – The “Export To...” button. Click it to copy the image to the clipboard or export it to a graphic file.
32 Art Text User’s Manual
6 – The plain color and gradient fill tools.
7 – The texture library.
8 – The material library.
9 – The Effects tab contains the Fill section, the texture and material libraries.
10 – The Geometry tab contains transformation patterns.
11 – The Styles tab contains the library of styles (pre-designed sets of effects that can be applied at once).
12 – The Stroke tool. 13 – The Shadow and Glow tools.
Chapter 3: Art Text Interface 33
Program Settings
To open program settings, use the Art Text > Preferences menu. 1

1 – Open the built-in library of templates when the program starts. 2 – Automatically align an object to other objects when you move or resize it.
3 – Use Core Image software renderer – activates software rendering instead of rendering by the graphic processor. Select this check box when the exported image contains artifacts (for instance, unwanted vertical or horizontal lines across the image). Software rendering may be slower than rendering by the graphic processor.
4 – Resolution of images copied to the clipboard. It is important when you copy the final image to another application.
5 – Color of the document background. It is simulated on the canvas. The chessboard background lets you see transparent parts of your design. The Solid color is used for the background of the exported image if the selected graphic format doesn’t support transparency (see Chapter 7,
“Exporting” > “Transparent Background”).
34 Art Text User’s Manual
6 – Specifies whether the program automatically checks for updates. To check for updates manually, choose
Art Text > Check for Updates...
Chapter 3: Art Text Interface 35
Art Text Menus
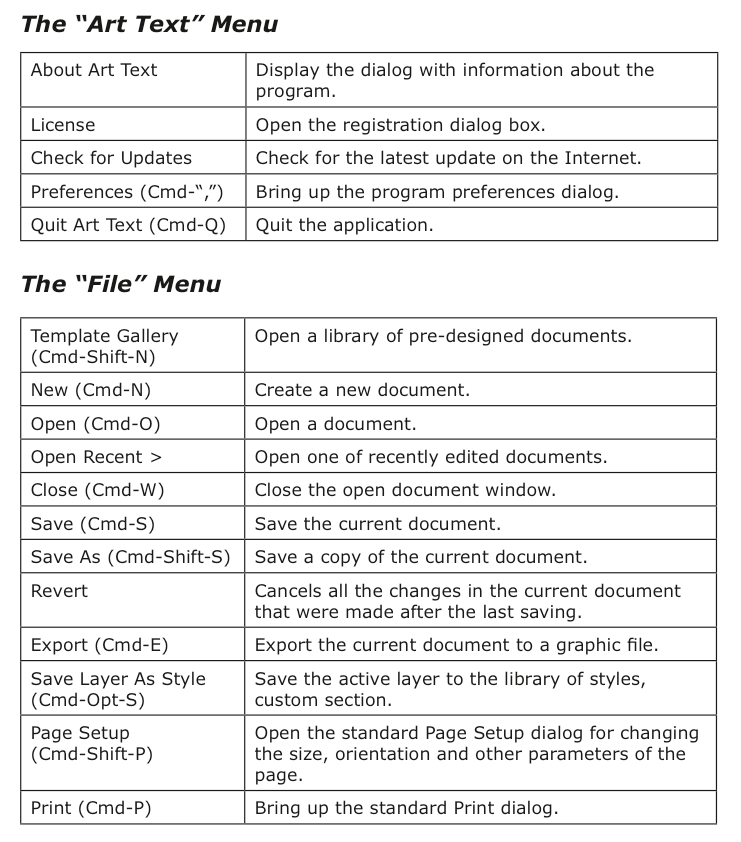
The “Art Text” Menu
The “File” Menu
About Art Text
Display the dialog with information about the program.
License
Open the registration dialog box.
Check for Updates
Check for the latest update on the Internet.
Preferences (Cmd-“,”)
Bring up the program preferences dialog.
Quit Art Text (Cmd-Q)
Quit the application.
Template Gallery (Cmd-Shift-N)
Open a library of pre-designed documents.
New (Cmd-N)
Create a new document.
Open (Cmd-O)
Open a document.
Open Recent >
Open one of recently edited documents.
Close (Cmd-W)
Close the open document window.
Save (Cmd-S)
Save the current document.
Save As (Cmd-Shift-S)
Save a copy of the current document.
Revert
Cancels all the changes in the current document that were made after the last saving.
Export (Cmd-E)
Export the current document to a graphic file.
Save Layer As Style (Cmd-Opt-S)
Save the active layer to the library of styles, custom section.
Page Setup (Cmd-Shift-P)
Open the standard Page Setup dialog for changing the size, orientation and other parameters of the page.
Print (Cmd-P)
Bring up the standard Print dialog.
36 Art Text User’s Manual

The “Edit” Menu
The “View” Menu
Undo (Cmd-Z)
Reverse the last operation you performed.
Redo (Cmd-Shift-Z)
Reverse the last Undo operation.
Cut (Cmd-X)
Cut selected text (in the text editor only).
Copy Selected (Cmd-C)
Copy selected layer(s) into the Clipboard.
Copy All Layers (Cmd-Opt-C)
Copy all layers into the Clipboard.
Paste (Cmd-V)
Paste the content of the Clipboard.
Select All (Cmd-A)
Select all layers if the main window is activated. Select all text in the text editor if the Layer Content window is activated.
Duplicate (Cmd-D)
Duplicate the selected layer(s).
Document Size (Cmd-Y)
Open the Document Size dialog box.
Special Characters (Cmd-Opt-T)
Open the Special Characters palette.
Zoom In (Cmd-=)
Zoom in the current view.
Zoom Out (Cmd-“-”)
Zoom out the current view.
Actual Size
Display the actual document size.
Effects Panel (Cmd-1)
Open the Effects panel.
Geometry Panel (Cmd-2)
Open the Geometry panel.
Styles Panel (Cmd-3)
Open the Styles panel.
Show/Hide Object Handles
Show or hide handles of the selected object.
Chapter 3: Art Text Interface 37
The “Layers” Menu

Select All (Cmd-A)
Select all layers.
Add Layer (Cmd-Shift-L)
Add a new layer to the top of layer stack.
Remove Layer (Cmd-Backspace)
Delete the selected layer.
Union (Cmd-U)
Merge layers using the union operation.
Join (Cmd-J)
Merge layers using the join operation.
Subtract
Merge layers using the subtract operation.
Intersect
Merge layers using the intersect operation.
Split into Letters (Cmd-Ctrl-Opt-T)
Put each character of the selected text layer into a separate layer.
Extract a Letter (Cmd-Ctrl-Opt-E)
Put the selected part of the selected text layer into a separate layer.
Select Next Layer (Cmd-])
Move the layer selection to the right in the layer bar. The layer located in front of the current will be selected.
Select Previous Layer (Cmd-[)
Move the layer selection to the left in the layer bar. The layer located behind the current will be selected.
38 Art Text User’s Manual

The “Format” Menu
Font > Show/Hide Fonts (Cmd-T)
Open the Fonts panel.
Font > Bold (Cmd-B)
Modify the properties of the selected text.
Font > Italic (Cmd-I)
Font > Bigger (Cmd-Opt-=)
Increase/decrease the size of the selected text.
Font > Smaller (Cmd-Opt-”-”)
Font > Kern
Modify the properties of the selected text.
Font > Ligature
Font > Baseline
Text > Align Left (Cmd-{)
Align text to the left, right, center or justify it.
Text > Center (Cmd-|)
Text > Align Right (Cmd-})
Text > Justify
Move to Center (Horizontally) (Cmd-Shift-H)
Center the selected object.
Move to Center (Vertically) (Cmd-Shift-V)
Fit to Document
Fit the content to the document size constraining proportions.
Resize to Document
Fit the content to the document size without constraining proportions.
Show/Hide Color (Cmd-Shift-C)
Display the Colors panel.
Chapter 3: Art Text Interface 39
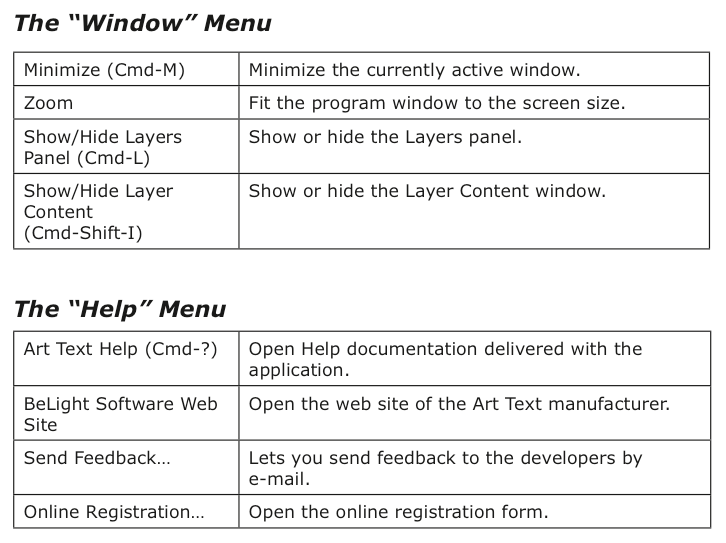
The “Window” Menu
The “Help” Menu
Minimize (Cmd-M)
Minimize the currently active window.
Zoom
Fit the program window to the screen size.
Show/Hide Layers Panel (Cmd-L)
Show or hide the Layers panel.
Show/Hide Layer Content (Cmd-Shift-I)
Show or hide the Layer Content window.
Art Text Help (Cmd-?)
Open Help documentation delivered with the application.
BeLight Software Web Site
Open the web site of the Art Text manufacturer.
Send Feedback..Lets you send feedback to the developers by e-mail.
Online Registration..Open the online registration form.
40 Art Text User’s Manual
Art Text Keyboard Shortcuts
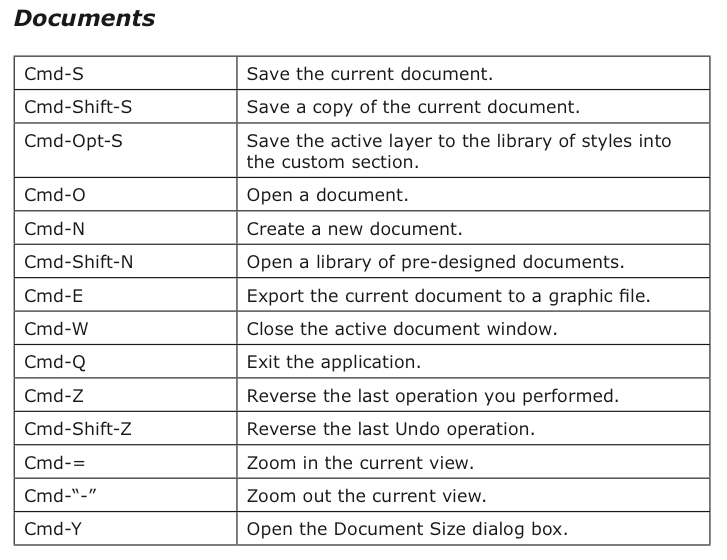
Documents
Cmd-S
Save the current document.
Cmd-Shift-S
Save a copy of the current document.
Cmd-Opt-S
Save the active layer to the library of styles into the custom section.
Cmd-O
Open a document.
Cmd-N
Create a new document.
Cmd-Shift-N
Open a library of pre-designed documents.
Cmd-E
Export the current document to a graphic file.
Cmd-W
Close the active document window.
Cmd-Q
Exit the application.
Cmd-Z
Reverse the last operation you performed.
Cmd-Shift-Z
Reverse the last Undo operation.
Cmd-=
Zoom in the current view.
Cmd-“-”
Zoom out the current view.
Cmd-Y
Open the Document Size dialog box.
Chapter 3: Art Text Interface 41
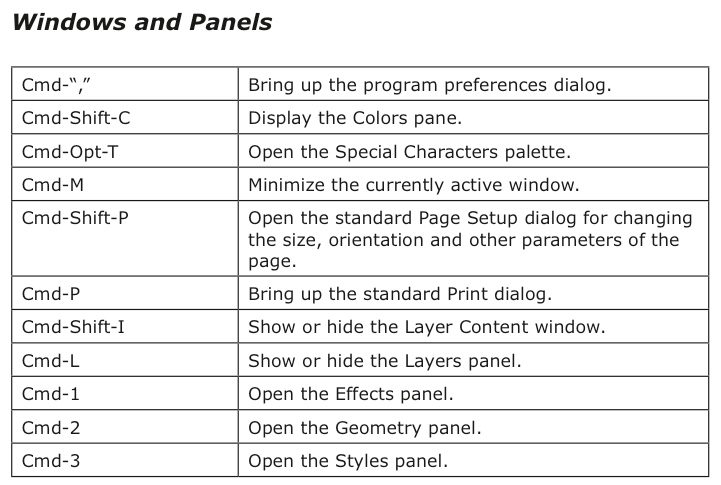
Windows and Panels
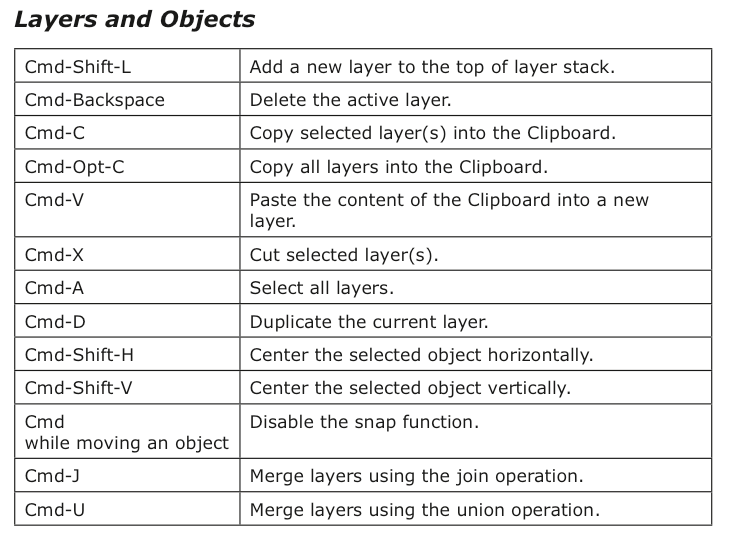
Layers and Objects
Cmd-“,”
Bring up the program preferences dialog.
Cmd-Shift-C
Display the Colors pane.
Cmd-Opt-T
Open the Special Characters palette.
Cmd-M
Minimize the currently active window.
Cmd-Shift-P
Open the standard Page Setup dialog for changing the size, orientation and other parameters of the page.
Cmd-P
Bring up the standard Print dialog.
Cmd-Shift-I
Show or hide the Layer Content window.
Cmd-L
Show or hide the Layers panel.
Cmd-1
Open the Effects panel.
Cmd-2
Open the Geometry panel.
Cmd-3
Open the Styles panel.
Cmd-Shift-L
Add a new layer to the top of layer stack.
Cmd-Backspace
Delete the active layer.
Cmd-C
Copy selected layer(s) into the Clipboard.
Cmd-Opt-C
Copy all layers into the Clipboard.
Cmd-V
Paste the content of the Clipboard into a new layer.
Cmd-X
Cut selected layer(s).
Cmd-A
Select all layers.
Cmd-D
Duplicate the current layer.
Cmd-Shift-H
Center the selected object horizontally.
Cmd-Shift-V
Center the selected object vertically.
Cmd while moving an object
Disable the snap function.
Cmd-J
Merge layers using the join operation.
Cmd-U
Merge layers using the union operation.
42 Art Text User’s Manual
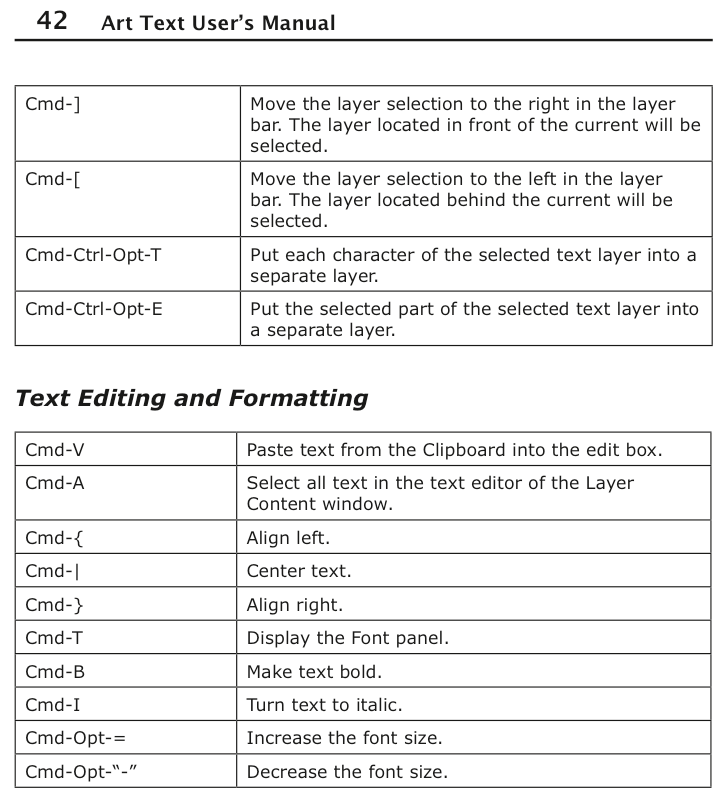
Cmd-]
Move the layer selection to the right in the layer bar. The layer located in front of the current will be selected.
Cmd-[
Move the layer selection to the left in the layer bar. The layer located behind the current will be selected.
Cmd-Ctrl-Opt-T
Put each character of the selected text layer into a separate layer.
Cmd-Ctrl-Opt-E
Put the selected part of the selected text layer into a separate layer.
Text Editing and Formatting
Other

Cmd-V
Paste text from the Clipboard into the edit box.
Cmd-A
Select all text in the text editor of the Layer Content window.
Cmd-{
Align left.
Cmd-|
Center text.
Cmd-}
Align right.
Cmd-T
Display the Font panel.
Cmd-B
Make text bold.
Cmd-I
Turn text to italic.
Cmd-Opt-=
Increase the font size.
Cmd-Opt-“-”
Decrease the font size.
Cmd-?
Open the built-in Help.
Chapter 4: Working with Documents 43
Chapter 4: Working with Documents
Using Templates
To access templates, choose File > Template Gallery (Cmd-Shift-N). Templates are grouped into categories. To open a different category, click on its name at the bottom of the window.
To open a template, double-click on its thumbnail. Or click on a thumbnail followed by the Choose button.
You can use templates to learn the program or modify them to create a new document.
Note that templates and styles are not the same. A template is a complete document. A style is a set of settings that can be applied to your text or image. Templates can consist of one or several layers.
44 Art Text User’s Manual
Creating, Opening and Saving
Documents
To create a new document, choose File > New in the menu.
To open an existing document, choose File > Open in the menu. Or double- click on a document file in Finder.
To save a document, choose File > Save in the menu.
Chapter 4: Working with Documents 45
Document Size
To set up the document size, choose Edit > Document Size, or click Set Size... in the main window.

1 – Measurement units used for the whole application.
2 – Maintain proportions when one of document sides was changed. The current document width and height are used to calculate the side proportion when you open the Document Size dialog box. This value is used to calculate new height or width until you click OK.
3 – The Set Size button changes the document size so that all visible objects are included. The amount of the blank space around the objects can be set by the margins control.
4 – Document size.
5 – The Automatically resize objects check box activates resizing the design when you change the document size. Proportions of the design are constrained.
6 – Choose one of previous document sizes.
For default document size for new documents, the program takes the last applied width and height.
46 Art Text User’s Manual
Chapter 5: Working with Layers 47
Chapter 5: Working with Layers
Introduction to Layers and Objects
The object term is used here for text or an image. Note that parts of text can be separate objects as in the picture below. An object can be selected, in this state its resize handles are displayed.

Objects in Art Text are located one over another forming a layered structure. One layer contains only one object. Adding or removing a layer means also adding or removing an object. No object can exist without a layer.
Some operations provided in Art Text are natural for objects (changing color or creating a shadow effect). Others are natural for layers (merging layers). When we discuss the object layering, we will talk about layers. When we mention the layer content or applying effects, we will talk about objects.
Tools for working with layers usually change the appearance of the content. For working with layers, you will use the Layers panel and the Layer bar.
See Chapter 5, “Working with Layers” > “Managing Layers”. To choose an image or edit text, you should use the Layer Content window.
See Chapter 5, “Working with Layers” > “The Layer Content Window”.
To modify objects, you will use the Effects (Cmd-1), Geometry (Cmd-2) or Styles (Cmd-3) tab.
48 Art Text User’s Manual
Object Size and Location Object Size
Before setting up the size of an object, check the document size that defines the size of the final image (displayed by white or chessboard background). For this, click the Set Size button in the main window.
To resize an object, drag its corner or side handle. If the handles are invisible, click the Hide/Show Object Handles button in the main window (View > Hide/Show Object Handles). The handles are also used to define the active layer.
To set the size of the object precisely, use the Layers panel. Choose Window > Show/Hide Layers Panel (Cmd-L).
To make an object to meet the document size, use Format > Fit to Document or Format > Resize to Document.
The Fit to Document function resizes text or image proportionally so that its bigger size fits the documents size.
The Resize to Document function does not constrain the proportion.
The Use Font Size button in the Geometry tab restores the original text size. After clicking the button, the size of letters corresponds the font size set in the Fonts panel.
Object Location
To move an object to other location, drag it with the mouse. While you are moving it around, guide lines can appear showing that the object has aligned to other object or to the center of the work area.
If this is enabled in the program Preferences, the object you are moving snaps to other objects. For temporary disabling the snap function, hold the Cmd key while you are moving an object.
To move the selected object that lays behind others, press and hold the Option key before you start moving the object. This will prevent occasional selection of another object.
To set up numeric coordinates of the selected object, use the Layers panel.
Chapter 5: Working with Layers 49
Managing Layers
Functions related to layers are located in the Layers panel and Layer bar.
The Layers panel: • adding an removing layers; • renaming layers; • changing the order of layers; • changing the layer opacity; • changing the size of an object; • rotating layers; • flipping the layer content.
The Layer bar: • adding an removing layers; • duplicating layers; • changing the order of layers; • changing the content of a layer; • merging layers.
50 Art Text User’s Manual
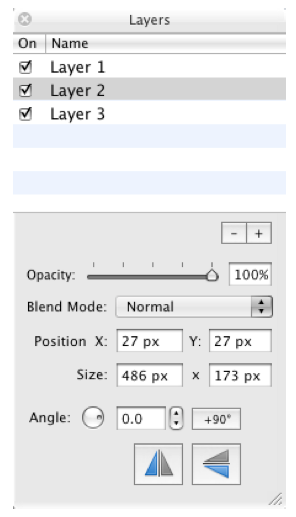
The Layers Panel
The Layers panel displays a list of layers (1 in the picture). The active layer is highlighted. Its parameters (3 – 8) are displayed below the list.
To open or close the Layers panel, choose Window > Show/Hide Layers Panel (Cmd-L).

1 – List of layers.
2 – Remove Layer and Add Layer buttons.
3 – Opacity of the layer content.
4 – Blend mode selector – the way of blending the content of layers. See Chapter 5: “Working with Layers” > “Blending Layers” for more details.
5 – Position of the selected object in the document. The zero point is the bottom left corner.
6 – Size of the selected object. You can also resize the object using the resize handles.
Chapter 5: Working with Layers 51
7 – Rotate the layer content. 8 – Flip the layer content.
You can change parameters of several selected layers together. To select several layers, click on their names holding the Cmd or Shift button.
Renaming Layers
To change the layer name in the list, double-click on it.
Changing the Layer Order
The order of layer names in the list reflects the layer stack order. It determines how objects overlap one another. The layer located at the top of the list is atop others. The layer at the bottom of the list is behind all other layers.
To change the stack order, drag the layer name to a new position in the list.
Hiding the Layer Content
Click a check box next to each layer name to hide or show the layer content.
Adding and Removing Layers
Click the “plus” button to add a new layer.
To create a copy of an existing layer, use the Duplicate function in the Layer bar.
Click the “minus” button to remove the active layer.
52 Art Text User’s Manual
The Layer Bar
The Layer bar is located at the bottom of the main window and displays icons of layers. When a layer is selected, its icon becomes highlighted. Several layers can be selected to modify them together.
To change the layer stack order, drag an icon to the left or right. The rightmost icon corresponds to the top layer.
Compare the two pictures below:

Chapter 5: Working with Layers 53
The star is on top of the other shapes in the left picture. Its icon is in the rightmost position in the Layer bar. Moving the icon to the left (see the right picture), you move the star behind other objects on the canvas.
To change text or an image in the active layer, open the Layer Content window by double-clicking the layer icon.
To choose a graphic file for the active layer, you can also drag it from the Finder application and drop onto the layer icon in the Layer bar.
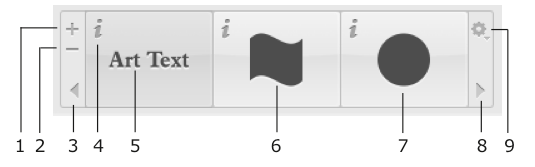
1 – Add a new layer with the default content. 2 – Delete layer and its content. 3 and 8 – Scroll layer icons.
4 – Click the “i” icon to open the Layer Content window.
5, 6 and 7 – Icons of layers displaying the layer content.
9 – Layer actions menu that includes the following functions: • The Remove function removes a layer and its content. It does the same
as the “minus” button (2). • The Duplicate function creates a copy of the selected layer. • The Join, Union, Subtract and Intersect functions create a new layer
out of several selected layers. These functions are described in Chapter 5:
“Working with Layers” > “Merging Layers”. • The Split into Letters and Extract a Letter functions create several
layers out of one. These functions are described in Chapter 5: “Working
with Layers” > “Splitting Layers”. • The Show/Hide Layers Panel item opens and closes the Layers panel. • The Add Layer With Image... function creates a new layer and lets you
choose an image to place in it. Use this feature for adding background images.
54 Art Text User’s Manual
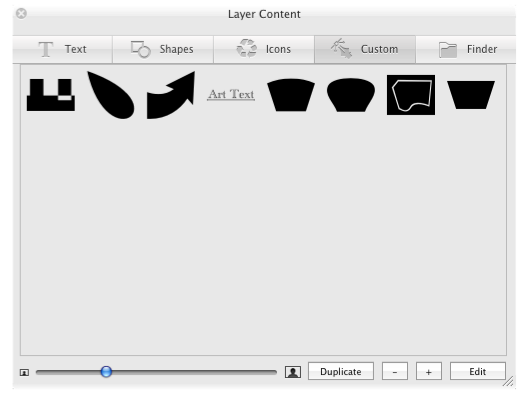
The Layer Content Window
The Layer Content window displays the content of the active layer. It lets you: • edit text; • choose a shape; • choose an icon;
• choose an image file.
To open the Layer Content window, double-click the layer icon in the layer bar at the bottom of the main window.
Editing Text

The Text tab can be used as a simple text editor. You can type your text right here or paste text from other sources.
The alignment buttons affect the whole text.
The Font button opens the standard Font panel. You can change the font of the selected part of text or of the whole text.
Line spacing can be applied to selected text lines or to the whole text. Kerning changes the distance between letters of the selected text.
To convert text to a vector image, click the Edit as Shape button. The created image will be opened in the vector image editor.
Chapter 5: Working with Layers 55
Choosing a Shape
Open the Shapes tab and click on a shape thumbnail.

The buttons and scroll bar at the bottom change the thumbnail size. To modify a shape in the vector image editor, double-click on it.
Choosing an Icon
Open the Icons tab, select a category in the drop-down menu and click on an icon thumbnail.

The buttons and scroll bar at the bottom change the thumbnail size. To modify an icon in the vector image editor, double-click on it.
56 Art Text User’s Manual
Choosing a Custom Vector Image
To choose an image you have previously created, open the Custom tab and click on an image.

To modify an image in the vector image editor, double-click on it.
Choosing an Image File
Open the Finder tab, click the Open button and choose a folder containing images or an individual graphic file. Then click Open. Select an image in the Layer Content window.
Previously selected folders are listed in the drop-down menu. You can choose one of the folders in the list instead of navigating to it by the Open button.
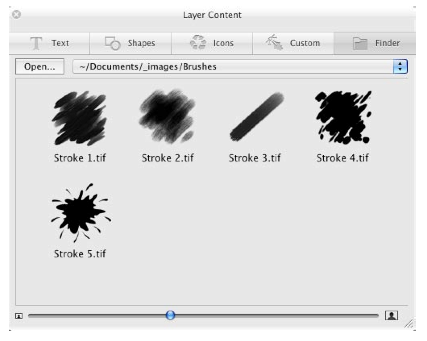
The buttons and scroll bar at the bottom change the thumbnail size.
Chapter 5: Working with Layers 57
Merging Layers
Using the operations described below you can create new shapes out of overlapping shapes:
• Join layers • Union layers • Subtract layers • Intersect layers
To merge layers, select two or more layers and choose Union, Join, Subtract or Intersect. These options are located in the actions menu (click on the wheel icon in the layer bar) and also under Layers in the main menu.

The result depends on how the objects overlay. Here matter the shape of the original objects and applied geometric transformation. Properties (such as color, shadow, texture, etc.) will be re-applied to the resulting object. The result is a single object (there is an exception for Intersect). Only selected layers are affected.
ATTENTION!
1. The operations combine objects of selected layers together in one new layer. The original layers disappear. The resulting object is a vector image created out of vector outlines of the original objects. Text is not text any longer but a vector image and further text editing is impossible.
Merging is not grouping. You cannot split layers back after they were merged (unless you choose Edit > Undo).
2. Don’t confuse merging layers with blending layers. Choosing a blending mode, you define how the content of layers will look in the final image. The content of layers stays unchanged.
Note that if you merge an image from the Finder tab of the Layer Content window, the program will use the rectangular shape of the whole image, not the alpha channel (transparency).
58 Art Text User’s Manual
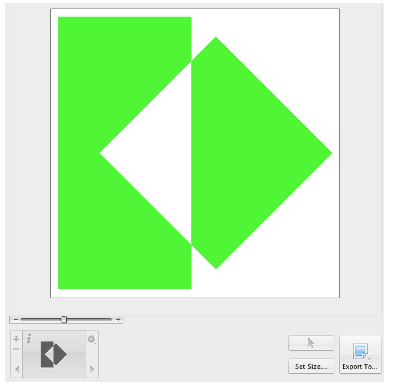
Join Layers
If the objects overlay, the overlapping area becomes excluded (transparent). Without overlaying, the result is similar to the Union operation.
Original layers

Resulting layer
Chapter 5: Working with Layers 59
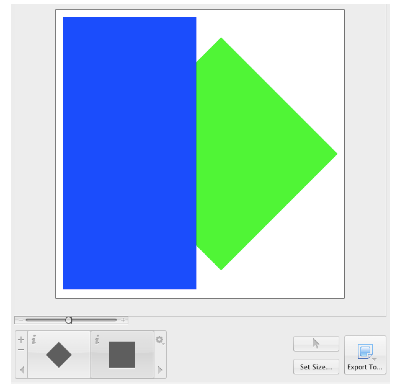
Union Layers
The resulting layer shape is sum of merged layers shapes.
Original layers
Resulting layer
60 Art Text User’s Manual
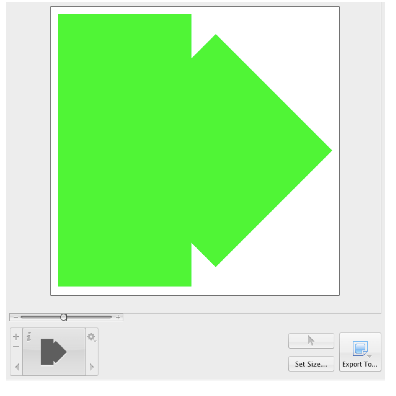
Subtract Layers
The shape of the object in the lowest layer is the basis for a new shape. The other objects determine the area(s) that will be cut off. The result is a part of the lowest object that is not overlaid by other(s). If the objects don’t overlay, the result looks like the lowest object.
Original layers

Resulting layer

Chapter 5: Working with Layers 61
Intersect Layers
The result is the area(s) where all the selected layers overlap. If there are no such areas, the program doesn’t modify the document.
Original layers

Resulting layer

62 Art Text User’s Manual
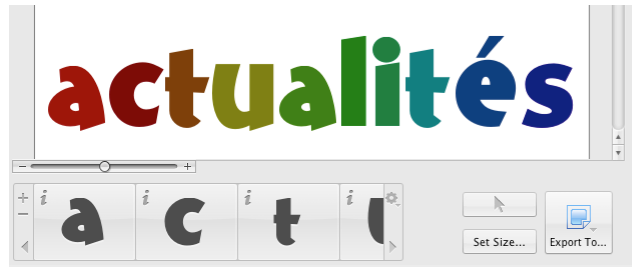
Splitting Layers
Your design idea may require applying different effects to different parts of text. The program allows you to use the same color, material, or texture with the whole layer. To apply different effects to individual letters, you have to put them into separate layers.
The program can help you create multiple layers out of a text layer. To make sure that you have a text layer, double-click on it. The Text tab of the Layer Content window should open displaying the text.
Note that you cannot merge the resulting layers back to create one text layer (except using the Edit > Undo command).
To put each character into an individual layer:
1. Select a text layer.
2. Select Layers > Split into Letters (Cmd-Ctrl-Opt-T). Or, right-click on the layer and select Split into Letters in the context menu.
The original document has one layer:

Chapter 5: Working with Layers 63
After splitting, the number of layers equals the numbers of letters in the original word:
To put a part of the text into an individual layer:
1. Select a text layer.
2. Choose Layers > Extract a Letter (Cmd-Ctrl-Opt-E). Or, right-click on the layer and choose Extract a Letter in the context menu.
3. Select one or several characters that you want to separate.
In the same original document as in the example above, the letter “é” was separated. We have three layers that contain everything before “é”, “é”, and the rest of the word.

64 Art Text User’s Manual
Blending Layers
The blending mode defines how a layer interacts with layers behind it. To choose a blending mode, use the Layers panel (Cmd-L). Some blending modes are described below with examples.
The examples show how the blending mode of the top layer (active) affects the final image compared with the default settings. Two other layers are set to the Normal mode. Changing blending mode of several layers, you may get different results.
The Opacity parameter was set to 100% by all the layers. The active layer will be shown at 100% and 50% opacity. Changing the opacity of the top layer significantly changes the final image.
• Normal • XOR • Plus Darker • Plus Lighter • Source In • Source Out • Source Atop • Destination Over • Destination In • Destination Out • Destination Atop
By default, a new layer has the Normal blending mode and 100% opacity.
Normal
Layers appear in the original layering order.

Chapter 5: Working with Layers 65
XOR
Parts of lower layers, that are overlaid by the top layer, are excluded. Parts of the top layer, that overlay other layers, are excluded too.

XOR mode, XOR mode, Default mode 100% opacity 50% opacity
Plus Darker
Parts of lower layers, that are overlaid by the top layer, became darker.

Plus Darker mode, Plus Darker mode, Default mode 100% opacity 50% opacity
66 Art Text User’s Manual
Plus Lighter
Parts of lower layers, that are overlaid by the top layer, become lighter.
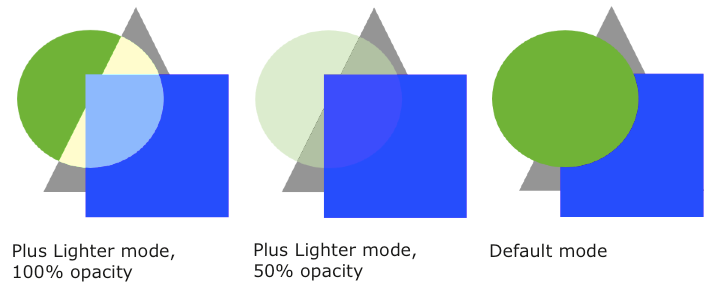
Plus Lighter mode, Plus Lighter mode, Default mode 100% opacity 50% opacity
Source In
Only those parts of the top layer remain visible, that overlay any lower layer. The rest is excluded.

Source In mode, Source In mode, Default mode 100% opacity 50% opacity
Chapter 5: Working with Layers 67
Source Out
Only those parts of the top layer remain visible that don’t overlay any lower layer. The rest is excluded.
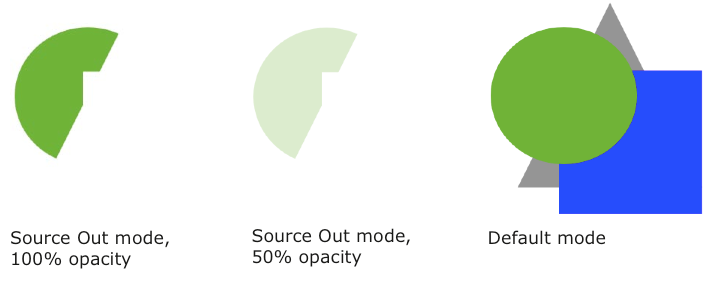
Source Out mode, Source Out mode, Default mode 100% opacity 50% opacity
Source Atop
Parts of the top layer, that don’t overlay any lower layer, are excluded.

Source Atop mode, Source Atop mode, Default mode 100% opacity 50% opacity
68 Art Text User’s Manual
Destination Over
Parts of the top layer, that overlay any lower layer, are excluded. Looks like the top layer is behind all others.

Destination Over mode, Destination Over mode, Default mode 100% opacity 50% opacity
Destination In
Only those parts of lower layers remain visible that lay behind the top layer.

Destination In mode, Destination In mode, Default mode 100% opacity 50% opacity
Chapter 5: Working with Layers 69
Destination Out
Only those parts of lower layers remain visible that are not overlaid by the top layer.

Destination Out mode, Destination Out mode, Default mode 100% opacity 50% opacity
Destination Atop
Only those parts of lower layers remain visible that are overlaid by the top layer. And parts of the top layer that don’t overlay any lower layer stay visible. The rest is excluded.
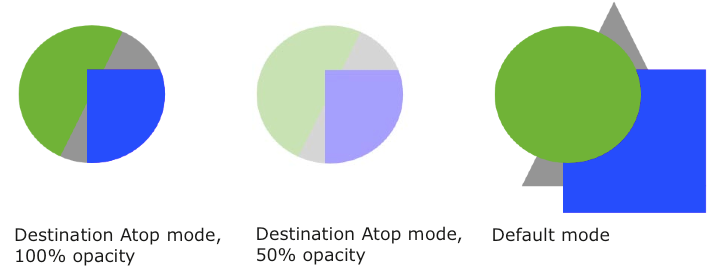
Destination Atop mode, Destination Atop mode, Default mode 100% opacity 50% opacity
70 Art Text User’s Manual
The Editor of Vector Shapes
The built-in editor of vector shapes lets you create new vector images. Also, you can modify icons and shapes provided in the Layer Content window, and you can edit text as a vector shape.
The Library of Custom Images
Vector images you have created are located in the Custom tab of the Layer Content window.
To create a new image, click the “+” button.
To remove an image, select it and click the “–” button.
To create a copy of an image, select it and click the Duplicate button.
To edit an image, select it and click the Edit button. Or, double-click on this image.
To choose an image for the current layer, click on it.
Custom images are stored in this folder:
~/Library/Application Support/BeLight Software/Art Text/IconArt/
Chapter 6: Graphic Tools and Effects 71
The Interface of the Editor
To open the editor, click the Edit or “+” button in the Custom tab of the Layer Content window.
Tools in the vector editor:

1 – The selection tool is used to select or move points.
2 – The straight segment tool.
72 Art Text User’s Manual
3 – The curved segment tool. 4 – The rectangle tool. 5 – The ellipse tool. 6 – Add an anchor point.
7 – Delete an anchor point. 8 – Change the anchor point type. 9 – Clear the canvas.
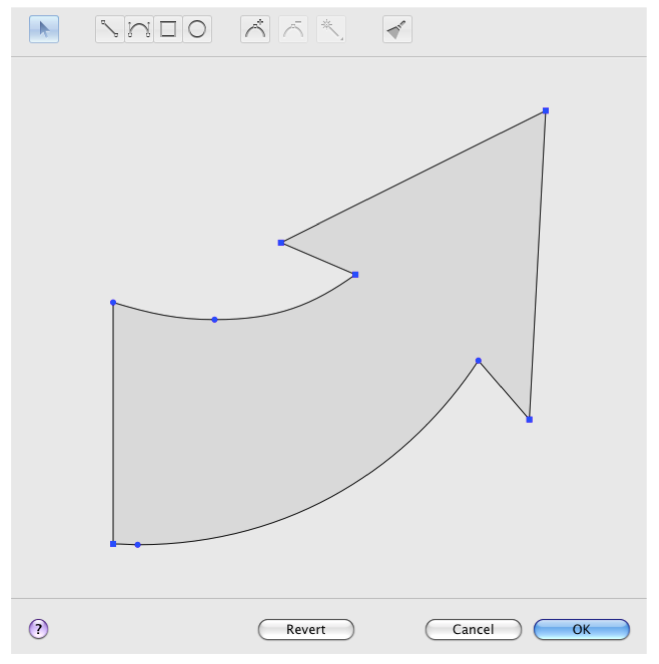
Points and Paths
A vector shape comprises anchor points and lines that connect them. Anchor points mark the beginning and end of each line (or segment). By adding one line after another you create a path. The path must be closed. This means that it begins and ends with the same point.
Anchor points can be of two types: corner point and smooth point. When you change the type of a point, intersecting lines may change from curved to straight and vice versa.
1 – Corner point. At a corner point, a path abruptly changes direction. A corner point may join either straight or curved lines in any combination. A corner point with two straight lines doesn’t have direction lines.
2 – Straight segment.
Chapter 6: Graphic Tools and Effects73

3 – Smooth point. At a smooth point, a path continue following the same direction. A smooth point joins only two curved segments.
4 – Direction line.
5 – Direction point. It is a handle on the end of a direction line. Moving a direction point, you can change the length and angle of the corresponding direction line.
6 – Curved segment. 7 – Corner point.
The direction of a curved path in a smooth anchor point coincides with the direction of the direction line. Leaving the anchor point, the path branches off from the direction line. The longer the direction line is, the longer the path passes near it.
74 Art Text User’s Manual
Drawing a Shape
Select the straight segment 1 or curved 2 segment tool. Click on the canvas to add as many anchor points as you need. Make the last click on the first point of the path to make it closed. Also, you can finish drawing by activating the selection tool. In this case the program will close the path automatically.
1 2
2
Images you create here are solid shapes, not contours.
The direction you draw a path matters when one shape has been drawn over another. In the picture below, shapes A and B were drawn in the clockwise direction. C was drawn in
the counter-clockwise direction. The areas where the shapes overlap are different. The intersection area of A and B remains solid, when the intersection of A and C is a hole.

Adding Anchor Points
You add anchor points when you draw a path.
To add more anchor points, activate the adding tool 3 and click on a path segment.
3
Deleting Anchor Points
To delete an anchor point, select it and click the delete button 4
4
.
Changing the Type of Anchor Points
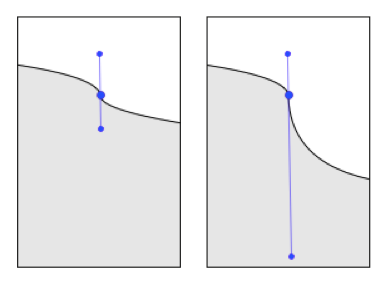
To choose other type of an anchor point, click the type button 5.
5
Moving Anchor Points
To move an anchor point drag it with the mouse. A straight segment attached to this point will change its direction. A curved segment will change the direction and shape.
Chapter 6: Graphic Tools and Effects 75
Chapter 6: Graphic Tools and Effects
Basics
The original data for an Art Text document is text or an image (object). At the beginning you add text or choose an image and then apply graphic effects to it. A document can contain multiple objects. Combining them, you can create a complex design. Each individual object is located in its own layer.
In Art Text you can: • Fill objects with plain color • Fill objects with gradient colors • Apply textures • Apply materials • Change object’s shape • Resize changing or keeping the side proportion • Create a new shape by merging two layers
An object is a vector shape or icon, text (vector by its nature) or raster image. Raster images do not support transformations. To apply materials, a source image should have areas with different transparency (not 100% over the whole image). Otherwise, a 3D effect will be applied to the rectangular image bound instead of image details.
Not all effects can be combined with others. You can apply one of this: plain color fill, gradient fill, texture or material. You can apply only one transformation to an object.
Most effects can be applied to several selected objects.
76 Art Text User’s Manual
The Fill Effect
To open the fill tools, choose the Fill section in the Effects tab.

1 – The Plain Color tool.
2 – The Gradient tool. Choose linear or radial gradient.
3 – Gradient colors.

Chapter 6: Graphic Tools and Effects 77
4 – An additional gradient color. It appears between two main colors.

5 – The Intensity parameter defines how the image space is distributed among colors.
6 – An angle of the linear gradient.
7 – The radial gradient’s control. You can change the location of the middle color.

78 Art Text User’s Manual
Applying Textures
Art Text can apply textures to text and images. Textures can be taken from the built-in library or from your hard drive. To open the library of textures, choose the Texture section in the Effects tab.
Choose the Finder item to use images from your hard drive. You can select an individual image, one or several folders.
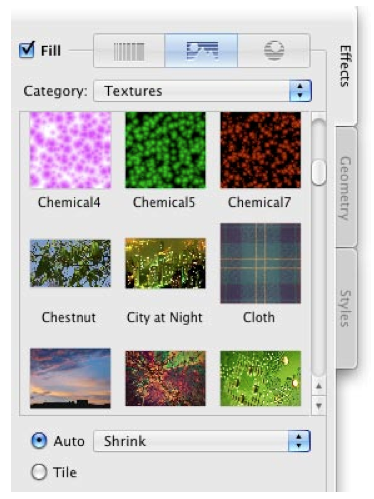
To apply a texture, choose a texture category then click on a thumbnail. To apply a texture image located on the hard drive, drag the image from the
Finder and drop onto an object on the canvas.
Two radio buttons below thumbnails define how a texture should fit the image area. The Auto option resizes an image automatically. The Tile option lets doing this manually.
Chapter 6: Graphic Tools and Effects 79
The original shape to which a texture is applied.

The original image used as a texture.

Auto > Stretch deforms an image to fit the shape.
Auto > Shrink fits the texture to the larger shape size. A part of the texture can be invisible.

The Tile option lets you choose the texture size and position inside the shape.

80 Art Text User’s Manual
Applying Materials
Materials are used in Art Text for creating 3D looking text and images, to give glassy, metal, plastic look to an object, and for other effects.
The built-in library of materials is located in the Shading section on the Effects tab.
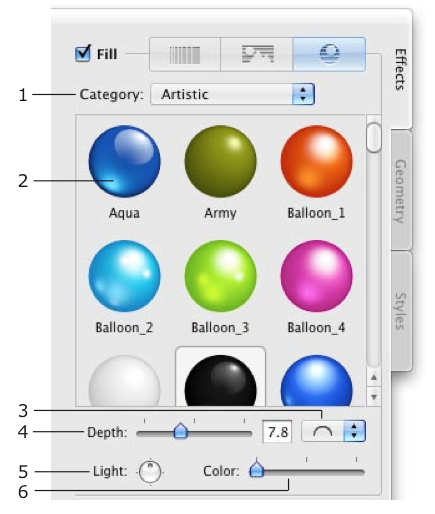
1 – Material category selector.
2 – The thumbnail of a material. The applied one has white background.
3 – 3D shape (bevel) selector. It is not available for image-based materials.
4 – The amount of the bevel effect.
5 – Rotate the applied material. For 3D looking objects, this control moves light spots around the center of the object.
6 – Color. By default, color of the original material is applied. You can change it.
Chapter 6: Graphic Tools and Effects 81
There are two kinds of materials: based on shader technology and based on images. The majority of materials are shader-based. Image-based materials are grouped into separate categories in the library.
To apply a material to an object in the active layer, choose a material category (1) and click on a material thumbnail (2).
When you apply a material to an image opened from a graphic file, be sure that the image has areas with different transparency (not 100% over the whole image). Otherwise, a 3D effect will be applied to the rectangular image bound instead of image details.
Bevel Shape
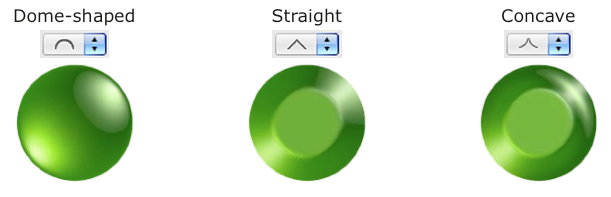
Dome-shaped Straight Concave
This option is available only for shader-based materials.
Note that straight and concave shapes can produce similar results. To get different pictures, use materials with a light spot near the center.
Light
The Light control moves the light spots around the center. This lets you simulate light falling onto a 3D object from the top or from a side.
When your design consists of several 3D objects, you can adjust the location of light spots as if they appeared from the same light source.
82 Art Text User’s Manual
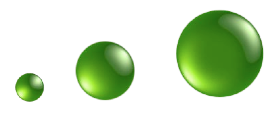
Depth
At lower values you will get an object looking almost flat. The slider covers the most appropriate range of values 0 – 20. To set greater values, use the edit box.
An image below shows circles with the Depth parameter set to 7, 15 and 30.

At the same Depth value, the result depends on the size of the object. After some point, increasing Depth will not change the final image. Small objects can loose 3D look at too large values. See how circles 50x50, 100x100 and 150x150 pixels look at Depth = 15.
Color
The Color control changes all colors in a way similar to the Hue parameter in the standard Colors panel. Black, white and grayscale colors will stay unchanged.
Chapter 6: Graphic Tools and Effects 83
The Editor of Materials
Art Text material editor lets you create two types of materials: materials based on shaders (light spots) and materials based on images.
To create a new material, select Create a Material in the material category drop-down list.
To edit an existing custom material, double click on its thumbnail. You cannot modify a built-in material, but you can modify and save its copy. To do this, double-click a material thumbnail in the library.

84 Art Text User’s Manual
Materials Based on Shaders
In a shader-based material, light spots on a specular surface are simulated to create 3D looking objects. The editor of materials allows you adjusting light spots and previewing the result on a sample sphere and on letters.
The window of the editor shows a list of custom materials. Buttons below the list let you add, remove and make a copy of the selected material. The middle part of the window shows parameters of the selected material. Samples of an applied material are displayed on the right.

Chapter 6: Graphic Tools and Effects 85
Types of Light Sources
1 – Additional specular light. 2 – Ambient color. 3 – Diffuse color. 4 – Main specular light.
Ambient Light
The ambient light is emitted by a general indirect source. In 3D graphics the ambient color is used as color of object part laying in shadow.
Without the ambient light (color is set to black), the object in shadow is black.
Diffuse
Diffuse is not really a source of light. Diffuse color is used to describe how the object will look at poor white lighting. It is used to make an object have some color when it is under light.
86 Art Text User’s Manual
Specular
Specular light is the light reflected by the object in some direction. It seems like highlight from spot light source.
The program supports multiple specular light sources. To add more specular highlights, click the Add Spotlight button.
To turn on/off all additional spotlights, use the Additional specular spotlights option. For separate control, use On/Off options of individual spotlights.
To remove an additional spotlight, click its Remove button. “^” and “v” arrows change the order of additional spotlights. Their order can
affect the resulting image.
Parameters of Light Sources
Azimuth defines the horizontal direction from which the light is shed. In other words, the Azimuth control rotates a light spot around the sample sphere center.
Elevation defines how high the light source is located. The central position of the slider sets the source right above the sphere.
Shininess defines the intensity of reflected light. Shininess is used in 3D graphics to show how the highlight from the given spot light source looks from different viewer’s positions. When the look direction coincides with the direction of the reflected light, the highlight has maximum brightness. This corresponds to the minimum value of Shininess.
Spot Size defines the size of highlight. At greater values of the Spot Size the surface looks matte, at lower - glossy.
Border sets how smooth the edge of the light spot is.
Chapter 6: Graphic Tools and Effects 87
Changing the Location of Spotlights
Apart from the Azimuth and Elevation controls, the location of spotlights can be changed right on the sample sphere. For this, select the Show spotlight controls option. Small circles that appear in the preview are handles. Drag a handle with the mouse to move the corresponding light spot. The bigger handle corresponds to the main specular light.

Materials Based on Images
Using images, you can create materials that give a result similar to shaders as well as completely different pictures.
To create a new material, select Create a Material in the material category drop-down list. In the material editor, click the Create from Image button and choose a graphic file. Then close the editor. Any further adjustments can be made in the main window.
An example of image-based material:

A similar result can be achieved using shaders.

88 Art Text User’s Manual
The Stroke Effect
The stroke effect makes text and vector shapes outlined. If you apply the tool to an imported image, its rectangular edge will be outlined.

The Stroke tool is located in the main window, the Effects tab.
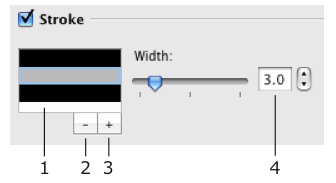
1234 1 – List of lines. The current line is highlighted. Double-click a line to change
its color.
2 and 3 – The Remove and Add Line buttons. You cannot delete the last line. If you don’t want it, turn the effect off using the check box.
4 – The Width control defines the width of the current line. You can add multiple lines with different width and color.

If spaces between letters are too small, set a larger value of the Kerning parameter. Double-click the layer icon below the canvas to open the text editor. Kerning is located at the bottom of the editor.
Chapter 6: Graphic Tools and Effects 89
The Shadow Effect
The Shadow tool is located in the bottom-right corner of the main window.

1 – The Blur parameter.

2 – The Distance between the object and shadow.

3 – The angle of the shadow.
4 – The shadow location control. It changes the distance and angle at once.
5 – The color of the shadow.
90 Art Text User’s Manual
The Glow Effect
The Glow tool is located in the bottom-right corner of the main window.

1 – The Blur parameter. 2 – The color of the glow effect. 3 – The width of the glow effect.
4 – Tint color check box. When it is selected, the second color button appears and you can create bi-color glow. In the picture below, (1) is the main color and (2) is the tint color.

Chapter 6: Graphic Tools and Effects 91
Transformations
Transformation effects create geometric distortion of text or a vector image (shape or icon from the internal library). Transformation does not work with custom images. Using the transformation tools, you can also change the text or image size.
The transformation tools are located in the Geometry tab.

92 Art Text User’s Manual
To apply a transformation, click on its thumbnail and adjust one or several transformation parameters.
To restore the default state of an object, click the Reset button. When several objects are selected, you can use only geometric
transformations.
Geometric Transformations
Geometric transformations have dark shapes on thumbnails and are located at the top.
An image or text has a frame with handles. Moving the frame corner handles resizes the content proportionally. With the Shift key pressed, the proportion of sides will change.
Moving the side handles changes width or height of the content. With the Option key pressed, you will scale the frame from the middle, rather than from the side.
Frame handles of the Frame transformation allow you to change the shape of the frame itself. Unlike other geometric transformations, it allows you to move the handles separately.

Chapter 6: Graphic Tools and Effects 93
Spline Transformations
Spline curves are linked to an image or text. When you change the shape of a curve, the content changes accordingly.

A spline curve is controlled by two types of handles: knot point (1) and direction line handle (2). The curve consists of one or multiple segments (3) with knot points on its ends. The Spline-Curve transformation lets you adding curve segments. Others have constant number of segments.
The shape of the curve is determined by the length and slope of the direction line (4). To control a direction line, drag its handle (2). For more significant change, move knot points (1).
Note that the Curved Text transformation does nothing with a single letter and an image except for rotation and resizing.
A transformation result can be used as a separate effect or as a part of a complex design.

The Resize button lets you choose the transformation adjusting mode or the resize mode. The resize handles are square. The transformation control handles are round.
94 Art Text User’s Manual
The Set Size Controls
You can change the object size by moving handles. In addition to this, there are two buttons.
The Fit to Document button resizes text or image proportionally so that its bigger size fits the documents size.
The Use Font Size button restores the original text size. After clicking the button, the size of letters corresponds to the font size set in the Fonts panel.
Chapter 7: Exporting
Exporting
Your work can be exported to a graphic file or copied to the clipboard.
Depending on the effects you have used, you can get a vector or raster image when saving to the PDF format. Vector images are created only when you use plain color fill, stroke and transformation effects. If other effects were used, you will get a raster image.
To export an image to a graphic file: 1. Check the image size.
For this, click Set Size in the main window.
2. Click the Export To button and choose Export to File in a pop-up menu.
Or choose File > Export.
3. Type file name and choose the destination folder.
4. Choose image format in the Format drop-down list.
5. Adjust other settings if they are available for the selected format (resolution, quality, compression, transparency).
6. Click Save. Copying an Image to the Clipboard
Check image resolution in the program Preferences (Art Text > Preferences). Then click the Export To button in the main window and choose Copy to Clipboard.
Chapter 7: Exporting 95
96 Art Text User’s Manual
Transparent Background
Art Text can create and export images with transparent background. For this the following conditions should be met.
Condition 1
To export an image with the transparent background (alpha channel), your design should have the transparent background. To check this out, switch the canvas to the Chessboard background in the program Preferences (Cmd-,). The chessboard will be seen through transparent parts of your design.
Condition 2
When you export your work to an image, use a graphic file format that supports transparency (alpha channel). In Art Text, choose one of the following formats: PDF, TIFF, PNG, GIF (set Include Transparency), EPS.
Condition 3
It doesn’t really concern Art Text, but you should know this. Applications that will receive an image (exported or copied via the clipboard) should support the alpha channel. If an image has white or black background in another program, export from Art Text with another file format.
Replacing Transparency with the Solid Color
When you export to the graphic format that doesn’t support transparency, the transparent parts are filled with a solid color used for the canvas background. This color is white by default. To choose another color, open the program Preferences dialog (Cmd-,) and select the Solid radio button. Then select the color.
Version 2 July 2010
(C) 2010 BeLight Software, Ltd. All rights reserved.
BeLight Software, Ltd. reserves the right to improve, enhance and revise its products without notice.
The information in this document is furnished for informational use only, is subject to change without notice, and should not be constructed as a commitment by BeLight Software, Ltd. BeLight Software assumes no liability for any errors or inaccuracies that may appear in this document.
All trademarks, product and/or brand names mentioned in this publication, are the sole property of their respective owners.
Written by Nick Shubin. Thanks to Irina Stepanovska for help with the creation of this publication.
Art Text End User License Agreement 3
Art Text End User License Agreement
THIS LICENSING AGREEMENT (“AGREEMENT”) IS A LEGAL AGREEMENT BETWEEN YOU, EITHER AN INDIVIDUAL OR A SINGLE ENTITY, AND BELIGHT SOFTWARE (“LICENSOR”). IF YOU DO NOT AGREE TO EACH AND EVERY TERM, YOU ARE TO CLICK “DISAGREE” BUTTON AND NOT TO OPEN, USE OR INSTALL THE SOFTWARE AND YOU MUST DELETE THE SOFTWARE FROM YOUR COMPUTER AND/OR ANY OTHER DATA STORAGE DEVICE.
1. GENERAL The software and documentation accompanying this License whether on disk, on any other media (collectively the “Software”) are licensed to you by BeLight Software (“Licensor”) for use only under the terms of this License, and Licensor reserves all rights not expressly granted to you. The rights granted herein do not include any other patents or intellectual property rights.
Title and intellectual property rights in and to any content displayed by or accessed through the Software belong to the respective content owner. This License does not grant you any rights to use such content.
2. LICENSE Licensor hereby grants to You, and You accept, a non-exclusive license to install and use Software and Documentation, only as authorized in this license. You agree that You will not assign, sub license, transfer, pledge, lease, rent, or share Your rights under this license. You may not reverse engineer, decompile or disassemble the Licensed Software for any purpose whatsoever.
3. TRANSFER You may not distribute copies of the Software to any third party, nor may you use, rent, loan, sublicense, or lease the Software to third parties. You may, however, transfer all your rights to use the Software to another person or legal entity provided that: (a) You also transfer this Agreement, the Software and all other software bundled or pre-installed with the Software, including all copies, Updates and prior versions, to such person or entity; (b) You retain no copies, including backups and copies stored on a computer; and (c) the receiving party accepts the terms and conditions of this Agreement and any other terms and conditions upon which You legally obtained license to the Software. Notwithstanding the foregoing, You may not transfer pre-release or not for resale copies of the Software.
4. ILLEGAL USE You are not to use the Software, whether directly or indirectly, for any illegal purpose under the laws or ordinances of Federal, State, or local governments. It is Your sole responsibility to know and understand the laws and/or ordinances that govern the use of the Software. In the event that You violate any Federal, State or local law or ordinance by direct or indirect use of the Software, You shall take full legal responsibility for such illegal use. You shall hold Licensor harmless and without fault and otherwise indemnify Licensor for any damage, cost or liability incurred by Licensor as a result of any use, whether or not such use is within the scope of the license set forth herein.
4 Art Text User’s Manual
5. UPDATES You may continue to use the previous version of the Software on your computer after You receive the Update to assist You in the transition to the Update, provided that: the Update and the previous version are installed on the same computer; the previous version or copies thereof are not transferred to another party or computer unless all copies of the Update are also transferred to such party or computer; and You acknowledge that any obligation BeLight Software may have to support the previous version of the Software may be ended upon availability of the Update.
6. LICENSOR’S RIGHTS You acknowledge and agree that the Software and Documentation consists of proprietary, published and unpublished property of Licensor. You further acknowledge and agree that all right, title, and interest in and to the Software and Documentation are and shall remain with Licensor. This license conveys to You the right to install and use the Software and Documentation in accordance with the terms of this license. All rights not expressly granted here are reserved by BeLight Software. The Licensor will not transmit your personal information to any third party without your express consent.
7. TERMINATION This license is effective upon Your installing the software on any machine, and shall continue until terminated. You may terminate this Agreement at any time. The Licensor may immediately terminate this License Agreement if you breach any representation, warranty, agreement or obligation contained or referred to in this License Agreement. Upon termination, you must dispose of the Software and all copies or versions of the Software by destroying the Software.
8. LIMITED WARRANTY BeLight Software provides a thirty (30) day money-back guarantee on the Software. If, during this period, you are dissatisfied with the Software for any reason, BeLight Software will refund your money if you return the Software and all copies to the place of purchase within thirty (30) days of the date of the original purchase. THE FOREGOING IS THE SOLE AND EXCLUSIVE WARRANTY OFFERED BY BELIGHT SOFTWARE. BELIGHT SOFTWARE DISCLAIMS ALL OTHER WARRANTIES, EXPRESS OR IMPLIED, INCLUDING BUT NOT LIMITED TO THE IMPLIED WARRANTIES OF MERCHANTABILITY AND FITNESS FOR A PARTICULAR PURPOSE, WITH REGARD TO THE LICENSED SOFTWARE AND ALL ACCOMPANYING MATERIALS. BELIGHT SOFTWARE AND ITS AGENTS DO NOT AND CANNOT WARRANT THE PERFORMANCE OR RESULTS YOU MAY OBTAIN BY USING THE SOFTWARE.
9. LIMITATION OF LIABILITY IN NO EVENT WILL BELIGHT SOFTWARE OR ITS AGENTS BE LIABLE TO YOU FOR ANY DAMAGES, CLAIMS OR COSTS WHATSOEVER OR ANY CONSEQUENTIAL, INDIRECT, INCIDENTAL DAMAGES, OR ANY LOST PROFITS OR LOST SAVINGS. BELIGHT SOFTWARE’S AGGREGATE LIABILITY AND THAT OF ITS AGENTS UNDER OR IN CONNECTION WITH THIS AGREEMENT SHALL BE LIMITED TO THE AMOUNT PAID FOR THE SOFTWARE, IF ANY.
Table of Contents 5
10. FEES You may register your copy of the Software by purchasing a License Code for the download version at: http://www.belightsoft.com/buy/ You may not distribute the License Code. By clicking “Agree”, you acknowledge that you have paid the Licensor all applicable license fees for the Software.
11. SEVERABILITY Should any term of this license be declared void or unenforceable by any court of competent jurisdiction, such declaration shall have no effect on the remaining terms hereof.
12. GENERAL PROVISIONS This License Agreement is personal between You and BeLight Software. It is not transferable and any attempt by You to rent, lease, sublicense, assign or transfer any of the rights, duties or obligations hereunder. YOU ACKNOWLEDGE THAT YOU HAVE READ THIS AGREEMENT, UNDERSTAND IT AND AGREE TO BE BOUND BY ITS TERMS AND CONDITIONS. YOU FURTHER AGREE THAT IT IS THE COMPLETE AND EXCLUSIVE STATEMENT OF THE AGREEMENT BETWEEN YOU AND BELIGHT SOFTWARE WHICH SUPERSEDES ANY PROPOSAL OR PRIOR AGREEMENT, ORAL OR WRITTEN, AND ANY OTHER COMMUNICATIONS BETWEEN YOU AND BELIGHT SOFTWARE OR BELIGHT SOFTWARE’S AGENT(S) RELATING TO THE LICENSED SOFTWARE.
If you have any questions regarding this Agreement or if you wish to request any information from BeLight Software please use the address and contact information included with this product to contact BeLight Software.
© 2010 BeLight Software, Ltd. All Rights Reserved. BeLight Software and Art Text are trademarks of BeLight Software, Ltd. Mac, the Mac logo, Mac OS X, iPhoto, and Macintosh are trademarks of Apple Computer, Inc. All other trademarks, registered trademarks, product and/or brand names are the sole property of their respective owners.
6 Art Text User’s Manual
Contents
Chapter 1: Introduction.................................. 9
Welcome to Art Text .............................................................. 9 System Requirements............................................................ 9 Installing and Removing Art Text ............................................. 9 Updating Art Text .................................................................10 Registration.........................................................................10 Technical Support.................................................................11 Useful Web Resources...........................................................11 Conventions Used in this Document ........................................12
Chapter 2: Getting Started ........................... 13 Setting up the Program after Installation ............................... 13 Quick Start Guide....................................................................15
Step 1: Opening a New Document..........................................15 Step 2: Setting Up the Image Size..........................................15 Step 3: Changing Text or Choosing an Image...........................16 Step 4: Applying Effects........................................................17 Step 5: Applying Transformation ............................................19 Step 6: Adding More Text or Graphic Objects ...........................20 Step 7: Organizing Layers in Your Document............................20 Step 8: Adding the Background..............................................22 Step 9: Saving Your Document...............................................23 Step 10: Exporting the Final Image ........................................23
The Effects Guide....................................................................24 Using Styles............................................................................28
Chapter 3: Art Text Interface ....................... 31 The Art Text Workspace..........................................................31 Program Settings....................................................................33 Art Text Menus ....................................................................... 35 Art Text Keyboard Shortcuts...................................................40
Chapter 4: Working with Documents ............ 43 Using Templates ..................................................................... 43 Creating, Opening and Saving Documents .............................. 44 Document Size........................................................................45
Chapter 5: Working with Layers ................... 47 Introduction to Layers and Objects ........................................47 Object Size and Location.........................................................48
Object Size..........................................................................48
Table of Contents 7
8
Art Text User’s Manual
Object Location....................................................................48
Managing Layers.....................................................................49
The Layers Panel..................................................................50
The Layer Bar ......................................................................52
The Layer Content Window.....................................................54
Editing Text .........................................................................54 Choosing a Shape ................................................................55 Choosing an Icon .................................................................55 Choosing a Custom Vector Image ...........................................56 Choosing an Image File.........................................................56
Merging Layers ....................................................................... 57
Join Layers..........................................................................58 Union Layers .......................................................................59 Subtract Layers....................................................................60 Intersect Layers...................................................................61
Splitting Layers ......................................................................62 Blending Layers......................................................................64 The Editor of Vector Shapes....................................................70
The Library of Custom Images ...............................................70 The Interface of the Editor.....................................................71 Points and Paths ..................................................................72 Drawing a Shape..................................................................74 Adding Anchor Points............................................................74 Deleting Anchor Points..........................................................74 Changing the Type of Anchor Points ........................................74 Moving Anchor Points............................................................74
Chapter 6: Graphic Tools and Effects ............ 75 Basics ..................................................................................... 75 The Fill Effect..........................................................................76 Applying Textures...................................................................78 Applying Materials..................................................................80 The Editor of Materials............................................................83
Materials Based on Shaders...................................................84 Parameters of Light Sources ..................................................86 Materials Based on Images....................................................87
The Stroke Effect .................................................................... 88 The Shadow Effect..................................................................89 The Glow Effect.......................................................................90 Transformations ..................................................................... 91
Geometric Transformations....................................................92 Spline Transformations..........................................................93 The Set Size Controls............................................................94
Chapter 7: Exporting .................................... 95 Exporting................................................................................95 Transparent Background ........................................................96
Chapter 1: Introduction
Welcome to Art Text
The Art Text application is intended for creating unique textual graphics by applying effects to text and vector shapes. Your work can be saved in the native Art Text format or in common graphic file formats.
Images created in Art Text can be used in publishing materials, on web pages, or in other applications.
In Art Text, you will find: • 2D effects (shadow, blur, stroke) • 3D effects (adjustable color, shape, light) • Transformation (geometric deformation of text or images)
The program is supplied with well tuned styles that can be applied to your original text or graphics.
The retail version of Art Text includes additional fonts.
System Requirements
• Apple Macintosh computer with PowerPC or Intel processor • Mac OS X v10.4.11 or later • 100 MB of available disk space
Installing and Removing Art Text
To install, double-click the Art Text installer in Finder. Then drag the Art Text icon into the Applications folder.
If you wish to remove the program from your computer please complete the following steps:
• Quit Art Text. • Delete the “Art Text 2” application from the Applications folder; • Delete “com.belightsoft.arttext2.plist” file from
“~/Library/Preferences/”, • Delete the “Art Text” folder from
“~/Library/Application Support/BeLight Software/”. Here “~“ is user’s home folder.
Chapter 1: Introduction 9
10 Art Text User’s Manual
Updating Art Text
From time to time, the software developer releases new versions of the product.
To change your copy to a new version, you just need to install an update. Before launching the update installer, make sure that the application and the supporting files are at the default location. Usually they are if you have followed the installation procedure and didn’t change paths or transfer files manually. The default file location can be found in the “Installing and Removing Art Text” section.
To check for the latest update, visit the Art Text Updates web page:
http://www.belightsoft.com/arttext/update
Registration
If you have already purchased Art Text from BeLight Software or its resellers, you will find the license code either on the back of the disc envelope (boxed retail edition) or in the purchase confirmation e-mail (retail or standard edition via download).
To register Art Text: 1. Open the application. 2. Bring up the License dialog by choosing Art Text > License... in the
menu. 3. Enter your name and license code.
It’s recommended that you keep the e-mail or the disc package containing your license code in a safe place in case you need to register the application after re-installation or update.
The unregistered version of Art Text is fully operational. The only limitation is that it adds the “Trial” text over the resulting image. To eliminate this text, you need to register your copy of the software.
You can purchase a license code on the developer’s web site:
http://www.belightsoft.com/buy/
Technical Support
The developer of Art Text offers free technical support. By E-mail:
support@belightsoft.com
Technical support form on BeLight’s website:
http://www.belightsoft.com/support/
Forum on BeLight’s website:
http://www.belightsoft.com/forum/
When reporting a problem, please make sure to specify: • The version of Art Text you are using. • The version of Mac OS X installed on your computer. • Your previous actions that could have lead to the problem. • If the problem persists, describe how to reproduce it.
• When necessary, illustrate your report with screenshots (press Cmd-Shift-3 to save a screenshot on your Desktop).
Useful Web Resources
Art Text Page:
http://www.belightsoft.com/arttext/
Information about Art Text, links to the Download, Latest Update, Buy, and FAQ sections.
BeLight Software Web site:
http://www.belightsoft.com
Check it out for updates, new product announcements, and special offers.
BeLight Software Technical Support:
http://www.belightsoft.com/support
Visit this link if you have questions about the software.
Chapter 1: Introduction 11
12 Art Text User’s Manual
Conventions Used in this Document
• Bold Text is used for names of menu items, shortcuts, buttons, radio buttons, edit boxes, check boxes and other controls.
• Text in Italics is used for names of windows, dialog boxes, panels, tabs and other elements of the program interface. Such text formatting is used for names of programs, files, folders and web links.
It is also used for chapter and section references, and to introduce important remarks.
• For menu items hierarchy, the “>” symbol is used. A record File > Open is equivalent to “the Open item under the File menu”.
• A shortcut (shortkey) is one or several keys which are pressed together. Cmd-S means you should hold down the Command (Apple) key while pressing the S key, then release them.
• Ctrl-click is a click holding the Ctrl key down. Right-click is a click by the right button of a two-button mouse. Both actions are equivalent.
• Context (contextual or shortcut) menu is a pop-up menu which contains options that vary depending on the object (image, text, etc.) you have clicked on. To open the context menu, right-click or Ctrl-click on the object.
Chapter 2: Getting Started 13
Chapter 2:
Getting Started
Setting up the Program after
Installation
The information below covers the most important settings to start your work with Art Text.
1. Register the program if you have purchased a license code. Otherwise, the program will work in the demo mode.
To do this, choose Art Text > License... from the menu to open the registration dialog box. Input your name and your license code.
After successful registration, the program will offer you online registration. You can register or skip registration.
By registering online, you are sending your data to the developer’s data base. This makes it possible to send your license code back to you in case it gets lost. The online registration does not turn the program from the demo to the registered mode.
14 Art Text User’s Manual
2. Set up the program Preferences (Art Text > Preferences...).

1 – Deselect the Open Template Gallery on start-up check box if you don’t use the built-in templates.
2 – Keep the Snap option enabled. Text and images will align to each other when you move them around.
3 – Keep the Use Core Image software rendering option disabled. In this case, rendering is quicker because the graphic card (not the CPU) does this job.
4 – The resolution of an image pasted in the clipboard. It is important when your work is finished and you are going to copy it to another program. Leave this parameter alone for now.
5 – Choose your preferable background. Working with white background is better for beginners as the preview area looks like an ordinary page. The chessboard background lets you see transparent parts of your design.
6 – Specifies whether the program automatically checks for updates. To check for updates manually, choose Art Text > Check for Updates...
More details can be found in Chapter 3, “Art Text Interface” > “Program Settings”.
Chapter 2: Getting Started 15
Quick Start Guide
This guide describes some possible steps of using Art Text. Steps described below and their order are not obligatory. Some of them can be skipped, performed several times, or in another order.
For a better understanding of the location and names of program controls, it is recommended that you look through “The Art Text Workspace” section.
Step 1: Opening a New Document
To open a blank Art Text document, choose File > New. For learning purposes, you can load a template from the built-in collection
(File > Template Gallery) and then modify it. Step 2: Setting Up the Image Size
Set up the final image size (what will be exported to a file or another program). To do this, click the Set Size button in the main window. The white or chessboard-like background shows the image edges. Objects or their parts outside the image area will be trimmed at export.
You can change the image size at any time later.
16 Art Text User’s Manual
Step 3: Changing Text or Choosing an Image
By default the “Art Text” text is displayed on the canvas. To change text or replace it with an image, double-click the “Art Text” icon in the bottom panel (Layer bar). This will bring up the Layer Content panel displaying the Text tab.

To choose a shape or icon, switch to the corresponding tab.
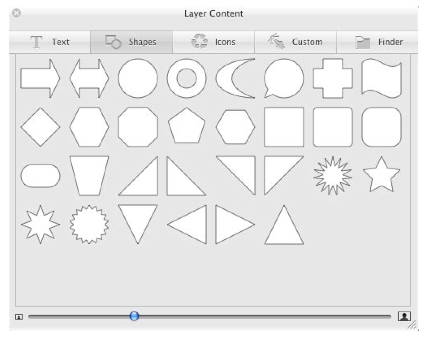
Once you have changed the layer content (text or image), close the panel. The icon in the Layer bar will change correspondingly.
Chapter 2: Getting Started 17
Step 4: Applying Effects
The color and fill related settings can be found in the Effects tab (4) of the right panel. You can choose color or gradient fill (1), texture library (2), or materials (3). You can also apply stroke (7), shadow (8), or glow (9) effects. The Geometry tab (5) is described below.
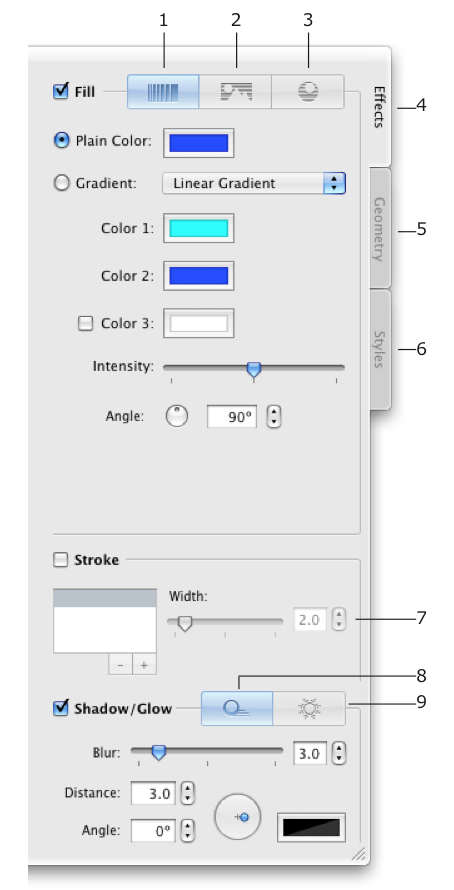
18 Art Text User’s Manual
Browse through the library of pre-designed styles (6). A style is a set of effects that can be applied at once. Styles are located in a separate tab.
You can preview them applied to your text or icon. To do this, deselect the Use Text from Templates check box at the bottom.
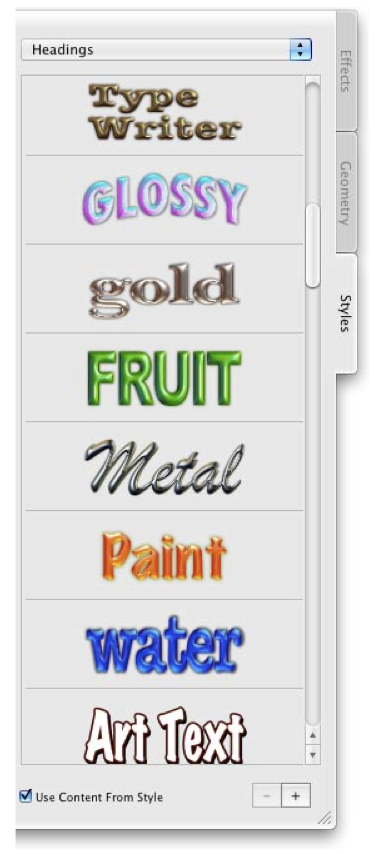
Chapter 2: Getting Started 19
Step 5: Applying Transformation
To change the shape of text or icon, open the Geometry tab in the right panel. It displays thumbnails of geometric transformations. Choose one by clicking on it and adjust the amount of distortion using the slider(s) below.
Handles on the corners and sides of the object frame can be moved with the mouse. Drag them to resize or change the shape (spline transformations only).
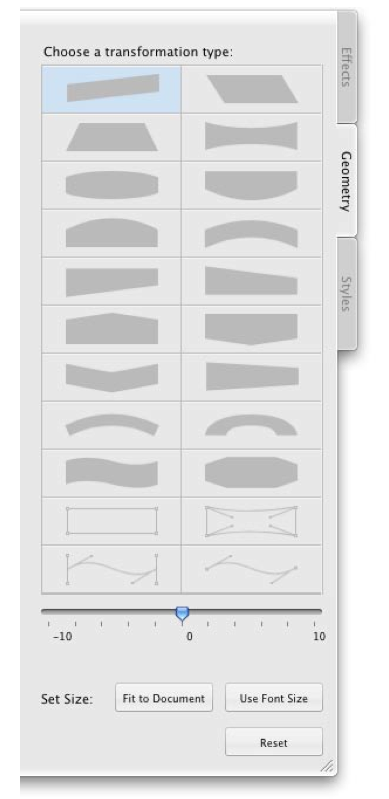
20 Art Text User’s Manual
Step 6: Adding More Text or Graphic Objects
Each new text or image should be located in a new layer. Icons of layers are shown in the Layer bar at the bottom of the main window.
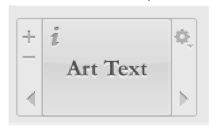
To add a new layer, click the “+” button in the Layer bar. Unnecessary layers can be removed using the “–” button.
A new layer will contain the default text. Step 3 describes how to change it. Steps 4 and 5 describe how to apply effects to the content of new layers.
Step 7: Organizing Layers in Your Document
Note that depending on your design idea, this step can be performed after adding new layers, but before applying or adjusting any effects.
Two controls in Art Text are responsible for layers: Layer bar and Layers panel. The Layer bar is located at the bottom of the main window.

Chapter 2: Getting Started 21
The Layer bar displays icons of layers with layer content. When a layer is active, the icon is highlighted. When you apply effects or change their settings, the active layer is affected.
To add a new layer, click the “+” button. To remove the active layer, click the “-” button.
Layers overlap each other. The icon of the top layer is to the right in the Layer bar. The bottom layer is to the left. Drag an icon left of right in the bar to change the layer order.
The Layers panel displays names of all the layers in the document. You can drag them in the list to change the layer order. The panel lets you rotate layers and change their opacity and blend mode.
To open the panel, choose Window > Show Layers Panel from the menu.

22 Art Text User’s Manual
Step 8: Adding the Background
To add a background image or colored background:
1. Add a new layer.
2. Move its icon in the Layer bar to the leftmost position.
3. Double click the icon to open the Layer Content panel.
4. Open the Shapes tab of the panel.
5. Click on a rectangle and close the panel.
6. To choose a plain color or gradient, open the Fill tab in the Effects section.
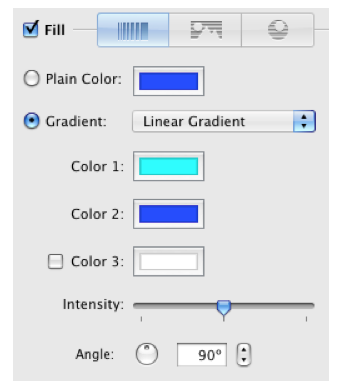
Chapter 2: Getting Started 23
To choose an image, open the Texture tab in the Effects section. Click the Category drop-down list and choose a library section. Then click on an image. To select an image located on the hard drive, choose the Finder item in the Category drop-down. Select a folder containing images.

Step 9: Saving Your Document
To save your document, choose File > Save in the menu.
Step 10: Exporting the Final Image
To export your work, click the Export To... button in the main window. Then choose the destination: the clipboard or a graphic file.

The resolution of the image pasted into the clipboard can be set in the program Preferences (Cmd-,).
When you are exporting to a file, choose the graphic format, resolution, and type a file name. Some formats have more export options.
24 Art Text User’s Manual
The Effects Guide
Below are represented graphic effects that can be applied in Art Text.
Color fill
Relates information: Chapter 6, “Graphic Tools and Effects” > “The Fill Effect”

Gradient fill
Relates information: Chapter 6, “Graphic Tools and Effects” > “The Fill Effect”

Stroke
Relates information: Chapter 6, “Graphic Tools and Effects” > “The Stroke Effect”

Texture
Relates information: Chapter 6, “Graphic Tools and Effects” > “Applying Textures”

Material
Relates information: Chapter 6, “Graphic Tools and Effects” > “Applying Materials”

Image-based material
Relates information: Chapter 6, “Graphic Tools and Effects” > “Applying Materials”

Chapter 2: Getting Started 25
26 Art Text User’s Manual
Transformation
Relates information: Chapter 6, “Graphic Tools and Effects” > “Transformations”

Spline transformation
Relates information: Chapter 6, “Graphic Tools and Effects” > “Transformations”

Shadow
Relates information: Chapter 6, “Graphic Tools and Effects” > “The Shadow Effect”

Chapter 2: Getting Started 27
Glow
Relates information: Chapter 6, “Graphic Tools and Effects” > “The Glow Effect”

28 Art Text User’s Manual
Using Styles
A style is a set of effects that can be applied at once. Styles are located in the Styles tab of the right side panel. Choose View > Styles Panel to open it.
Styles are grouped into categories. You can choose a category in a pop-up menu at the top. You can add custom styles to the library.
To apply a style, select it in the side panel. The selected style will be applied to the active layer.
Parameters of applied effects can be saved as a custom style. This is useful when you need to create several pieces of text or several images with the same effects.
To add a new style, click the “+” button.
To remove a custom style, select it in the list and click the “-” button. Built-in styles cannot be removed.
The Use content from style option lets you choose whether to show the selected style with the default content or with your own. Note that the default content was selected as the best for demonstrating the style.
Chapter 2: Getting Started 29
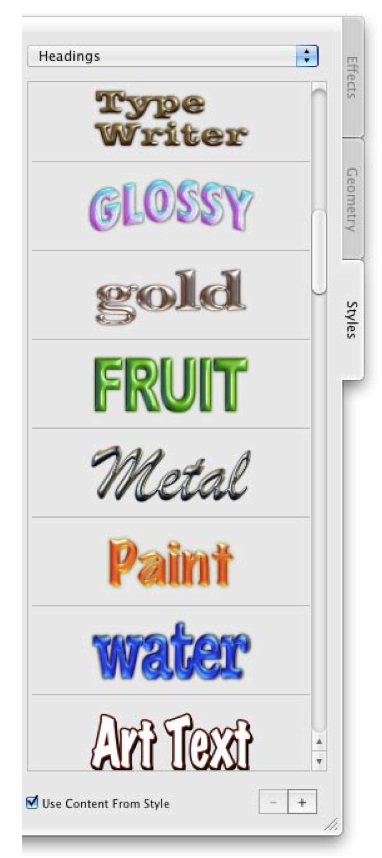
30 Art Text User’s Manual
Chapter 3: Art Text Interface
Chapter 3: Art Text Interface
The Art Text Workspace

1 – The Layer bar displays icons of all layers in your document. It lets you add and delete layers, change their stacking order, and change the layer content.
2 – Canvas. This is the area where you preview the image.
3 – The “Hide/Show Layer Border” button. Handles on the border are used for resizing objects.
4 – The Set Size button. Click it to change the document size (dimensions of the final image).
5 – The “Export To...” button. Click it to copy the image to the clipboard or export it to a graphic file.
32 Art Text User’s Manual
6 – The plain color and gradient fill tools.
7 – The texture library.
8 – The material library.
9 – The Effects tab contains the Fill section, the texture and material libraries.
10 – The Geometry tab contains transformation patterns.
11 – The Styles tab contains the library of styles (pre-designed sets of effects that can be applied at once).
12 – The Stroke tool. 13 – The Shadow and Glow tools.
Chapter 3: Art Text Interface 33
Program Settings
To open program settings, use the Art Text > Preferences menu. 1
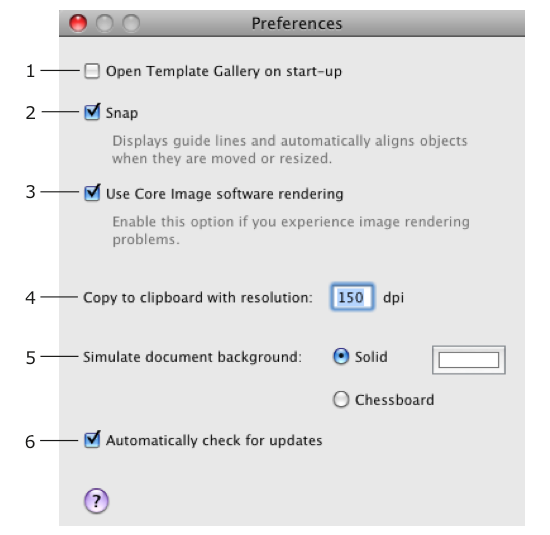
1 – Open the built-in library of templates when the program starts. 2 – Automatically align an object to other objects when you move or resize it.
3 – Use Core Image software renderer – activates software rendering instead of rendering by the graphic processor. Select this check box when the exported image contains artifacts (for instance, unwanted vertical or horizontal lines across the image). Software rendering may be slower than rendering by the graphic processor.
4 – Resolution of images copied to the clipboard. It is important when you copy the final image to another application.
5 – Color of the document background. It is simulated on the canvas. The chessboard background lets you see transparent parts of your design. The Solid color is used for the background of the exported image if the selected graphic format doesn’t support transparency (see Chapter 7,
“Exporting” > “Transparent Background”).
34 Art Text User’s Manual
6 – Specifies whether the program automatically checks for updates. To check for updates manually, choose
Art Text > Check for Updates...
Chapter 3: Art Text Interface 35
Art Text Menus

The “Art Text” Menu
The “File” Menu
About Art Text
Display the dialog with information about the program.
License
Open the registration dialog box.
Check for Updates
Check for the latest update on the Internet.
Preferences (Cmd-“,”)
Bring up the program preferences dialog.
Quit Art Text (Cmd-Q)
Quit the application.
Template Gallery (Cmd-Shift-N)
Open a library of pre-designed documents.
New (Cmd-N)
Create a new document.
Open (Cmd-O)
Open a document.
Open Recent >
Open one of recently edited documents.
Close (Cmd-W)
Close the open document window.
Save (Cmd-S)
Save the current document.
Save As (Cmd-Shift-S)
Save a copy of the current document.
Revert
Cancels all the changes in the current document that were made after the last saving.
Export (Cmd-E)
Export the current document to a graphic file.
Save Layer As Style (Cmd-Opt-S)
Save the active layer to the library of styles, custom section.
Page Setup (Cmd-Shift-P)
Open the standard Page Setup dialog for changing the size, orientation and other parameters of the page.
Print (Cmd-P)
Bring up the standard Print dialog.
36 Art Text User’s Manual
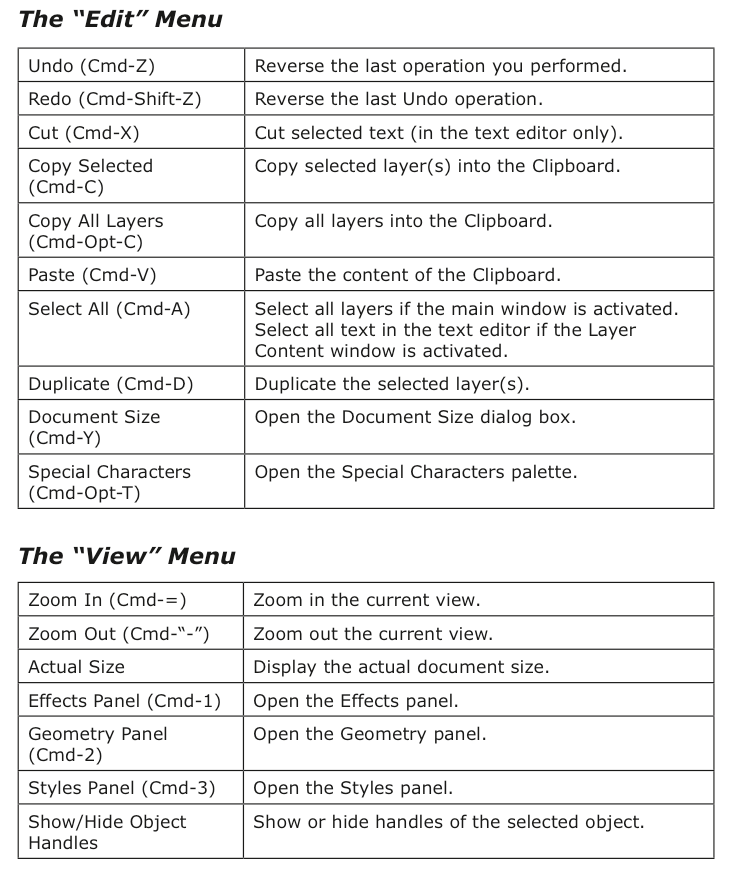
The “Edit” Menu
The “View” Menu
Undo (Cmd-Z)
Reverse the last operation you performed.
Redo (Cmd-Shift-Z)
Reverse the last Undo operation.
Cut (Cmd-X)
Cut selected text (in the text editor only).
Copy Selected (Cmd-C)
Copy selected layer(s) into the Clipboard.
Copy All Layers (Cmd-Opt-C)
Copy all layers into the Clipboard.
Paste (Cmd-V)
Paste the content of the Clipboard.
Select All (Cmd-A)
Select all layers if the main window is activated. Select all text in the text editor if the Layer Content window is activated.
Duplicate (Cmd-D)
Duplicate the selected layer(s).
Document Size (Cmd-Y)
Open the Document Size dialog box.
Special Characters (Cmd-Opt-T)
Open the Special Characters palette.
Zoom In (Cmd-=)
Zoom in the current view.
Zoom Out (Cmd-“-”)
Zoom out the current view.
Actual Size
Display the actual document size.
Effects Panel (Cmd-1)
Open the Effects panel.
Geometry Panel (Cmd-2)
Open the Geometry panel.
Styles Panel (Cmd-3)
Open the Styles panel.
Show/Hide Object Handles
Show or hide handles of the selected object.
Chapter 3: Art Text Interface 37
The “Layers” Menu
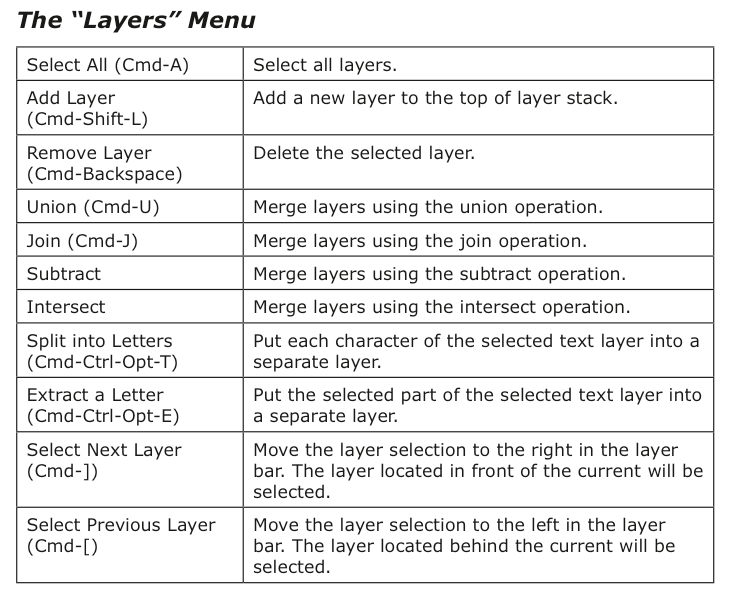
Select All (Cmd-A)
Select all layers.
Add Layer (Cmd-Shift-L)
Add a new layer to the top of layer stack.
Remove Layer (Cmd-Backspace)
Delete the selected layer.
Union (Cmd-U)
Merge layers using the union operation.
Join (Cmd-J)
Merge layers using the join operation.
Subtract
Merge layers using the subtract operation.
Intersect
Merge layers using the intersect operation.
Split into Letters (Cmd-Ctrl-Opt-T)
Put each character of the selected text layer into a separate layer.
Extract a Letter (Cmd-Ctrl-Opt-E)
Put the selected part of the selected text layer into a separate layer.
Select Next Layer (Cmd-])
Move the layer selection to the right in the layer bar. The layer located in front of the current will be selected.
Select Previous Layer (Cmd-[)
Move the layer selection to the left in the layer bar. The layer located behind the current will be selected.
38 Art Text User’s Manual
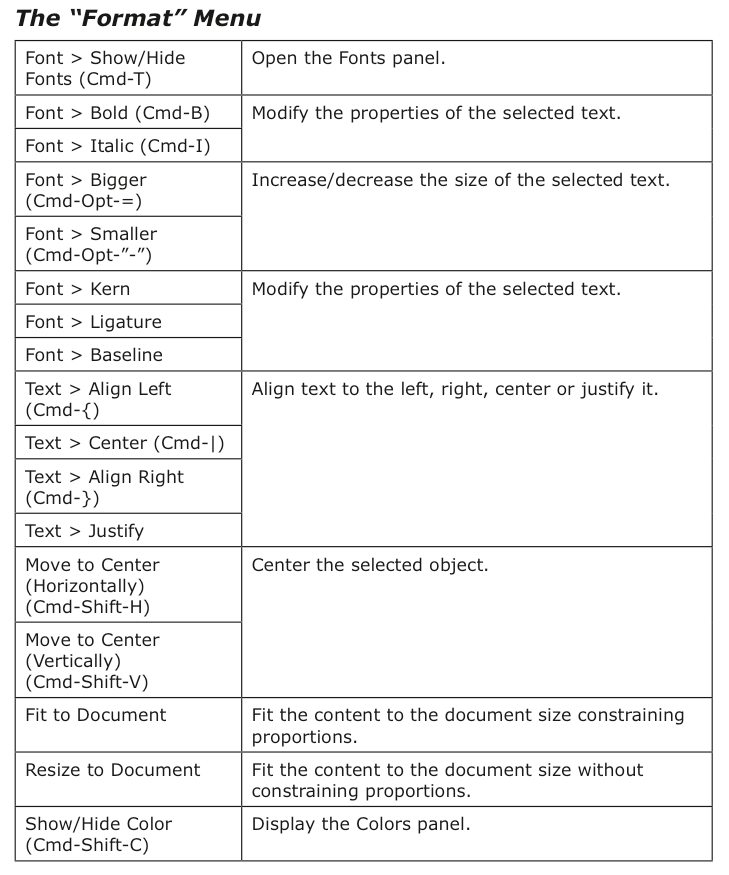
The “Format” Menu
Font > Show/Hide Fonts (Cmd-T)
Open the Fonts panel.
Font > Bold (Cmd-B)
Modify the properties of the selected text.
Font > Italic (Cmd-I)
Font > Bigger (Cmd-Opt-=)
Increase/decrease the size of the selected text.
Font > Smaller (Cmd-Opt-”-”)
Font > Kern
Modify the properties of the selected text.
Font > Ligature
Font > Baseline
Text > Align Left (Cmd-{)
Align text to the left, right, center or justify it.
Text > Center (Cmd-|)
Text > Align Right (Cmd-})
Text > Justify
Move to Center (Horizontally) (Cmd-Shift-H)
Center the selected object.
Move to Center (Vertically) (Cmd-Shift-V)
Fit to Document
Fit the content to the document size constraining proportions.
Resize to Document
Fit the content to the document size without constraining proportions.
Show/Hide Color (Cmd-Shift-C)
Display the Colors panel.
Chapter 3: Art Text Interface 39

The “Window” Menu
The “Help” Menu
Minimize (Cmd-M)
Minimize the currently active window.
Zoom
Fit the program window to the screen size.
Show/Hide Layers Panel (Cmd-L)
Show or hide the Layers panel.
Show/Hide Layer Content (Cmd-Shift-I)
Show or hide the Layer Content window.
Art Text Help (Cmd-?)
Open Help documentation delivered with the application.
BeLight Software Web Site
Open the web site of the Art Text manufacturer.
Send Feedback..Lets you send feedback to the developers by e-mail.
Online Registration..Open the online registration form.
40 Art Text User’s Manual
Art Text Keyboard Shortcuts

Documents
Cmd-S
Save the current document.
Cmd-Shift-S
Save a copy of the current document.
Cmd-Opt-S
Save the active layer to the library of styles into the custom section.
Cmd-O
Open a document.
Cmd-N
Create a new document.
Cmd-Shift-N
Open a library of pre-designed documents.
Cmd-E
Export the current document to a graphic file.
Cmd-W
Close the active document window.
Cmd-Q
Exit the application.
Cmd-Z
Reverse the last operation you performed.
Cmd-Shift-Z
Reverse the last Undo operation.
Cmd-=
Zoom in the current view.
Cmd-“-”
Zoom out the current view.
Cmd-Y
Open the Document Size dialog box.
Chapter 3: Art Text Interface 41
Windows and Panels

Layers and Objects

Cmd-“,”
Bring up the program preferences dialog.
Cmd-Shift-C
Display the Colors pane.
Cmd-Opt-T
Open the Special Characters palette.
Cmd-M
Minimize the currently active window.
Cmd-Shift-P
Open the standard Page Setup dialog for changing the size, orientation and other parameters of the page.
Cmd-P
Bring up the standard Print dialog.
Cmd-Shift-I
Show or hide the Layer Content window.
Cmd-L
Show or hide the Layers panel.
Cmd-1
Open the Effects panel.
Cmd-2
Open the Geometry panel.
Cmd-3
Open the Styles panel.
Cmd-Shift-L
Add a new layer to the top of layer stack.
Cmd-Backspace
Delete the active layer.
Cmd-C
Copy selected layer(s) into the Clipboard.
Cmd-Opt-C
Copy all layers into the Clipboard.
Cmd-V
Paste the content of the Clipboard into a new layer.
Cmd-X
Cut selected layer(s).
Cmd-A
Select all layers.
Cmd-D
Duplicate the current layer.
Cmd-Shift-H
Center the selected object horizontally.
Cmd-Shift-V
Center the selected object vertically.
Cmd while moving an object
Disable the snap function.
Cmd-J
Merge layers using the join operation.
Cmd-U
Merge layers using the union operation.
42 Art Text User’s Manual

Cmd-]
Move the layer selection to the right in the layer bar. The layer located in front of the current will be selected.
Cmd-[
Move the layer selection to the left in the layer bar. The layer located behind the current will be selected.
Cmd-Ctrl-Opt-T
Put each character of the selected text layer into a separate layer.
Cmd-Ctrl-Opt-E
Put the selected part of the selected text layer into a separate layer.
Text Editing and Formatting
Other

Cmd-V
Paste text from the Clipboard into the edit box.
Cmd-A
Select all text in the text editor of the Layer Content window.
Cmd-{
Align left.
Cmd-|
Center text.
Cmd-}
Align right.
Cmd-T
Display the Font panel.
Cmd-B
Make text bold.
Cmd-I
Turn text to italic.
Cmd-Opt-=
Increase the font size.
Cmd-Opt-“-”
Decrease the font size.
Cmd-?
Open the built-in Help.
Chapter 4: Working with Documents 43
Chapter 4: Working with Documents
Using Templates
To access templates, choose File > Template Gallery (Cmd-Shift-N). Templates are grouped into categories. To open a different category, click on its name at the bottom of the window.
To open a template, double-click on its thumbnail. Or click on a thumbnail followed by the Choose button.
You can use templates to learn the program or modify them to create a new document.
Note that templates and styles are not the same. A template is a complete document. A style is a set of settings that can be applied to your text or image. Templates can consist of one or several layers.
44 Art Text User’s Manual
Creating, Opening and Saving
Documents
To create a new document, choose File > New in the menu.
To open an existing document, choose File > Open in the menu. Or double- click on a document file in Finder.
To save a document, choose File > Save in the menu.
Chapter 4: Working with Documents 45
Document Size
To set up the document size, choose Edit > Document Size, or click Set Size... in the main window.
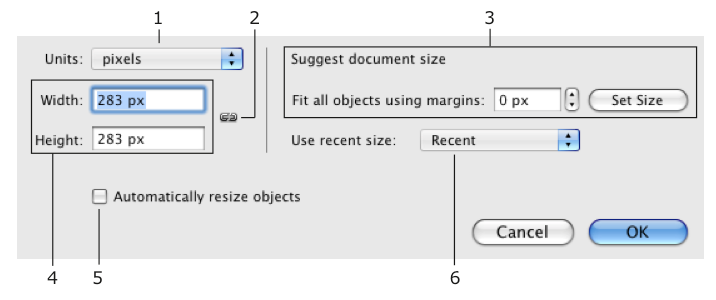
1 – Measurement units used for the whole application.
2 – Maintain proportions when one of document sides was changed. The current document width and height are used to calculate the side proportion when you open the Document Size dialog box. This value is used to calculate new height or width until you click OK.
3 – The Set Size button changes the document size so that all visible objects are included. The amount of the blank space around the objects can be set by the margins control.
4 – Document size.
5 – The Automatically resize objects check box activates resizing the design when you change the document size. Proportions of the design are constrained.
6 – Choose one of previous document sizes.
For default document size for new documents, the program takes the last applied width and height.
46 Art Text User’s Manual
Chapter 5: Working with Layers 47
Chapter 5: Working with Layers
Introduction to Layers and Objects
The object term is used here for text or an image. Note that parts of text can be separate objects as in the picture below. An object can be selected, in this state its resize handles are displayed.

Objects in Art Text are located one over another forming a layered structure. One layer contains only one object. Adding or removing a layer means also adding or removing an object. No object can exist without a layer.
Some operations provided in Art Text are natural for objects (changing color or creating a shadow effect). Others are natural for layers (merging layers). When we discuss the object layering, we will talk about layers. When we mention the layer content or applying effects, we will talk about objects.
Tools for working with layers usually change the appearance of the content. For working with layers, you will use the Layers panel and the Layer bar.
See Chapter 5, “Working with Layers” > “Managing Layers”. To choose an image or edit text, you should use the Layer Content window.
See Chapter 5, “Working with Layers” > “The Layer Content Window”.
To modify objects, you will use the Effects (Cmd-1), Geometry (Cmd-2) or Styles (Cmd-3) tab.
48 Art Text User’s Manual
Object Size and Location Object Size
Before setting up the size of an object, check the document size that defines the size of the final image (displayed by white or chessboard background). For this, click the Set Size button in the main window.
To resize an object, drag its corner or side handle. If the handles are invisible, click the Hide/Show Object Handles button in the main window (View > Hide/Show Object Handles). The handles are also used to define the active layer.
To set the size of the object precisely, use the Layers panel. Choose Window > Show/Hide Layers Panel (Cmd-L).
To make an object to meet the document size, use Format > Fit to Document or Format > Resize to Document.
The Fit to Document function resizes text or image proportionally so that its bigger size fits the documents size.
The Resize to Document function does not constrain the proportion.
The Use Font Size button in the Geometry tab restores the original text size. After clicking the button, the size of letters corresponds the font size set in the Fonts panel.
Object Location
To move an object to other location, drag it with the mouse. While you are moving it around, guide lines can appear showing that the object has aligned to other object or to the center of the work area.
If this is enabled in the program Preferences, the object you are moving snaps to other objects. For temporary disabling the snap function, hold the Cmd key while you are moving an object.
To move the selected object that lays behind others, press and hold the Option key before you start moving the object. This will prevent occasional selection of another object.
To set up numeric coordinates of the selected object, use the Layers panel.
Chapter 5: Working with Layers 49
Managing Layers
Functions related to layers are located in the Layers panel and Layer bar.
The Layers panel: • adding an removing layers; • renaming layers; • changing the order of layers; • changing the layer opacity; • changing the size of an object; • rotating layers; • flipping the layer content.
The Layer bar: • adding an removing layers; • duplicating layers; • changing the order of layers; • changing the content of a layer; • merging layers.
50 Art Text User’s Manual
The Layers Panel
The Layers panel displays a list of layers (1 in the picture). The active layer is highlighted. Its parameters (3 – 8) are displayed below the list.
To open or close the Layers panel, choose Window > Show/Hide Layers Panel (Cmd-L).
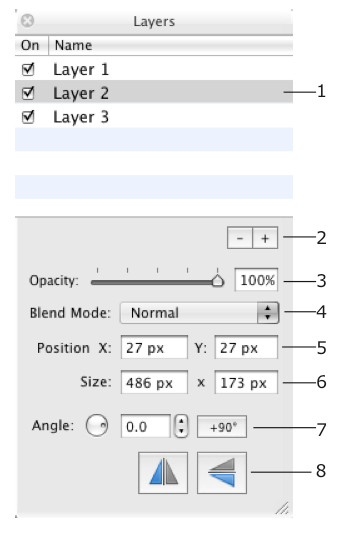
1 – List of layers.
2 – Remove Layer and Add Layer buttons.
3 – Opacity of the layer content.
4 – Blend mode selector – the way of blending the content of layers. See Chapter 5: “Working with Layers” > “Blending Layers” for more details.
5 – Position of the selected object in the document. The zero point is the bottom left corner.
6 – Size of the selected object. You can also resize the object using the resize handles.
Chapter 5: Working with Layers 51
7 – Rotate the layer content. 8 – Flip the layer content.
You can change parameters of several selected layers together. To select several layers, click on their names holding the Cmd or Shift button.
Renaming Layers
To change the layer name in the list, double-click on it.
Changing the Layer Order
The order of layer names in the list reflects the layer stack order. It determines how objects overlap one another. The layer located at the top of the list is atop others. The layer at the bottom of the list is behind all other layers.
To change the stack order, drag the layer name to a new position in the list.
Hiding the Layer Content
Click a check box next to each layer name to hide or show the layer content.
Adding and Removing Layers
Click the “plus” button to add a new layer.
To create a copy of an existing layer, use the Duplicate function in the Layer bar.
Click the “minus” button to remove the active layer.
52 Art Text User’s Manual
The Layer Bar

The Layer bar is located at the bottom of the main window and displays icons of layers. When a layer is selected, its icon becomes highlighted. Several layers can be selected to modify them together.
To change the layer stack order, drag an icon to the left or right. The rightmost icon corresponds to the top layer.
Compare the two pictures below:
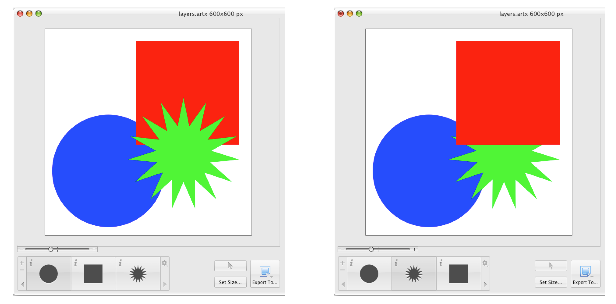
Chapter 5: Working with Layers 53
The star is on top of the other shapes in the left picture. Its icon is in the rightmost position in the Layer bar. Moving the icon to the left (see the right picture), you move the star behind other objects on the canvas.
To change text or an image in the active layer, open the Layer Content window by double-clicking the layer icon.
To choose a graphic file for the active layer, you can also drag it from the Finder application and drop onto the layer icon in the Layer bar.

1 – Add a new layer with the default content. 2 – Delete layer and its content. 3 and 8 – Scroll layer icons.
4 – Click the “i” icon to open the Layer Content window.
5, 6 and 7 – Icons of layers displaying the layer content.
9 – Layer actions menu that includes the following functions: • The Remove function removes a layer and its content. It does the same
as the “minus” button (2). • The Duplicate function creates a copy of the selected layer. • The Join, Union, Subtract and Intersect functions create a new layer
out of several selected layers. These functions are described in Chapter 5:
“Working with Layers” > “Merging Layers”. • The Split into Letters and Extract a Letter functions create several
layers out of one. These functions are described in Chapter 5: “Working
with Layers” > “Splitting Layers”. • The Show/Hide Layers Panel item opens and closes the Layers panel. • The Add Layer With Image... function creates a new layer and lets you
choose an image to place in it. Use this feature for adding background images.
54 Art Text User’s Manual
The Layer Content Window
The Layer Content window displays the content of the active layer. It lets you: • edit text; • choose a shape; • choose an icon;
• choose an image file.
To open the Layer Content window, double-click the layer icon in the layer bar at the bottom of the main window.
Editing Text
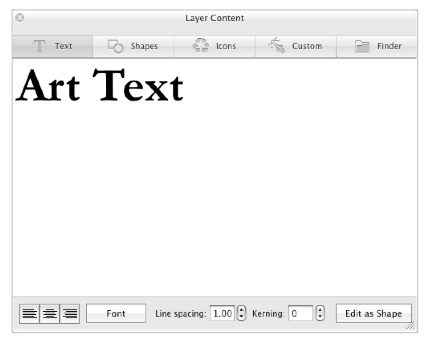
The Text tab can be used as a simple text editor. You can type your text right here or paste text from other sources.
The alignment buttons affect the whole text.
The Font button opens the standard Font panel. You can change the font of the selected part of text or of the whole text.
Line spacing can be applied to selected text lines or to the whole text. Kerning changes the distance between letters of the selected text.
To convert text to a vector image, click the Edit as Shape button. The created image will be opened in the vector image editor.
Chapter 5: Working with Layers 55
Choosing a Shape
Open the Shapes tab and click on a shape thumbnail.
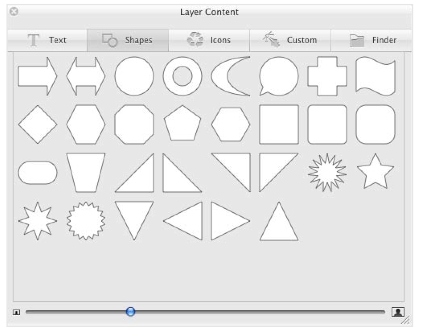
The buttons and scroll bar at the bottom change the thumbnail size. To modify a shape in the vector image editor, double-click on it.
Choosing an Icon
Open the Icons tab, select a category in the drop-down menu and click on an icon thumbnail.
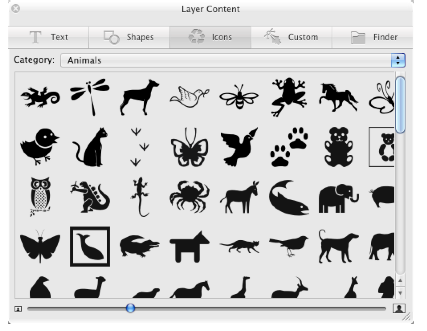
The buttons and scroll bar at the bottom change the thumbnail size. To modify an icon in the vector image editor, double-click on it.
56 Art Text User’s Manual
Choosing a Custom Vector Image
To choose an image you have previously created, open the Custom tab and click on an image.
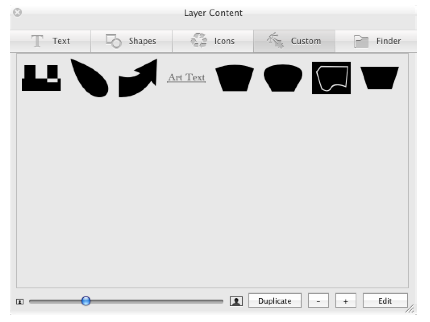
To modify an image in the vector image editor, double-click on it.
Choosing an Image File
Open the Finder tab, click the Open button and choose a folder containing images or an individual graphic file. Then click Open. Select an image in the Layer Content window.
Previously selected folders are listed in the drop-down menu. You can choose one of the folders in the list instead of navigating to it by the Open button.

The buttons and scroll bar at the bottom change the thumbnail size.
Chapter 5: Working with Layers 57
Merging Layers
Using the operations described below you can create new shapes out of overlapping shapes:
• Join layers • Union layers • Subtract layers • Intersect layers
To merge layers, select two or more layers and choose Union, Join, Subtract or Intersect. These options are located in the actions menu (click on the wheel icon in the layer bar) and also under Layers in the main menu.

The result depends on how the objects overlay. Here matter the shape of the original objects and applied geometric transformation. Properties (such as color, shadow, texture, etc.) will be re-applied to the resulting object. The result is a single object (there is an exception for Intersect). Only selected layers are affected.
ATTENTION!
1. The operations combine objects of selected layers together in one new layer. The original layers disappear. The resulting object is a vector image created out of vector outlines of the original objects. Text is not text any longer but a vector image and further text editing is impossible.
Merging is not grouping. You cannot split layers back after they were merged (unless you choose Edit > Undo).
2. Don’t confuse merging layers with blending layers. Choosing a blending mode, you define how the content of layers will look in the final image. The content of layers stays unchanged.
Note that if you merge an image from the Finder tab of the Layer Content window, the program will use the rectangular shape of the whole image, not the alpha channel (transparency).
58 Art Text User’s Manual
Join Layers
If the objects overlay, the overlapping area becomes excluded (transparent). Without overlaying, the result is similar to the Union operation.
Original layers
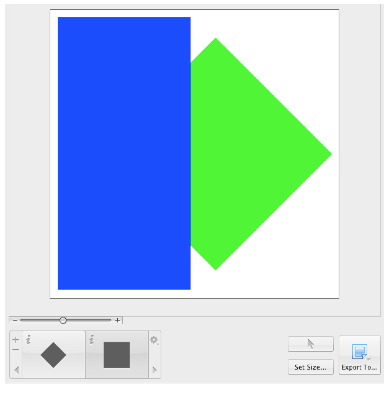
Resulting layer

Chapter 5: Working with Layers 59
Union Layers
The resulting layer shape is sum of merged layers shapes.
Original layers

Resulting layer

60 Art Text User’s Manual
Subtract Layers
The shape of the object in the lowest layer is the basis for a new shape. The other objects determine the area(s) that will be cut off. The result is a part of the lowest object that is not overlaid by other(s). If the objects don’t overlay, the result looks like the lowest object.
Original layers
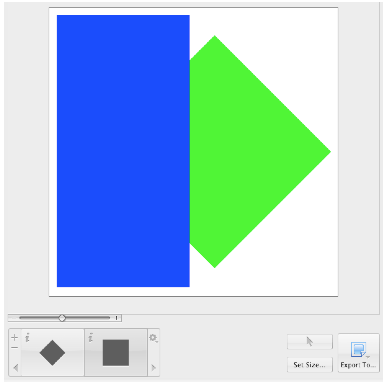
Resulting layer
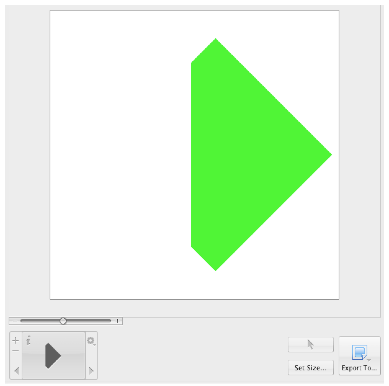
Chapter 5: Working with Layers 61
Intersect Layers
The result is the area(s) where all the selected layers overlap. If there are no such areas, the program doesn’t modify the document.
Original layers

Resulting layer
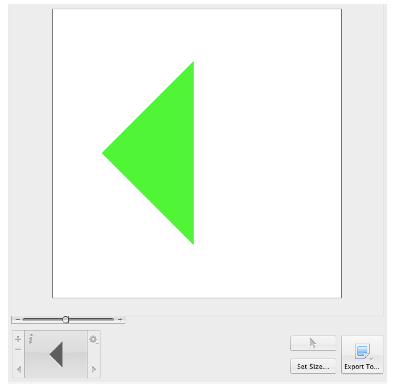
62 Art Text User’s Manual
Splitting Layers
Your design idea may require applying different effects to different parts of text. The program allows you to use the same color, material, or texture with the whole layer. To apply different effects to individual letters, you have to put them into separate layers.
The program can help you create multiple layers out of a text layer. To make sure that you have a text layer, double-click on it. The Text tab of the Layer Content window should open displaying the text.
Note that you cannot merge the resulting layers back to create one text layer (except using the Edit > Undo command).
To put each character into an individual layer:
1. Select a text layer.
2. Select Layers > Split into Letters (Cmd-Ctrl-Opt-T). Or, right-click on the layer and select Split into Letters in the context menu.
The original document has one layer:

Chapter 5: Working with Layers 63
After splitting, the number of layers equals the numbers of letters in the original word:

To put a part of the text into an individual layer:
1. Select a text layer.
2. Choose Layers > Extract a Letter (Cmd-Ctrl-Opt-E). Or, right-click on the layer and choose Extract a Letter in the context menu.
3. Select one or several characters that you want to separate.
In the same original document as in the example above, the letter “é” was separated. We have three layers that contain everything before “é”, “é”, and the rest of the word.
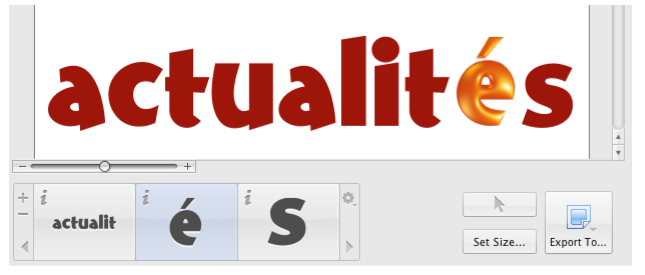
64 Art Text User’s Manual
Blending Layers
The blending mode defines how a layer interacts with layers behind it. To choose a blending mode, use the Layers panel (Cmd-L). Some blending modes are described below with examples.
The examples show how the blending mode of the top layer (active) affects the final image compared with the default settings. Two other layers are set to the Normal mode. Changing blending mode of several layers, you may get different results.
The Opacity parameter was set to 100% by all the layers. The active layer will be shown at 100% and 50% opacity. Changing the opacity of the top layer significantly changes the final image.
• Normal • XOR • Plus Darker • Plus Lighter • Source In • Source Out • Source Atop • Destination Over • Destination In • Destination Out • Destination Atop
By default, a new layer has the Normal blending mode and 100% opacity.
Normal
Layers appear in the original layering order.
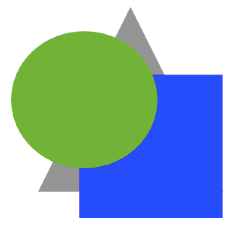
Chapter 5: Working with Layers 65
XOR
Parts of lower layers, that are overlaid by the top layer, are excluded. Parts of the top layer, that overlay other layers, are excluded too.
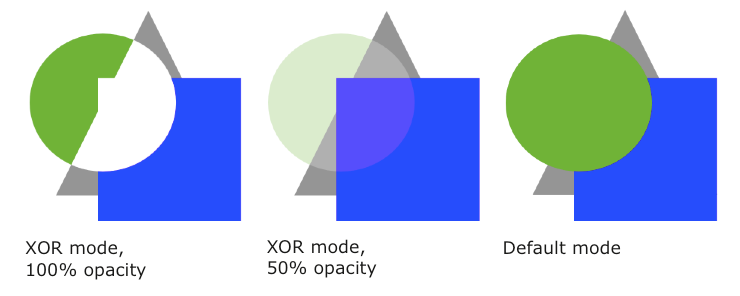
XOR mode, XOR mode, Default mode 100% opacity 50% opacity
Plus Darker
Parts of lower layers, that are overlaid by the top layer, became darker.

Plus Darker mode, Plus Darker mode, Default mode 100% opacity 50% opacity
66 Art Text User’s Manual
Plus Lighter
Parts of lower layers, that are overlaid by the top layer, become lighter.

Plus Lighter mode, Plus Lighter mode, Default mode 100% opacity 50% opacity
Source In
Only those parts of the top layer remain visible, that overlay any lower layer. The rest is excluded.
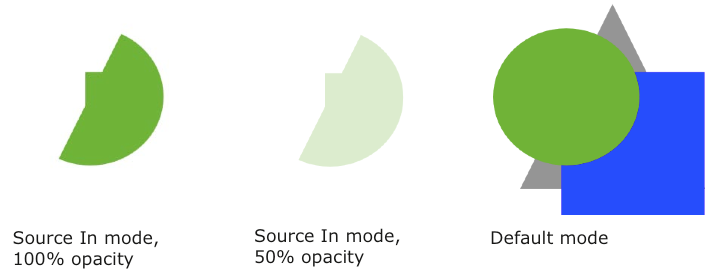
Source In mode, Source In mode, Default mode 100% opacity 50% opacity
Chapter 5: Working with Layers 67
Source Out
Only those parts of the top layer remain visible that don’t overlay any lower layer. The rest is excluded.

Source Out mode, Source Out mode, Default mode 100% opacity 50% opacity
Source Atop
Parts of the top layer, that don’t overlay any lower layer, are excluded.

Source Atop mode, Source Atop mode, Default mode 100% opacity 50% opacity
68 Art Text User’s Manual
Destination Over
Parts of the top layer, that overlay any lower layer, are excluded. Looks like the top layer is behind all others.
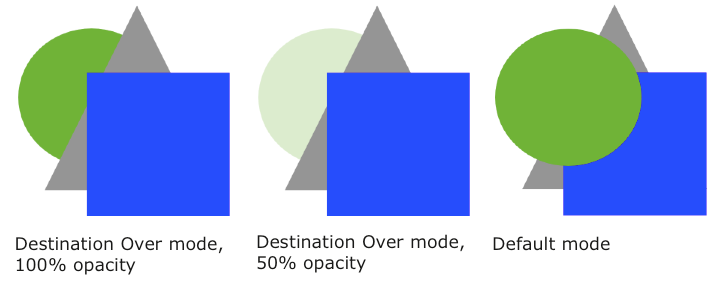
Destination Over mode, Destination Over mode, Default mode 100% opacity 50% opacity
Destination In
Only those parts of lower layers remain visible that lay behind the top layer.
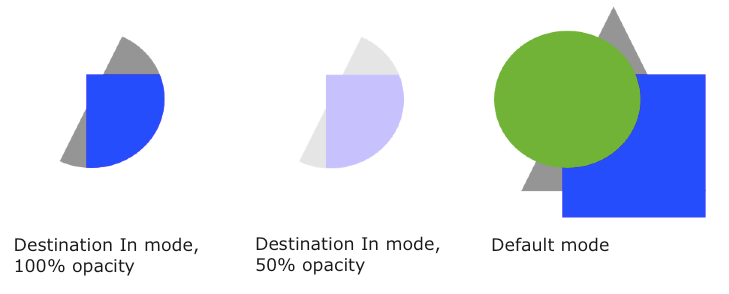
Destination In mode, Destination In mode, Default mode 100% opacity 50% opacity
Chapter 5: Working with Layers 69
Destination Out
Only those parts of lower layers remain visible that are not overlaid by the top layer.
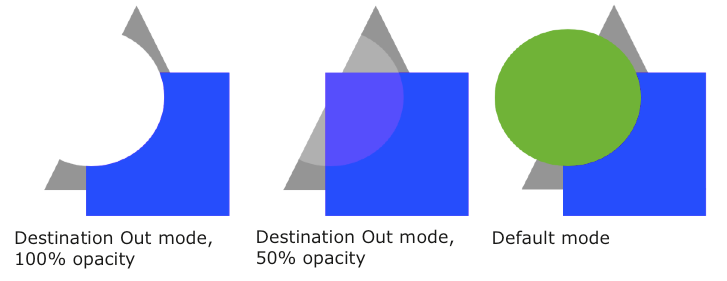
Destination Out mode, Destination Out mode, Default mode 100% opacity 50% opacity
Destination Atop
Only those parts of lower layers remain visible that are overlaid by the top layer. And parts of the top layer that don’t overlay any lower layer stay visible. The rest is excluded.

Destination Atop mode, Destination Atop mode, Default mode 100% opacity 50% opacity
70 Art Text User’s Manual
The Editor of Vector Shapes
The built-in editor of vector shapes lets you create new vector images. Also, you can modify icons and shapes provided in the Layer Content window, and you can edit text as a vector shape.
The Library of Custom Images
Vector images you have created are located in the Custom tab of the Layer Content window.

To create a new image, click the “+” button.
To remove an image, select it and click the “–” button.
To create a copy of an image, select it and click the Duplicate button.
To edit an image, select it and click the Edit button. Or, double-click on this image.
To choose an image for the current layer, click on it.
Custom images are stored in this folder:
~/Library/Application Support/BeLight Software/Art Text/IconArt/
Chapter 6: Graphic Tools and Effects 71
The Interface of the Editor
To open the editor, click the Edit or “+” button in the Custom tab of the Layer Content window.

Tools in the vector editor:

1 – The selection tool is used to select or move points.
2 – The straight segment tool.
72 Art Text User’s Manual
3 – The curved segment tool. 4 – The rectangle tool. 5 – The ellipse tool. 6 – Add an anchor point.
7 – Delete an anchor point. 8 – Change the anchor point type. 9 – Clear the canvas.
Points and Paths
A vector shape comprises anchor points and lines that connect them. Anchor points mark the beginning and end of each line (or segment). By adding one line after another you create a path. The path must be closed. This means that it begins and ends with the same point.
Anchor points can be of two types: corner point and smooth point. When you change the type of a point, intersecting lines may change from curved to straight and vice versa.

1 – Corner point. At a corner point, a path abruptly changes direction. A corner point may join either straight or curved lines in any combination. A corner point with two straight lines doesn’t have direction lines.
2 – Straight segment.
Chapter 6: Graphic Tools and Effects73
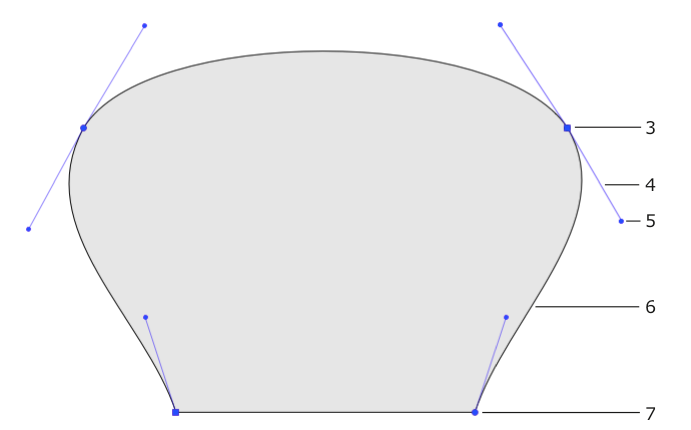
3 – Smooth point. At a smooth point, a path continue following the same direction. A smooth point joins only two curved segments.
4 – Direction line.
5 – Direction point. It is a handle on the end of a direction line. Moving a direction point, you can change the length and angle of the corresponding direction line.
6 – Curved segment. 7 – Corner point.
The direction of a curved path in a smooth anchor point coincides with the direction of the direction line. Leaving the anchor point, the path branches off from the direction line. The longer the direction line is, the longer the path passes near it.

74 Art Text User’s Manual
Drawing a Shape
Select the straight segment 1 or curved 2 segment tool. Click on the canvas to add as many anchor points as you need. Make the last click on the first point of the path to make it closed. Also, you can finish drawing by activating the selection tool. In this case the program will close the path automatically.
1
Images you create here are solid shapes, not contours.
The direction you draw a path matters when one shape has been drawn over another. In the picture below, shapes A and B were drawn in the clockwise direction. C was drawn in
the counter-clockwise direction. The areas where the shapes overlap are different. The intersection area of A and B remains solid, when the intersection of A and C is a hole.
Adding Anchor Points
You add anchor points when you draw a path.
To add more anchor points, activate the adding tool 3 and click on a path segment.
3
Deleting Anchor Points
To delete an anchor point, select it and click the delete button 4
4
.
Changing the Type of Anchor Points
To choose other type of an anchor point, click the type button 5.
5
Moving Anchor Points
To move an anchor point drag it with the mouse. A straight segment attached to this point will change its direction. A curved segment will change the direction and shape.
Chapter 6: Graphic Tools and Effects 75
Chapter 6: Graphic Tools and Effects
Basics
The original data for an Art Text document is text or an image (object). At the beginning you add text or choose an image and then apply graphic effects to it. A document can contain multiple objects. Combining them, you can create a complex design. Each individual object is located in its own layer.
In Art Text you can: • Fill objects with plain color • Fill objects with gradient colors • Apply textures • Apply materials • Change object’s shape • Resize changing or keeping the side proportion • Create a new shape by merging two layers
An object is a vector shape or icon, text (vector by its nature) or raster image. Raster images do not support transformations. To apply materials, a source image should have areas with different transparency (not 100% over the whole image). Otherwise, a 3D effect will be applied to the rectangular image bound instead of image details.
Not all effects can be combined with others. You can apply one of this: plain color fill, gradient fill, texture or material. You can apply only one transformation to an object.
Most effects can be applied to several selected objects.
76 Art Text User’s Manual
The Fill Effect
To open the fill tools, choose the Fill section in the Effects tab.
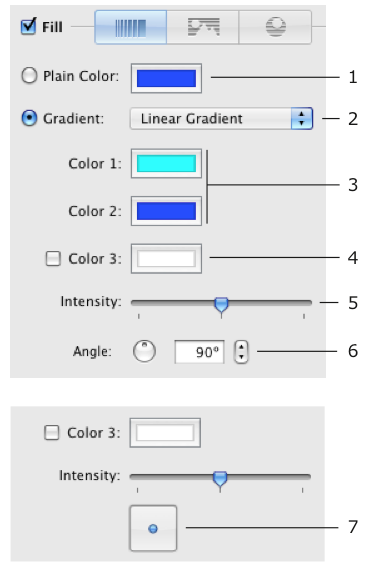
1 – The Plain Color tool.
2 – The Gradient tool. Choose linear or radial gradient.
3 – Gradient colors.

Chapter 6: Graphic Tools and Effects 77
4 – An additional gradient color. It appears between two main colors.

5 – The Intensity parameter defines how the image space is distributed among colors.
6 – An angle of the linear gradient.
7 – The radial gradient’s control. You can change the location of the middle color.

78 Art Text User’s Manual
Applying Textures
Art Text can apply textures to text and images. Textures can be taken from the built-in library or from your hard drive. To open the library of textures, choose the Texture section in the Effects tab.
Choose the Finder item to use images from your hard drive. You can select an individual image, one or several folders.

To apply a texture, choose a texture category then click on a thumbnail. To apply a texture image located on the hard drive, drag the image from the
Finder and drop onto an object on the canvas.
Two radio buttons below thumbnails define how a texture should fit the image area. The Auto option resizes an image automatically. The Tile option lets doing this manually.
Chapter 6: Graphic Tools and Effects 79
The original shape to which a texture is applied.

The original image used as a texture.
Auto > Stretch deforms an image to fit the shape.

Auto > Shrink fits the texture to the larger shape size. A part of the texture can be invisible.
The Tile option lets you choose the texture size and position inside the shape.
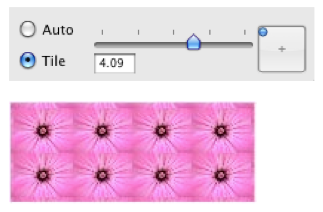
80 Art Text User’s Manual
Applying Materials
Materials are used in Art Text for creating 3D looking text and images, to give glassy, metal, plastic look to an object, and for other effects.
The built-in library of materials is located in the Shading section on the Effects tab.

1 – Material category selector.
2 – The thumbnail of a material. The applied one has white background.
3 – 3D shape (bevel) selector. It is not available for image-based materials.
4 – The amount of the bevel effect.
5 – Rotate the applied material. For 3D looking objects, this control moves light spots around the center of the object.
6 – Color. By default, color of the original material is applied. You can change it.
Chapter 6: Graphic Tools and Effects 81
There are two kinds of materials: based on shader technology and based on images. The majority of materials are shader-based. Image-based materials are grouped into separate categories in the library.
To apply a material to an object in the active layer, choose a material category (1) and click on a material thumbnail (2).
When you apply a material to an image opened from a graphic file, be sure that the image has areas with different transparency (not 100% over the whole image). Otherwise, a 3D effect will be applied to the rectangular image bound instead of image details.
Bevel Shape

Dome-shaped Straight Concave
This option is available only for shader-based materials.
Note that straight and concave shapes can produce similar results. To get different pictures, use materials with a light spot near the center.
Light
The Light control moves the light spots around the center. This lets you simulate light falling onto a 3D object from the top or from a side.
When your design consists of several 3D objects, you can adjust the location of light spots as if they appeared from the same light source.
82 Art Text User’s Manual
Depth
At lower values you will get an object looking almost flat. The slider covers the most appropriate range of values 0 – 20. To set greater values, use the edit box.
An image below shows circles with the Depth parameter set to 7, 15 and 30.

At the same Depth value, the result depends on the size of the object. After some point, increasing Depth will not change the final image. Small objects can loose 3D look at too large values. See how circles 50x50, 100x100 and 150x150 pixels look at Depth = 15.

Color
The Color control changes all colors in a way similar to the Hue parameter in the standard Colors panel. Black, white and grayscale colors will stay unchanged.
Chapter 6: Graphic Tools and Effects 83
The Editor of Materials
Art Text material editor lets you create two types of materials: materials based on shaders (light spots) and materials based on images.
To create a new material, select Create a Material in the material category drop-down list.
To edit an existing custom material, double click on its thumbnail. You cannot modify a built-in material, but you can modify and save its copy. To do this, double-click a material thumbnail in the library.

84 Art Text User’s Manual
Materials Based on Shaders
In a shader-based material, light spots on a specular surface are simulated to create 3D looking objects. The editor of materials allows you adjusting light spots and previewing the result on a sample sphere and on letters.
The window of the editor shows a list of custom materials. Buttons below the list let you add, remove and make a copy of the selected material. The middle part of the window shows parameters of the selected material. Samples of an applied material are displayed on the right.
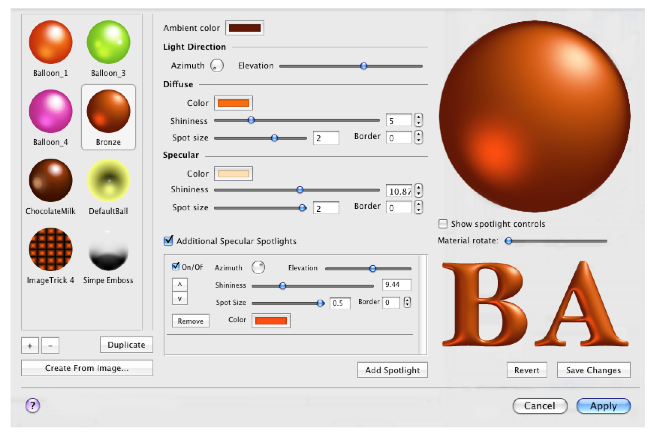
Chapter 6: Graphic Tools and Effects 85
Types of Light Sources

1 – Additional specular light. 2 – Ambient color. 3 – Diffuse color. 4 – Main specular light.
Ambient Light
The ambient light is emitted by a general indirect source. In 3D graphics the ambient color is used as color of object part laying in shadow.
Without the ambient light (color is set to black), the object in shadow is black.
Diffuse
Diffuse is not really a source of light. Diffuse color is used to describe how the object will look at poor white lighting. It is used to make an object have some color when it is under light.
86 Art Text User’s Manual
Specular
Specular light is the light reflected by the object in some direction. It seems like highlight from spot light source.
The program supports multiple specular light sources. To add more specular highlights, click the Add Spotlight button.
To turn on/off all additional spotlights, use the Additional specular spotlights option. For separate control, use On/Off options of individual spotlights.
To remove an additional spotlight, click its Remove button. “^” and “v” arrows change the order of additional spotlights. Their order can
affect the resulting image.
Parameters of Light Sources
Azimuth defines the horizontal direction from which the light is shed. In other words, the Azimuth control rotates a light spot around the sample sphere center.
Elevation defines how high the light source is located. The central position of the slider sets the source right above the sphere.
Shininess defines the intensity of reflected light. Shininess is used in 3D graphics to show how the highlight from the given spot light source looks from different viewer’s positions. When the look direction coincides with the direction of the reflected light, the highlight has maximum brightness. This corresponds to the minimum value of Shininess.
Spot Size defines the size of highlight. At greater values of the Spot Size the surface looks matte, at lower - glossy.
Border sets how smooth the edge of the light spot is.
Chapter 6: Graphic Tools and Effects 87
Changing the Location of Spotlights
Apart from the Azimuth and Elevation controls, the location of spotlights can be changed right on the sample sphere. For this, select the Show spotlight controls option. Small circles that appear in the preview are handles. Drag a handle with the mouse to move the corresponding light spot. The bigger handle corresponds to the main specular light.
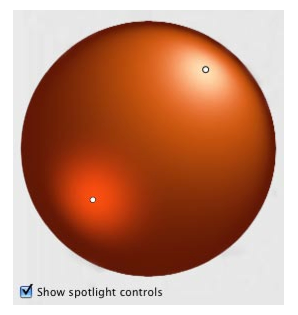
Materials Based on Images
Using images, you can create materials that give a result similar to shaders as well as completely different pictures.
To create a new material, select Create a Material in the material category drop-down list. In the material editor, click the Create from Image button and choose a graphic file. Then close the editor. Any further adjustments can be made in the main window.
An example of image-based material:

A similar result can be achieved using shaders.

88 Art Text User’s Manual
The Stroke Effect
The stroke effect makes text and vector shapes outlined. If you apply the tool to an imported image, its rectangular edge will be outlined.

The Stroke tool is located in the main window, the Effects tab.

1234 1 – List of lines. The current line is highlighted. Double-click a line to change
its color.
2 and 3 – The Remove and Add Line buttons. You cannot delete the last line. If you don’t want it, turn the effect off using the check box.
4 – The Width control defines the width of the current line. You can add multiple lines with different width and color.

If spaces between letters are too small, set a larger value of the Kerning parameter. Double-click the layer icon below the canvas to open the text editor. Kerning is located at the bottom of the editor.
Chapter 6: Graphic Tools and Effects 89
The Shadow Effect
The Shadow tool is located in the bottom-right corner of the main window.
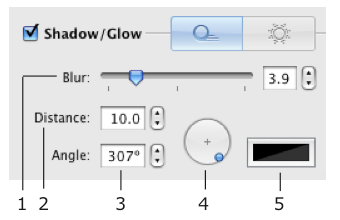
1 – The Blur parameter.

2 – The Distance between the object and shadow.

3 – The angle of the shadow.
4 – The shadow location control. It changes the distance and angle at once.
5 – The color of the shadow.
90 Art Text User’s Manual
The Glow Effect
The Glow tool is located in the bottom-right corner of the main window.
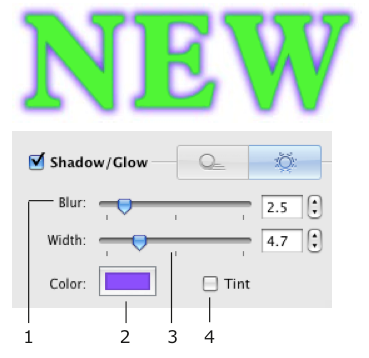
1 – The Blur parameter. 2 – The color of the glow effect. 3 – The width of the glow effect.
4 – Tint color check box. When it is selected, the second color button appears and you can create bi-color glow. In the picture below, (1) is the main color and (2) is the tint color.
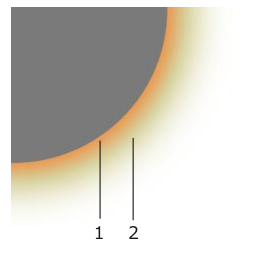
Chapter 6: Graphic Tools and Effects 91
Transformations
Transformation effects create geometric distortion of text or a vector image (shape or icon from the internal library). Transformation does not work with custom images. Using the transformation tools, you can also change the text or image size.
The transformation tools are located in the Geometry tab.
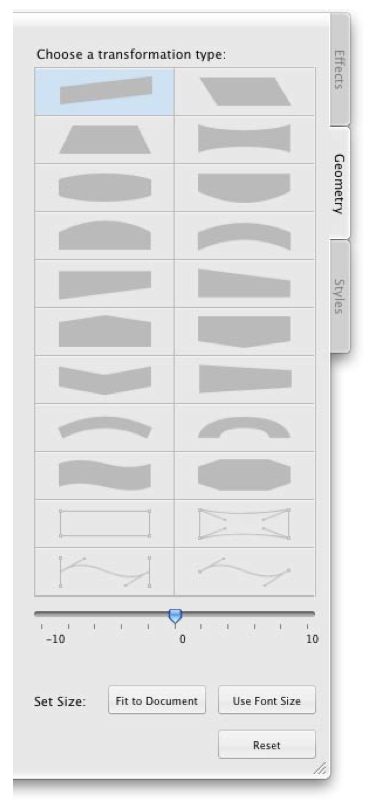
92 Art Text User’s Manual
To apply a transformation, click on its thumbnail and adjust one or several transformation parameters.
To restore the default state of an object, click the Reset button. When several objects are selected, you can use only geometric
transformations.
Geometric Transformations
Geometric transformations have dark shapes on thumbnails and are located at the top.
An image or text has a frame with handles. Moving the frame corner handles resizes the content proportionally. With the Shift key pressed, the proportion of sides will change.
Moving the side handles changes width or height of the content. With the Option key pressed, you will scale the frame from the middle, rather than from the side.
Frame handles of the Frame transformation allow you to change the shape of the frame itself. Unlike other geometric transformations, it allows you to move the handles separately.
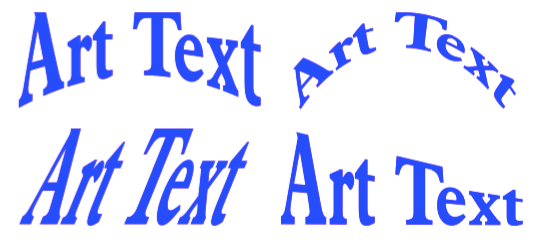
Chapter 6: Graphic Tools and Effects 93
Spline Transformations
Spline curves are linked to an image or text. When you change the shape of a curve, the content changes accordingly.
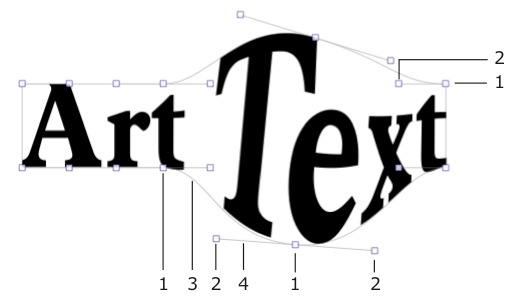
A spline curve is controlled by two types of handles: knot point (1) and direction line handle (2). The curve consists of one or multiple segments (3) with knot points on its ends. The Spline-Curve transformation lets you adding curve segments. Others have constant number of segments.
The shape of the curve is determined by the length and slope of the direction line (4). To control a direction line, drag its handle (2). For more significant change, move knot points (1).
Note that the Curved Text transformation does nothing with a single letter and an image except for rotation and resizing.
A transformation result can be used as a separate effect or as a part of a complex design.

The Resize button lets you choose the transformation adjusting mode or the resize mode. The resize handles are square. The transformation control handles are round.
94 Art Text User’s Manual
The Set Size Controls
You can change the object size by moving handles. In addition to this, there are two buttons.
The Fit to Document button resizes text or image proportionally so that its bigger size fits the documents size.
The Use Font Size button restores the original text size. After clicking the button, the size of letters corresponds to the font size set in the Fonts panel.
Chapter 7: Exporting
Exporting
Your work can be exported to a graphic file or copied to the clipboard.
Depending on the effects you have used, you can get a vector or raster image when saving to the PDF format. Vector images are created only when you use plain color fill, stroke and transformation effects. If other effects were used, you will get a raster image.
To export an image to a graphic file: 1. Check the image size.
For this, click Set Size in the main window.
2. Click the Export To button and choose Export to File in a pop-up menu.
Or choose File > Export.
3. Type file name and choose the destination folder.
4. Choose image format in the Format drop-down list.
5. Adjust other settings if they are available for the selected format (resolution, quality, compression, transparency).
6. Click Save. Copying an Image to the Clipboard
Check image resolution in the program Preferences (Art Text > Preferences). Then click the Export To button in the main window and choose Copy to Clipboard.
Chapter 7: Exporting 95
96 Art Text User’s Manual
Transparent Background
Art Text can create and export images with transparent background. For this the following conditions should be met.
Condition 1
To export an image with the transparent background (alpha channel), your design should have the transparent background. To check this out, switch the canvas to the Chessboard background in the program Preferences (Cmd-,). The chessboard will be seen through transparent parts of your design.
Condition 2
When you export your work to an image, use a graphic file format that supports transparency (alpha channel). In Art Text, choose one of the following formats: PDF, TIFF, PNG, GIF (set Include Transparency), EPS.
Condition 3
It doesn’t really concern Art Text, but you should know this. Applications that will receive an image (exported or copied via the clipboard) should support the alpha channel. If an image has white or black background in another program, export from Art Text with another file format.
Replacing Transparency with the Solid Color
When you export to the graphic format that doesn’t support transparency, the transparent parts are filled with a solid color used for the canvas background. This color is white by default. To choose another color, open the program Preferences dialog (Cmd-,) and select the Solid radio button. Then select the color.