 Macな暮らし
Macと気ままな暮らし、コーヒーとiTunesのカントリーを聞きながら。
Macな暮らし
Macと気ままな暮らし、コーヒーとiTunesのカントリーを聞きながら。

ボタンやロゴをきれいに作成できるソフト。無料ではあるがその出来映えにビックリ!

Art Text 2 Lite
Art Text 2 Liteはロゴやアプリケーションのアイコン、およびボタン等ウェブ用のグラフィックスを作成するためのレイヤーベースで設計されたアプリケーションです。アートテキストライトを使えば、PhotoshopやIllustratorなどの専門的な知識がなくても結果が得られます。
Art Text 2 Liteを使用するためのいくつかのアイデア入手可能です:
●宣伝パンフレットやチラシ用キャッチー見出し。 Keynoteのプレゼンテーション用
●ユニークなタイトル
●今後のiPhone / iPadアプリケーション用アイコン
●新しいビジネスベンチャーのためのロゴ
●クライアントのサイトのWebグラフィックス✧カスタマイズ可能なテンプレート✧アートテキストLite内のテンプレートギャラリーは35。完全にカスタマイズ可能なテンプレートが付属しています(フルで300バージョン)の見出し、ボタン、アイコン、およびロゴのため。ベクタグラフィックスと✧作業は✧28のベクトルアイコン(完全版で590)と図形のライブラリを使用すると、ウェブのための会社のロゴやグラフィックを設計するための完全なパレットを提供します。
フルバージョンはたったの$ 19.99です。
http://www.belightsoft.com/resources/ATGettingStartedGuide.pdfスタートアップガイドはここ(まずはこれから)
http://www.belightsoft.com/resources/ATUsersManual.pdf英語のマニュアルはここ
http://www.belightsoft.com/products/arttext/screencasts.php ビデオで詳しく説明してある(非常に分かりやすのでオススメ)
http://www.belightsoft.com/resources/ATUsersManual.pdf英語のマニュアルはここ
http://www.belightsoft.com/products/arttext/screencasts.php ビデオで詳しく説明してある(非常に分かりやすのでオススメ)
BeLight Software Art Text Getting Started Guide
Version 2 July 2010
(C) 2010 BeLight Software, Ltd. All rights reserved.
BeLight Software, Ltd. reserves the right to improve, enhance and revise its products without notice.
The information in this document is furnished for informational use only, is subject to change without notice, and should not be constructed as a commitment by BeLight Software, Ltd. BeLight Software assumes no liability for any errors or inaccuracies that may appear in this document.
All trademarks, product and/or brand names mentioned in this publication, are the sole property of their respective owners.
Written by Nick Shubin. Cover design by Viktoriya Naumova and Tatiana Onishchenko. Thanks to Ray East for help with the creation of this publication.
入門ガイドBeLightのソフトウェアアートテキスト
バージョン2010年7月2日
(C)2010 BeLightのソフトウェア、株式会社すべての権利を保有。
BeLightソフトウェア株式会社は、予告なく製品を、改善し、拡張し改訂する権利を留保します。
このドキュメントの情報は情報提供のみを使用するために内装され、予告なく変更される場合がある、とBeLightのソフトウェアによる確約として構築されるべきではない、(株)BeLightのソフトウェアは、本文書に含まれるいかなる誤りまたは不正確な記述に対しては一切の責任を負いかねます。
すべての商標、製品および/または本書に記載のブランド名はそれぞれの所有者に帰属します。
ニックシュービンによって書かれました。 Viktoriya NaumovaとタチアナOnishchenkoによるデザインをカバーしています。この出版物の作成を手助けするためのレイ東に感謝
Contents
Chapter 1: Introduction.................................. 4
Welcome to Art Text .............................................................. 4
System Requirements............................................................ 4
Installing and Removing Art Text ............................................. 4
Updating Art Text .................................................................. 5
Registration.......................................................................... 5
Technical Support.................................................................. 5
Useful Web Resources............................................................ 6
Where to Find More Detailed Documentation............................. 6
Chapter 2: A Quick Tour ................................. 7
The Art Text Workspace ......................................................... 7
The Layer Bar ....................................................................... 8
Setting up the Program after Installation .................................. 9
Using Styles ........................................................................11
Using Templates...................................................................11
Chapter 3: Quick Start Guide ........................ 12
Step 1: Opening a New Document..........................................12
Step 2: Setting Up the Image Size..........................................12
Step 3: Changing Text or Choosing an Image...........................13
Step 4: Applying Effects........................................................14
Step 5: Applying Transformation ............................................16
Step 6: Adding More Text or Graphic Objects ...........................17
Step 7: Organizing Layers in Your Document............................17
Step 8: Adding the Background..............................................18
Step 9: Saving Your Document...............................................20
Step 10: Exporting the Final Image ........................................20
Table of Contents 3
4 Art Text Getting Started Guide
Chapter 1: Introduction(第1章:はじめに)
Welcome to Art Text
アートのテキストのアプリケーションは、テキストやベクトルシェイプに効果を適用することによって、ユニークなテキスト、グラフィックスを作成するためのものです。あなたの仕事は、ネイティブアートのテキスト形式でまたは一般的なグラフィックファイル形式で保存することができます。
アートのテキストで作成された画像は、Webページ上で、または他のアプリケーションでは、出版資料として使用することができます。
アートのテキストでは、あなたは見つけるでしょう:•2Dエフェクト(シャドウ、ぼかし、ストローク)•3Dエフェクト(調整可能な色、形、光)•変換(テキストまたは画像の幾何学的変形)
プログラムは、元のテキストまたはグラフィックスに適用することができます十分にチューニングされたスタイルが付属しています。
アートテキストのリテール版には、追加のフォントも含まれています。
System Requirements(システム要件)
PowerPCまたはIntelプロセッサ•Mac OS Xのv10.4.11または使用可能なディスクスペースが100 MBの•Apple Macintoshコンピュータ
Installing and Removing Art Text(アートテキストの取り付けと取り外し)
To install, double-click the Art Text installer in Finder. Then drag the Art Text icon into the Applications folder.
If you wish to remove the program from your computer, please complete the following steps:
• Quit Art Text. • Delete the “Art Text 2” application from the Applications folder, • Delete “com.belightsoft.arttext2.plist” file from
“~/Library/Preferences/”, • Delete the “Art Text” folder from
“~/Library/Application Support/BeLight Software/”. Here “~“ is user’s home folder.
インストールするには、Finderでアートのテキストインストーラをダブルクリックします。その後、アプリケーションフォルダにアートのテキストのアイコンをドラッグします。
コンピュータからプログラムを削除したい場合、次の手順を完了してください。
•アートのテキストを終了します。 •アプリケーションフォルダから"アートテキスト2"アプリケーションの削除、•から"com.belightsoft.arttext2.plist"ファイルを削除します。
"〜/ライブラリ/ Preferences /"、•"アートテキスト"フォルダからの削除
"〜/ライブラリ/ Application Support / BeLightソフトウェア/"。ここで"〜"ユーザのホームフォルダです。
Updating Art Text
From time to time, the software developer releases new versions of the product. To change your copy to a new version, you just need to install an update. Before launching the update installer, make sure that the application and the supporting files are at the default location. Usually they are if you have followed the installation procedure and didn’t change paths or transfer files manually. The default file location can be found in the “Installing and Removing Art Text” section.
To check for the latest update, visit the Art Text Updates web page:
http://www.belightsoft.com/arttext/update
随時、ソフトウェア開発者は、製品の新しいバージョンをリリースしています。新しいバージョンにコピーを変更するには、あなただけのアップデートをインストールする必要があります。アップデートインストーラを起動する前に、アプリケーションとサポートファイルはデフォルトの位置にあることを確認してください。インストールの手順に従っている場合、通常それらは、手動でパスやファイル転送を変更していない。デフォルトのファイルの場所は"取り付けと取り外しアートテキスト"セクションで見つけることができます。
最新のアップデートをチェックするには、アートのテキストの更新のWebページを参照してください。
http://www.belightsoft.com/arttext/update
Registration(登録)
If you have already purchased Art Text from BeLight Software or its resellers, you will find the license code either on the back of the disc envelope (boxed retail edition) or in the purchase confirmation e-mail (retail or standard edition via download).
To register Art Text: 1. Open the application. 2. Bring up the License dialog by choosing Art Text > License... in the
menu. 3. Enter your name and license code.
It’s recommended that you keep the e-mail or the disc package containing your license code in a safe place in case you need to register the application after re-installation or update.
The unregistered version of Art Text is fully operational. The only limitation is that it adds the “Trial” text over the resulting image. To eliminate this text, you need to register your copy of the software.
You can purchase a license code on the developer’s web site:
http://www.belightsoft.com/buy/
すでにBeLightのソフトウェアまたはその再販業者からアートのテキストを購入している場合は、ディスクの封筒の裏面(箱入りリテール版)上または購入確認の電子メール(ダウンロードによる販売または標準版)のいずれかでライセンスコードを検索します。
アートのテキストを登録するには:1。アプリケーションを開きます。 2。アートテキスト]> [ライセンス]を選択してライセンスのダイアログを表示...の
メニュー。 3。あなたの名前とライセンスコードを入力してください。
それはあなたが再インストールまたはアップデート後にアプリケーションを登録する必要がある場合には、電子メールまたは安全な場所にライセンスコードを含むディスクのパッケージを維持することをお勧めします。
アートのテキストの未登録版は完全に動作可能です。唯一の制限は、それが結果として得られる画像の上に"試用版"のテキストを追加することです。このテキストを排除するには、ソフトウェアのコピーを登録する必要があります。
あなたが開発者のウェブサイト上でライセンスコードを購入することができます。
http://www.belightsoft.com/buy/
Technical Support(技術サポート)
The developer of Art Text offers free technical support.
By E-mail:
support@belightsoft.com
アートテキストの開発者は無償の技術サポートを提供しています。
E - mailで:
support@belightsoft.com
Chapter 1: Introduction 5(第1章:はじめに5)
6 Art Text Getting Started Guide(入門ガイド6アートテキスト)
Technical support form on BeLight’s website:
http://www.belightsoft.com/support/
Forum on BeLight’s website:
http://www.belightsoft.com/forum/
When reporting a problem, please make sure to specify: • The version of Art Text you are using. • The version of Mac OS X installed on your computer. • Your previous actions that could have lead to the problem. • If the problem persists, describe how to reproduce it.
• When necessary, illustrate your report with screenshots (press Cmd-Shift-3 to save a screenshot on your Desktop).
BeLightのWebサイトのテクニカルサポートのフォーム:
http://www.belightsoft.com/support/
BeLightのウェブサイト上のフォーラム:
http://www.belightsoft.com/forum/
問題を報告するとき、指定することを確認してください:•あなたが使用しているアートのテキストのバージョン。 •Mac OS Xのバージョンがコンピュータにインストールされている。 •問題へのリード持っていることが、前のアクション。 •問題が解決しない場合は、それを再現する方法について説明します。
•必要に応じて、スクリーンショット(プレスCmdをシフト- 3デスクトップ上にスクリーンショットを保存する)を使用してレポートを示しています。
Useful Web Resources
Art Text Page:
http://www.belightsoft.com/arttext/
Information about Art Text, links to the Download, Latest Update, Buy, and FAQ sections.
BeLight Software Web site:
http://www.belightsoft.com
Check it out for updates, new product announcements, and special offers.
BeLight Software Technical Support:
http://www.belightsoft.com/support
Visit this link if you have questions about the software.
Where to Find More Detailed Documentation
• Art Text built-in Help. Choose Help > Art Text Help in the program menu.
• Art Text Manual
http://www.belightsoft.com/resources/ATUsersManual.pdf
• Online help and screencasts can be found on the developer’s web site:
http://www.belightsoft.com/products/arttext/support.php
有用なWebリソース
アートテキストのページ:
http://www.belightsoft.com/arttext/
アートのテキストについての情報、ダウンロード、最新の更新、購入、およびFAQのセクションへのリンク。
BeLight SoftwareのWebサイト:
http://www.belightsoft.com
アップデート、新製品の発表、および特別オファーのためにそれをチェックアウト。
BeLightのソフトウェアテクニカルサポート:
http://www.belightsoft.com/support
あなたがソフトウェアについて質問がある場合、このリンクにアクセスしてください。
より詳細なドキュメントの入手先
•アートのテキスト内蔵ヘルプ。プログラムメニューの>アートテキストのヘルプを[ヘルプ]をクリックします。
•アートテキストのマニュアル
http://www.belightsoft.com/resources/ATUsersManual.pdf
•オンラインヘルプとスクリーンショットは開発者のウェブサイトで見つけることができます。
http://www.belightsoft.com/products/arttext/support.php
Chapter 2: A Quick Tour(第2章:クイックツアー)
The Art Text Workspace(アートテキストのワークスペース)
英語表示
日本語表示

Chapter 2: A Quick Tour(第2章:クイックツアー)7
8 Art Text Getting Started Guide(入門ガイド8アートテキスト)
The Layer Bar(レイヤーバー)
レイヤーバーはメインウィンドウの下部に位置し、レイヤーのアイコンが表示されている。レイヤーが選択されている場合、そのアイコンが強調表示になります。いくつかの層は、それらをまとめて変更するために選択することができます。
レイヤーの重なり順を変更するには、左または右にあるアイコンをドラッグします。右端のアイコンは、最上位層に相当する。
以下の二つの絵を比較すると階層の様子が分かるでしょう。
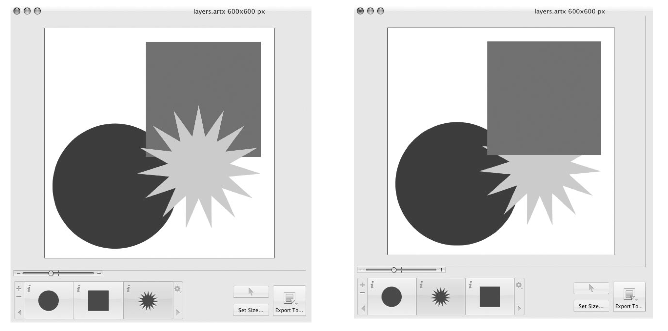
図形のスターは、左の画像内の他の図形の一番上にあります。そのアイコンはレイヤーバーの右端の位置にあります。左にアイコンを移動する(右写真参照)と、キャンバス上の他のオブジェクトの背後にスターの図形を動かすことができます。
Chapter 2: A Quick Tour 9
アクティブレイヤー内のテキストまたは画像を変更するには、レイヤーのアイコンをダブルクリックして、レイヤのコンテンツウィンドウを開きます。

コンテンツを選択すると変更することが出来る。
1 - デフォルトのコンテンツを使用して新しいレイヤーを追加します。
2 - レイヤーと、そのコンテンツを削除します。
3と8 - レイヤーをスクロールするためのアイコン。
4 - レイヤーのコンテンツのウィンドウを開くには"i"アイコンをクリックします。
5、6、7 - レイヤーのコンテンツを表示するレイヤーのアイコン。
9 - 以下の機能が含まれているレイヤのアクションメニュー:
インストール後にプログラムの設定
The information below covers the most important settings to start your work with Art Text.
1. Register the program if you have purchased a license code. Otherwise, the program will work in the demo mode.
To do this, choose Art Text > License... from the menu to open the registration dialog box. Input your name and your license code.
After successful registration, the program will offer you online registration. You can register or skip registration.
これを行うには、Art Text > License...(Liteには無し)を選択...メニューから[登録]ダイアログボックスを開きます。自分の名前とライセンスコード入力。
登録が成功した後、プログラムはオンライン登録を提供します。登録したり、スキップすることができます。
オンライン登録すると、開発者のデータベースにデータを送信しています。これは、それが失われる場合にはそれが可能なあなたに戻って、ライセンスコードを送信することができます。オンライン登録はデモから、登録モードにプログラムをオンにしていません。
2。プログラムのプリファレンスを設定する(Art Text > Preferences...)
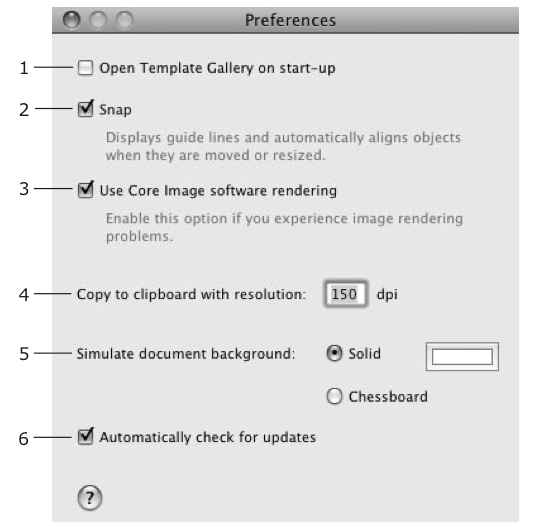
1 – Deselect the Open Template Gallery on start-up check box if you don’t use the built-in templates.
2 – Keep the Snap option enabled. Text and images will align to each other when you move them around.
3 – Keep the Use Core Image software rendering option disabled. In this case, rendering is quicker because the graphic card (not the CPU) does this job.
4 – The resolution of an image pasted in the clipboard. It is important when your work is finished and you are going to copy it to another program. Leave this parameter alone for now.
1 - 組み込みのテンプレートギャラリーを使用しない場合は、チェックボックスをはずす。
2 - スナップオプションは有効にしておいてください。それらを移動するときにテキストや画像は、お互いに整列されます。
3 - 使用してコアイメージのソフトウェアレンダリングオプションを無効にしてください。グラフィックカード(ではないCPUが)この仕事をするのでこのケースでは、レンダリングが高速です。
4 - クリップボードに貼り付けた画像の解像度。それはあなたの仕事が終了し、他のプログラムにコピーしようとしているときに重要です。デフォルトではこのパラメータにしておきます。(印刷物)
Chapter 3: Quick Start Guide 11(第3章:クイックスタートガイド11)
5 – Color of the document background. It is simulated on the canvas. The chessboard background lets you see transparent parts of your design. The Solid color is used for the background of the exported image if the selected graphic format doesn’t support transparency.
6 – Specify whether the program should check for updates automatically.
5 - 文書の背景の色。それは、キャンバス上でシミュレートされます。チェス盤の背景には、あなたのデザインの透明な部分を見ることができます。選択されたグラフィック形式は透明度をサポートしていない場合、ソリッドカラーは、エクスポートされたイメージの背景に使用されます。
6 - プログラムが自動的に更新を確認する必要があるかどうかを指定します。
Using Styles(スタイルの使用)
A style is a set of effects that can be applied at once. Styles are located in the Styles tab of the right side panel. Choose View > Styles Panel to open it.
Styles are grouped into categories. You can choose a category in a pop-up menu at the top. You can add custom styles to the library.
To apply a style, select it in the side panel. The selected style will be applied to the active layer.
Parameters of applied effects can be saved as a custom style. This is useful when you need to create several pieces of text or several images with the same effects.
To add a new style, click the “+” button.
To remove a custom style, select it in the list and click the “-” button. Built-in styles cannot be removed.
The Use content from style option lets you choose whether to show the selected style with the default content or with your own. Note that the default content was selected as the best for demonstrating the style.
スタイルは、一度に適用できるエフェクトのセットです。スタイルは、右側のパネルのスタイル]タブに配置されています。それを開くために>スタイルパネルを表示を選択します。
スタイルは、カテゴリに分類されます。あなたは、上部にあるポップアップメニューでカテゴリを選択することができます。あなたは、ライブラリにカスタムスタイルを追加することができます。
スタイルを適用するには、サイドパネルで選択します。選択したスタイルは、アクティブレイヤーに適用されます。
適用されるエフェクトのパラメータは、カスタムスタイルとして保存することができます。あなたが同じ効果をテキストまたはいくつかのイメージの断片をいくつか作成する必要がある場合に便利です。
新しいスタイルを追加するには、"+"ボタンをクリックしてください。
カスタムスタイルを削除するには、リストで選択し、" - "ボタンをクリックします。組み込みスタイルは削除できません。
スタイルのオプションから使用コンテンツを使用すると、デフォルトのコンテンツとしたり、独自で選択したスタイルを表示するかどうかを選択できます。既定のコンテンツがスタイルを証明するための最良として選択されていることに注意してください
Using Templates(テンプレートの使用)
To access templates, choose File > Template Gallery (Cmd-Shift-N). Templates are grouped into categories. To open a different category, click on its name at the bottom of the window.
To open a template, double-click on its thumbnail. Or click on a thumbnail followed by the Choose button.
You can use templates to learn the program or modify them to create a new document.
Note that templates and styles are not the same. A template is a complete document. A style is a set of settings that can be applied to your text or image. Templates can consist of one or several layers.
テンプレートにアクセスするには、[ファイル]> [テンプレートギャラリーを(CMD - Shift - N)を選択します。テンプレートはカテゴリにグループ化されています。別のカテゴリを開くには、ウィンドウの下部にその名前をクリックします。
テンプレートを開くには、そのサムネイルをダブルクリックします。または[選択]ボタンに続いてサムネイルをクリックしてください。
あなたがプログラムを習得したり、新しい文書を作成するためにそれらを変更するテンプレートを使用することができます。
テンプレートとスタイルが同じではないことに注意してください。テンプレートは、完全なドキュメントです。スタイルは、テキストまたは画像に適用できる設定のセットです。テンプレートは、1つまたはいくつかの層で構成することができます。
12 Art Text Getting Started Guide(入門ガイド12アートのテキスト)
Chapter 3: Quick Start Guide(第3章:クイックスタートガイド)
This guide describes some possible steps of using Art Text. Steps described below and their order are not obligatory. Some of them can be skipped, performed several times, or in another order.
For a better understanding of the location and names of program controls, it is recommended that you look through “The Art Text Workspace” section.
このガイドでは、アートのテキストを使用してのいくつかの可能な手順を説明します。手順は以下のとおりとそれらの順序は必須ではありません。そのうちのいくつかは、スキップを数回行い、または別の順序ですることができます。
プログラムのコントロールの位置と名前の理解を深めるために、それはあなたが"アートテキストのワークスペース"セクションに目を通すことをお勧めします。
Step 1: Opening a New Document(ステップ1:新しい文書を開く)
To open a blank Art Text document, choose File > New. For learning purposes, you can load a template from the built-in collection
(File > Template Gallery) and then modify it. Step 2: Setting Up the Image Size
Set up the final image size (what will be exported to a file or another program). To do this, click the Set Size button in the main window. The white or chessboard-like background shows the image edges. Objects or their parts outside the image area will be trimmed at export.
You can change the image size at any time later.
ブランクアートのテキスト文書を開くには、[ファイル]> [新規]を選択します。学習目的のために、組み込みのコレクションからテンプレートをロードすることができます
([ファイル]> [テンプレートギャラリー)し、それを修正する。ステップ2:画像サイズの設定
最終的な画像サイズ(ファイルまたは別のプログラムにエクスポートされる内容)を設定します。これを行うには、メインウィンドウにセットサイズのボタンをクリックします。白やチェス盤のような背景は、画像のエッジを示しています。画像領域外のオブジェクトやそれらの部品は、輸出時に削除されます。
あなたは後でいつでも画像サイズを変更することができます。
Chapter 3: Quick Start Guide 13(第3章:クイックスタートガイド13)
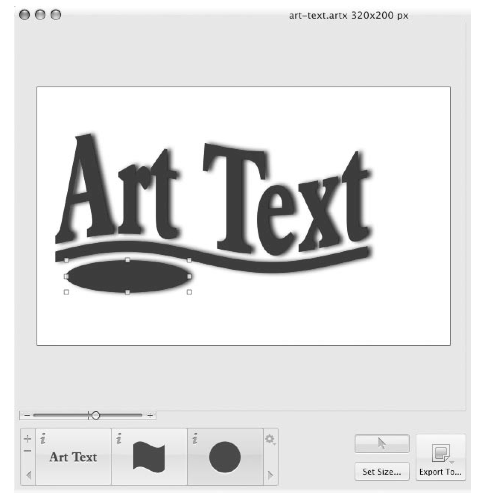
Step 3: Changing Text or Choosing an Image(ステップ3:テキストを変更するまたはイメージを選択する)
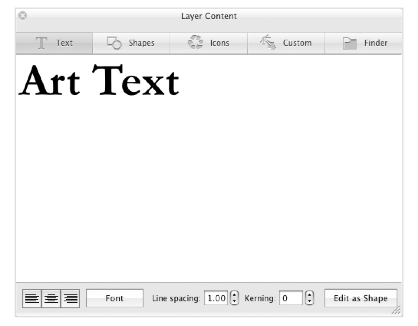
By default the “Art Text” text is displayed on the canvas. To change text or replace it with an image, double-click the “Art Text” icon in the bottom panel (Layer bar). This will bring up the Layer Content window displaying the Text tab.
デフォルトでは"アートテキスト"テキストがキャンバスに表示されます。テキストを変更したり、画像とそれを置き換えるには、下のパネル(レイヤーバー)の"アートテキスト"アイコンをダブルクリックします。これは、[テキスト]タブを表示するレイヤのコンテンツウィンドウが表示されます。

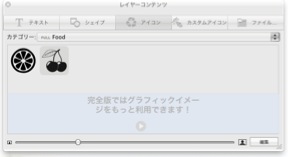
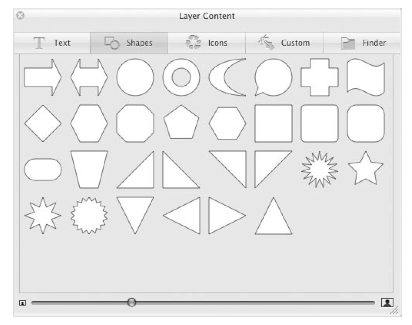
To choose a shape or icon, switch to the corresponding tab.
形状またはアイコンを選択するには、対応するタブに切り替えます。

Once you have changed the layer content (text or image), close the panel. The icon in the Layer bar will change correspondingly.
あなたがレイヤのコンテンツ(テキストまたは画像)を変更したら、パネルを閉じます。レイヤーバーのアイコンがそれに応じて変わります。
14 Art Text Getting Started Guide(入門ガイド14アートのテキスト)
Step 4: Applying Effects(ステップ4:エフェクトをかける)
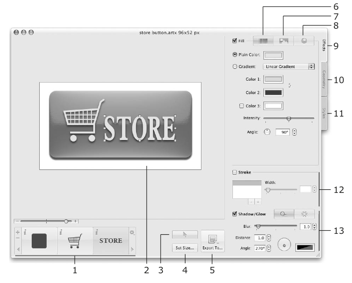
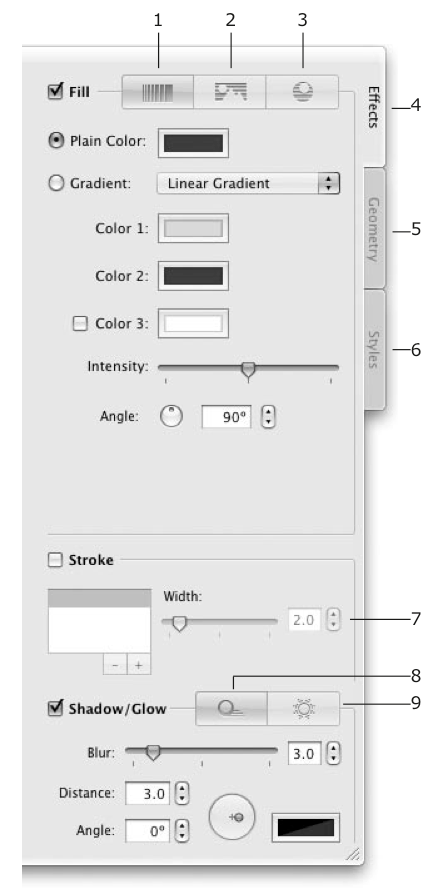
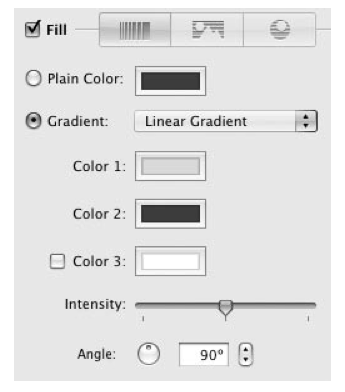
The color and fill related settings can be found in the Effects tab (4) of the right panel. You can choose color or gradient fill (1), texture library (2), or materials (3). You can also apply stroke (7), shadow (8), or glow (9) effects. The Geometry tab (5) is described below.
色と関連の設定を記入し、右側のパネルの[効果]タブ(4)に記載されています。あなたは、カラーまたはグラデーションの塗り(1)、テクスチャライブラリ(2)、またはマテリアル(3)を選択することができます。また、ストローク(7)、影(8)、またはグロー(9)エフェクトを適用できます。ジオメトリタブ(5)以下に記述されています。
Chapter 3: Quick Start Guide 15(第3章:クイックスタートガイド15)
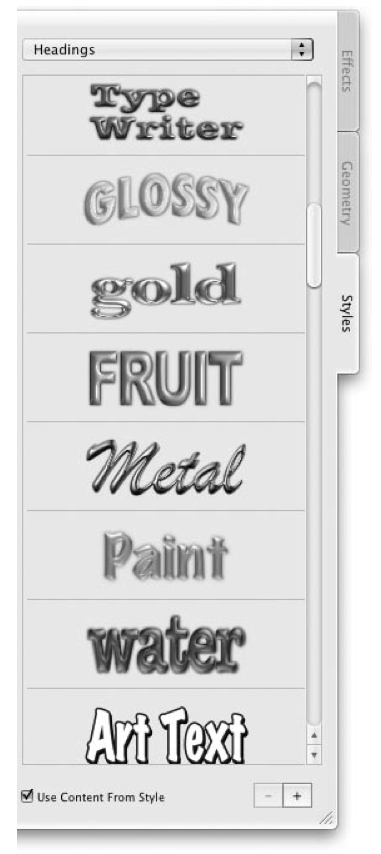
Browse through the library of pre-designed styles (6). A style is a set of effects that can be applied at once. Styles are located in a separate tab.
You can preview them applied to your text or icon. To do this, deselect the Use Text from Templates check box at the bottom.
デザイン済みのスタイル(6)のライブラリをブラウズ。スタイルは、一度に適用できるエフェクトのセットです。スタイルは、別々のタブに配置されています。
あなたはそれらをあなたのテキストまたはアイコンに適用されるプレビューすることができます。選択を解除し、これを行うにはテンプレートから使用するテキストは、下部のボックスをチェックしてください。
16 Art Text Getting Started Guide(入門ガイド16アートのテキスト)
Step 5: Applying Transformation(手順5:変換の適用)
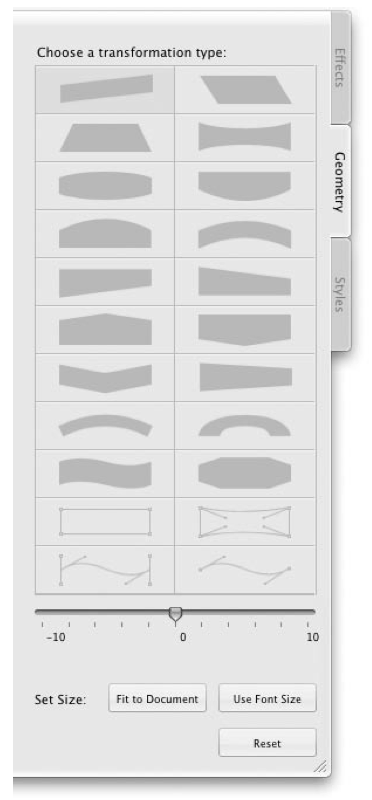
To change the shape of text or icon, open the Geometry tab in the right panel. It displays thumbnails of geometric transformations. Choose one by clicking on it and adjust the amount of distortion using the slider(s) below.
Handles on the corners and sides of the object frame can be moved with the mouse. Drag them to resize or change the shape (spline transformations only).
テキストやアイコンの形状を変更するには、右側のパネルでジオメトリ]タブを開きます。それは幾何学的変換のサムネールが表示されます。それをクリックして、いずれかを選択し、下のスライダ(s)を使用して歪みの量を調整する。
オブジェクトフレームの四隅と側面にあるハンドルをマウスで移動することができます。形状(スプラインの変換のみ)のサイズを変更したり、変更にドラッグします。
Chapter 3: Quick Start Guide 17(第3章:クイックスタートガイド17)
Step 6: Adding More Text or Graphic Objects(ステップ6:複数のテキストまたはグラフィックオブジェクトの追加)
Each new text or image should be located in a new layer. Icons of layers are shown in the Layer bar at the bottom of the main window.
それぞれの新しいテキストまたは画像を新しいレイヤーに配置する必要があります。レイヤーのアイコンは、メインウィンドウの下部にあるレイヤーバーに表示されています。

To add a new layer, click the “+” button in the Layer bar. Unnecessary layers can be removed using the “–” button.
A new layer will contain the default text. Step 3 describes how to change it. Steps 4 and 5 describe how to apply effects to the content of new layers.
新しいレイヤーを追加するには、レイヤーバーの"+"ボタンをクリックしてください。 " - "ボタンを不必要なレイヤーを使用して削除することができます。
新しいレイヤーは、デフォルトのテキストが含まれます。ステップ3は、それを変更する方法について説明します。手順4と5は、新しいレイヤーの内容にエフェクトを適用する方法について説明します。
Step 7: Organizing Layers in Your Document(手順7:文書内で整理するレイヤー)
Note that depending on your design idea, this step can be performed after adding new layers, but before applying or adjusting any effects.
Two controls in Art Text are responsible for layers: Layer bar and Layers panel. The Layer bar is located at the bottom of the main window.
デザインのアイデアに応じて、このステップは新しいレイヤを追加した後、任意のエフェクトを適用したり、調整する前に実行できることに注意してください。
レイヤーバーおよびレイヤーパネル:アートのテキストの2つのコントロールがレイヤーの責任です。レイヤーバーはメインウィンドウの下部に位置しています。
18 Art Text Getting Started Guide(入門ガイド18アートのテキスト)
The Layer bar displays icons of layers with layer content. When a layer is active, the icon is highlighted. When you apply effects or change their settings, the active layer is affected.
To add a new layer, click the “+” button. To remove the active layer, click the “-” button.
Layers overlap each other. The icon of the top layer is to the right in the Layer bar. The bottom layer is to the left. Drag an icon left of right in the bar to change the layer order.
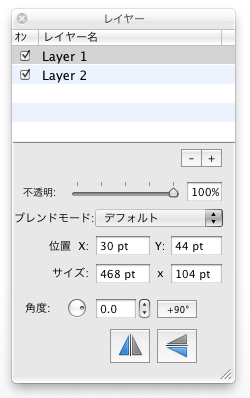
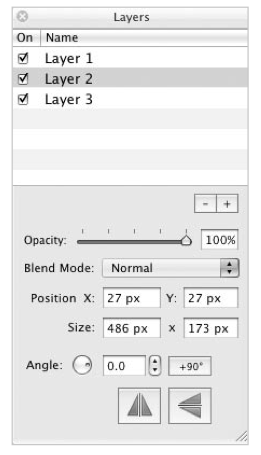
The Layers panel displays names of all the layers in the document. You can drag them in the list to change the layer order. The panel lets you rotate layers and change their opacity and blend mode.
To open the panel, choose Window > Show Layers Panel from the menu.
レイヤーバーでは、レイヤのコンテンツでレイヤーのアイコンが表示されます。レイヤーがアクティブなとき、アイコンが強調表示されます。エフェクトを適用したり、設定を変更すると、活性層が影響を受けます。
新しいレイヤーを追加するには、"+"ボタンをクリックしてください。アクティブなレイヤーを削除するには、" - "ボタンをクリック。
レイヤーは互いにオーバーラップ。最上層のアイコンは、レイヤーバーの右側にあります。底層は左側にあります。レイヤーの順序を変更するバーで右から左にアイコンをドラッグします。
レイヤーパネルでは、ドキュメント内のすべてのレイヤーの名前が表示されます。あなたは、レイヤーの順序を変更するリストにドラッグすることができます。パネルでは、レイヤーを回転させると、その不透明度とブレンドモードを変更することができます。
パネルを開くには、メニューからウィンドウ>レイヤーパネルを選択します。

Step 8: Adding the Background(ステップ8:背景を追加する)
To add a background image or colored background:
1. Add a new layer. 2. Move its icon in the Layer bar to the leftmost position. 3. Double click the icon to open the Layer Content panel. 4. Open the Shapes tab of the panel. 5. Click on a rectangle and close the panel.
背景画像や背景色を追加するには:
1。新しいレイヤーを追加します。 2。一番左の位置にレイヤーバーの中にアイコンを移動します。 3。レイヤコンテンツ]パネルを開くにはアイコンをダブルクリックしてください。 4。パネルの形状のタブを開きます。 5。長方形をクリックしてパネルを閉じます。
Chapter 3: Quick Start Guide 19(第3章:クイックスタートガイド19)
6. To choose a plain color or gradient, open the Fill tab in the Effects section.
6。プレーンカラーまたはグラデーションを選択するには、エフェクトセクションの[塗りつぶし]タブを開きます。
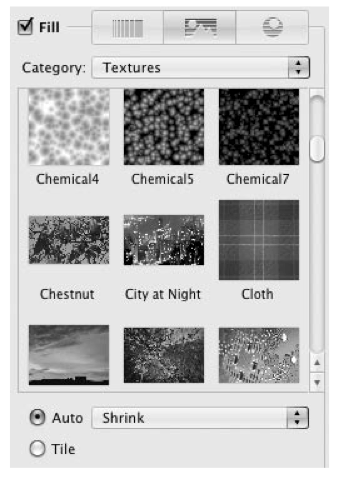
To choose an image, open the Texture tab in the Effects section. Click the Category drop-down list and choose a library section. Then click on an image. To select an image located on the hard drive, choose the Finder item in the Category drop-down. Select a folder containing images.
画像を選択するには、エフェクトセクションの[テクスチャ]タブを開きます。 [カテゴリ]ドロップダウンリストをクリックし、ライブラリのセクションを選択します。画像をクリックする。ハードドライブ上のイメージを選択するには、ドロップダウンカテゴリにある、Finder項目を選択してください。画像を含むフォルダを選択します。

20 Art Text Getting Started Guide(入門ガイド20アートのテキスト)
Step 9: Saving Your Document(ステップ9:文書を保存)
To save your document, choose File > Save in the menu. Step 10: Exporting the Final Image
To export your work, click the Export To... button in the main window. Then choose the destination: the clipboard or a graphic file.
あなたの文書を保存するには、[ファイル]>メニューでSaveを選択します。ステップ10:最終的なイメージのエクスポート
あなたの仕事をエクスポートするには、にエクスポート]をクリックします...メインウィンドウのボタン。クリップボードまたはグラフィックファイル:宛先を選択してください。

The resolution of the image pasted into the clipboard can be set in the program Preferences (Cmd-,).
When you are exporting to a file, choose the graphic format, resolution, and type a file name. Some formats have more export options.
クリップボードに貼り付けられた画像の解像度は、プログラムの環境設定(CMD -、)で設定することができます。
あなたがファイルにエクスポートしているときは、グラフィック形式、解像度を、選択し、ファイル名を入力します。一部の形式は、より多くのエクスポートオプションを持っている。
Version 2 July 2010
(C) 2010 BeLight Software, Ltd. All rights reserved.
BeLight Software, Ltd. reserves the right to improve, enhance and revise its products without notice.
The information in this document is furnished for informational use only, is subject to change without notice, and should not be constructed as a commitment by BeLight Software, Ltd. BeLight Software assumes no liability for any errors or inaccuracies that may appear in this document.
All trademarks, product and/or brand names mentioned in this publication, are the sole property of their respective owners.
Written by Nick Shubin. Cover design by Viktoriya Naumova and Tatiana Onishchenko. Thanks to Ray East for help with the creation of this publication.
入門ガイドBeLightのソフトウェアアートテキスト
バージョン2010年7月2日
(C)2010 BeLightのソフトウェア、株式会社すべての権利を保有。
BeLightソフトウェア株式会社は、予告なく製品を、改善し、拡張し改訂する権利を留保します。
このドキュメントの情報は情報提供のみを使用するために内装され、予告なく変更される場合がある、とBeLightのソフトウェアによる確約として構築されるべきではない、(株)BeLightのソフトウェアは、本文書に含まれるいかなる誤りまたは不正確な記述に対しては一切の責任を負いかねます。
すべての商標、製品および/または本書に記載のブランド名はそれぞれの所有者に帰属します。
ニックシュービンによって書かれました。 Viktoriya NaumovaとタチアナOnishchenkoによるデザインをカバーしています。この出版物の作成を手助けするためのレイ東に感謝
Contents
Chapter 1: Introduction.................................. 4
Welcome to Art Text .............................................................. 4
System Requirements............................................................ 4
Installing and Removing Art Text ............................................. 4
Updating Art Text .................................................................. 5
Registration.......................................................................... 5
Technical Support.................................................................. 5
Useful Web Resources............................................................ 6
Where to Find More Detailed Documentation............................. 6
Chapter 2: A Quick Tour ................................. 7
The Art Text Workspace ......................................................... 7
The Layer Bar ....................................................................... 8
Setting up the Program after Installation .................................. 9
Using Styles ........................................................................11
Using Templates...................................................................11
Chapter 3: Quick Start Guide ........................ 12
Step 1: Opening a New Document..........................................12
Step 2: Setting Up the Image Size..........................................12
Step 3: Changing Text or Choosing an Image...........................13
Step 4: Applying Effects........................................................14
Step 5: Applying Transformation ............................................16
Step 6: Adding More Text or Graphic Objects ...........................17
Step 7: Organizing Layers in Your Document............................17
Step 8: Adding the Background..............................................18
Step 9: Saving Your Document...............................................20
Step 10: Exporting the Final Image ........................................20
Table of Contents 3
4 Art Text Getting Started Guide
Chapter 1: Introduction(第1章:はじめに)
Welcome to Art Text
アートのテキストのアプリケーションは、テキストやベクトルシェイプに効果を適用することによって、ユニークなテキスト、グラフィックスを作成するためのものです。あなたの仕事は、ネイティブアートのテキスト形式でまたは一般的なグラフィックファイル形式で保存することができます。
アートのテキストで作成された画像は、Webページ上で、または他のアプリケーションでは、出版資料として使用することができます。
アートのテキストでは、あなたは見つけるでしょう:•2Dエフェクト(シャドウ、ぼかし、ストローク)•3Dエフェクト(調整可能な色、形、光)•変換(テキストまたは画像の幾何学的変形)
プログラムは、元のテキストまたはグラフィックスに適用することができます十分にチューニングされたスタイルが付属しています。
アートテキストのリテール版には、追加のフォントも含まれています。
System Requirements(システム要件)
PowerPCまたはIntelプロセッサ•Mac OS Xのv10.4.11または使用可能なディスクスペースが100 MBの•Apple Macintoshコンピュータ
Installing and Removing Art Text(アートテキストの取り付けと取り外し)
To install, double-click the Art Text installer in Finder. Then drag the Art Text icon into the Applications folder.
If you wish to remove the program from your computer, please complete the following steps:
• Quit Art Text. • Delete the “Art Text 2” application from the Applications folder, • Delete “com.belightsoft.arttext2.plist” file from
“~/Library/Preferences/”, • Delete the “Art Text” folder from
“~/Library/Application Support/BeLight Software/”. Here “~“ is user’s home folder.
インストールするには、Finderでアートのテキストインストーラをダブルクリックします。その後、アプリケーションフォルダにアートのテキストのアイコンをドラッグします。
コンピュータからプログラムを削除したい場合、次の手順を完了してください。
•アートのテキストを終了します。 •アプリケーションフォルダから"アートテキスト2"アプリケーションの削除、•から"com.belightsoft.arttext2.plist"ファイルを削除します。
"〜/ライブラリ/ Preferences /"、•"アートテキスト"フォルダからの削除
"〜/ライブラリ/ Application Support / BeLightソフトウェア/"。ここで"〜"ユーザのホームフォルダです。
Updating Art Text
From time to time, the software developer releases new versions of the product. To change your copy to a new version, you just need to install an update. Before launching the update installer, make sure that the application and the supporting files are at the default location. Usually they are if you have followed the installation procedure and didn’t change paths or transfer files manually. The default file location can be found in the “Installing and Removing Art Text” section.
To check for the latest update, visit the Art Text Updates web page:
http://www.belightsoft.com/arttext/update
随時、ソフトウェア開発者は、製品の新しいバージョンをリリースしています。新しいバージョンにコピーを変更するには、あなただけのアップデートをインストールする必要があります。アップデートインストーラを起動する前に、アプリケーションとサポートファイルはデフォルトの位置にあることを確認してください。インストールの手順に従っている場合、通常それらは、手動でパスやファイル転送を変更していない。デフォルトのファイルの場所は"取り付けと取り外しアートテキスト"セクションで見つけることができます。
最新のアップデートをチェックするには、アートのテキストの更新のWebページを参照してください。
http://www.belightsoft.com/arttext/update
Registration(登録)
If you have already purchased Art Text from BeLight Software or its resellers, you will find the license code either on the back of the disc envelope (boxed retail edition) or in the purchase confirmation e-mail (retail or standard edition via download).
To register Art Text: 1. Open the application. 2. Bring up the License dialog by choosing Art Text > License... in the
menu. 3. Enter your name and license code.
It’s recommended that you keep the e-mail or the disc package containing your license code in a safe place in case you need to register the application after re-installation or update.
The unregistered version of Art Text is fully operational. The only limitation is that it adds the “Trial” text over the resulting image. To eliminate this text, you need to register your copy of the software.
You can purchase a license code on the developer’s web site:
http://www.belightsoft.com/buy/
すでにBeLightのソフトウェアまたはその再販業者からアートのテキストを購入している場合は、ディスクの封筒の裏面(箱入りリテール版)上または購入確認の電子メール(ダウンロードによる販売または標準版)のいずれかでライセンスコードを検索します。
アートのテキストを登録するには:1。アプリケーションを開きます。 2。アートテキスト]> [ライセンス]を選択してライセンスのダイアログを表示...の
メニュー。 3。あなたの名前とライセンスコードを入力してください。
それはあなたが再インストールまたはアップデート後にアプリケーションを登録する必要がある場合には、電子メールまたは安全な場所にライセンスコードを含むディスクのパッケージを維持することをお勧めします。
アートのテキストの未登録版は完全に動作可能です。唯一の制限は、それが結果として得られる画像の上に"試用版"のテキストを追加することです。このテキストを排除するには、ソフトウェアのコピーを登録する必要があります。
あなたが開発者のウェブサイト上でライセンスコードを購入することができます。
http://www.belightsoft.com/buy/
Technical Support(技術サポート)
The developer of Art Text offers free technical support.
By E-mail:
support@belightsoft.com
アートテキストの開発者は無償の技術サポートを提供しています。
E - mailで:
support@belightsoft.com
Chapter 1: Introduction 5(第1章:はじめに5)
6 Art Text Getting Started Guide(入門ガイド6アートテキスト)
Technical support form on BeLight’s website:
http://www.belightsoft.com/support/
Forum on BeLight’s website:
http://www.belightsoft.com/forum/
When reporting a problem, please make sure to specify: • The version of Art Text you are using. • The version of Mac OS X installed on your computer. • Your previous actions that could have lead to the problem. • If the problem persists, describe how to reproduce it.
• When necessary, illustrate your report with screenshots (press Cmd-Shift-3 to save a screenshot on your Desktop).
BeLightのWebサイトのテクニカルサポートのフォーム:
http://www.belightsoft.com/support/
BeLightのウェブサイト上のフォーラム:
http://www.belightsoft.com/forum/
問題を報告するとき、指定することを確認してください:•あなたが使用しているアートのテキストのバージョン。 •Mac OS Xのバージョンがコンピュータにインストールされている。 •問題へのリード持っていることが、前のアクション。 •問題が解決しない場合は、それを再現する方法について説明します。
•必要に応じて、スクリーンショット(プレスCmdをシフト- 3デスクトップ上にスクリーンショットを保存する)を使用してレポートを示しています。
Useful Web Resources
Art Text Page:
http://www.belightsoft.com/arttext/
Information about Art Text, links to the Download, Latest Update, Buy, and FAQ sections.
BeLight Software Web site:
http://www.belightsoft.com
Check it out for updates, new product announcements, and special offers.
BeLight Software Technical Support:
http://www.belightsoft.com/support
Visit this link if you have questions about the software.
Where to Find More Detailed Documentation
• Art Text built-in Help. Choose Help > Art Text Help in the program menu.
• Art Text Manual
http://www.belightsoft.com/resources/ATUsersManual.pdf
• Online help and screencasts can be found on the developer’s web site:
http://www.belightsoft.com/products/arttext/support.php
有用なWebリソース
アートテキストのページ:
http://www.belightsoft.com/arttext/
アートのテキストについての情報、ダウンロード、最新の更新、購入、およびFAQのセクションへのリンク。
BeLight SoftwareのWebサイト:
http://www.belightsoft.com
アップデート、新製品の発表、および特別オファーのためにそれをチェックアウト。
BeLightのソフトウェアテクニカルサポート:
http://www.belightsoft.com/support
あなたがソフトウェアについて質問がある場合、このリンクにアクセスしてください。
より詳細なドキュメントの入手先
•アートのテキスト内蔵ヘルプ。プログラムメニューの>アートテキストのヘルプを[ヘルプ]をクリックします。
•アートテキストのマニュアル
http://www.belightsoft.com/resources/ATUsersManual.pdf
•オンラインヘルプとスクリーンショットは開発者のウェブサイトで見つけることができます。
http://www.belightsoft.com/products/arttext/support.php
Chapter 2: A Quick Tour(第2章:クイックツアー)
The Art Text Workspace(アートテキストのワークスペース)
英語表示
日本語表示
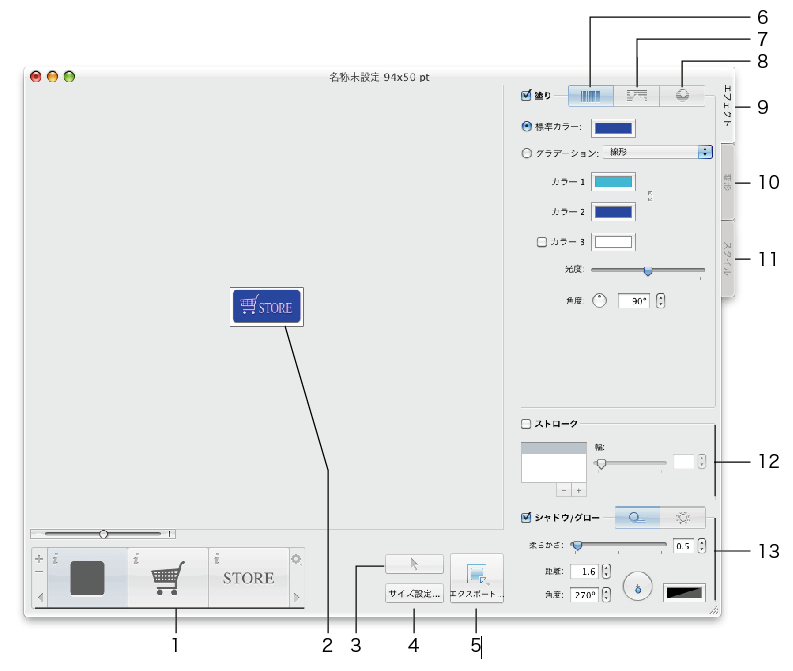
- レイヤーバーは、ドキュメント内のすべてのレイヤーのアイコンが表示されます。それはレイヤーを追加したり、削除したり、それらの重なり順序を変更したり、レイヤーの内容を変更することができます。
- キャンバス。これは、画像をプレビューしたり、作業をする領域です。
- この矢印アイコンをクリックすると"レイヤの境界線を表示/非表示"にできるボタン。クリックすると表示される境界線上のハンドルは、オブジェクトのサイズ変更に使用されます。
- サイズ設定ボタン。ドキュメントのサイズ(最終的な画像のサイズを)変更するには、これをクリック。
- "エクスポート..."ボタンをクリックすると、クリップボードにイメージをコピーまたはグラフィックファイルにエクスポートするには、このボタンをクリックします。
- プレーンカラーとグラデーションの塗りを行うツール。
- テクスチャライブラリ。
- マテリアル(材料)ライブラリ。
- [エフェクト(効果)]タブには、塗りつぶし、テクスチャやマテリアルのライブラリが含まれています。
- [変形]タブには、変形パターンが含まれています。
- [スタイル]タブでは、スタイル(一度に適用できる効果のプレデザインセット)のライブラリが含まれています。
- ストロークツール。
- シャドウとグローツール。
Chapter 2: A Quick Tour(第2章:クイックツアー)7
8 Art Text Getting Started Guide(入門ガイド8アートテキスト)
The Layer Bar(レイヤーバー)
レイヤーバーはメインウィンドウの下部に位置し、レイヤーのアイコンが表示されている。レイヤーが選択されている場合、そのアイコンが強調表示になります。いくつかの層は、それらをまとめて変更するために選択することができます。
レイヤーの重なり順を変更するには、左または右にあるアイコンをドラッグします。右端のアイコンは、最上位層に相当する。
以下の二つの絵を比較すると階層の様子が分かるでしょう。

図形のスターは、左の画像内の他の図形の一番上にあります。そのアイコンはレイヤーバーの右端の位置にあります。左にアイコンを移動する(右写真参照)と、キャンバス上の他のオブジェクトの背後にスターの図形を動かすことができます。
Chapter 2: A Quick Tour 9
アクティブレイヤー内のテキストまたは画像を変更するには、レイヤーのアイコンをダブルクリックして、レイヤのコンテンツウィンドウを開きます。
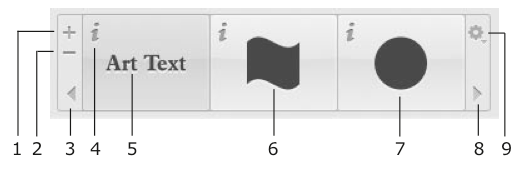
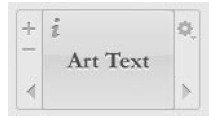
コンテンツを選択すると変更することが出来る。
1 - デフォルトのコンテンツを使用して新しいレイヤーを追加します。
2 - レイヤーと、そのコンテンツを削除します。
3と8 - レイヤーをスクロールするためのアイコン。
4 - レイヤーのコンテンツのウィンドウを開くには"i"アイコンをクリックします。
5、6、7 - レイヤーのコンテンツを表示するレイヤーのアイコン。
9 - 以下の機能が含まれているレイヤのアクションメニュー:
- 削除は、レイヤーとそのコンテンツを削除する。それは "−" ボタン(2)と同じことを行います。
- 複製は、選択したレイヤーのコピーを作成します。
- 上のレイヤーと融合、上のレイヤーと合体、交差領域を取り除く、交差領域を残すはいくつかの選択したレイヤーの組み合わせ方法の処理を行う。
- 文字を分割、文字の抜粋する機能は、いくつかの層から作成。
- レイヤーパネルの表示/隠す 項目はレイヤーパネルを開閉する。(下記参照)

- 新規イメージレイヤーを追加は、新しいレイヤーを作成し、次ののタスクを実行できます。(その中に配置する画像を選択してください。背景画像を追加するためにこの機能を使用してください。)
インストール後にプログラムの設定
The information below covers the most important settings to start your work with Art Text.
1. Register the program if you have purchased a license code. Otherwise, the program will work in the demo mode.
To do this, choose Art Text > License... from the menu to open the registration dialog box. Input your name and your license code.
After successful registration, the program will offer you online registration. You can register or skip registration.
- 以下の情報は、Art Textを使用して作業を開始するために最も重要な設定をカバーしています。
これを行うには、Art Text > License...(Liteには無し)を選択...メニューから[登録]ダイアログボックスを開きます。自分の名前とライセンスコード入力。
登録が成功した後、プログラムはオンライン登録を提供します。登録したり、スキップすることができます。
オンライン登録すると、開発者のデータベースにデータを送信しています。これは、それが失われる場合にはそれが可能なあなたに戻って、ライセンスコードを送信することができます。オンライン登録はデモから、登録モードにプログラムをオンにしていません。
2。プログラムのプリファレンスを設定する(Art Text > Preferences...)

1 – Deselect the Open Template Gallery on start-up check box if you don’t use the built-in templates.
2 – Keep the Snap option enabled. Text and images will align to each other when you move them around.
3 – Keep the Use Core Image software rendering option disabled. In this case, rendering is quicker because the graphic card (not the CPU) does this job.
4 – The resolution of an image pasted in the clipboard. It is important when your work is finished and you are going to copy it to another program. Leave this parameter alone for now.
1 - 組み込みのテンプレートギャラリーを使用しない場合は、チェックボックスをはずす。
2 - スナップオプションは有効にしておいてください。それらを移動するときにテキストや画像は、お互いに整列されます。
3 - 使用してコアイメージのソフトウェアレンダリングオプションを無効にしてください。グラフィックカード(ではないCPUが)この仕事をするのでこのケースでは、レンダリングが高速です。
4 - クリップボードに貼り付けた画像の解像度。それはあなたの仕事が終了し、他のプログラムにコピーしようとしているときに重要です。デフォルトではこのパラメータにしておきます。(印刷物)
Chapter 3: Quick Start Guide 11(第3章:クイックスタートガイド11)
5 – Color of the document background. It is simulated on the canvas. The chessboard background lets you see transparent parts of your design. The Solid color is used for the background of the exported image if the selected graphic format doesn’t support transparency.
6 – Specify whether the program should check for updates automatically.
5 - 文書の背景の色。それは、キャンバス上でシミュレートされます。チェス盤の背景には、あなたのデザインの透明な部分を見ることができます。選択されたグラフィック形式は透明度をサポートしていない場合、ソリッドカラーは、エクスポートされたイメージの背景に使用されます。
6 - プログラムが自動的に更新を確認する必要があるかどうかを指定します。
Using Styles(スタイルの使用)
A style is a set of effects that can be applied at once. Styles are located in the Styles tab of the right side panel. Choose View > Styles Panel to open it.
Styles are grouped into categories. You can choose a category in a pop-up menu at the top. You can add custom styles to the library.
To apply a style, select it in the side panel. The selected style will be applied to the active layer.
Parameters of applied effects can be saved as a custom style. This is useful when you need to create several pieces of text or several images with the same effects.
To add a new style, click the “+” button.
To remove a custom style, select it in the list and click the “-” button. Built-in styles cannot be removed.
The Use content from style option lets you choose whether to show the selected style with the default content or with your own. Note that the default content was selected as the best for demonstrating the style.
スタイルは、一度に適用できるエフェクトのセットです。スタイルは、右側のパネルのスタイル]タブに配置されています。それを開くために>スタイルパネルを表示を選択します。
スタイルは、カテゴリに分類されます。あなたは、上部にあるポップアップメニューでカテゴリを選択することができます。あなたは、ライブラリにカスタムスタイルを追加することができます。
スタイルを適用するには、サイドパネルで選択します。選択したスタイルは、アクティブレイヤーに適用されます。
適用されるエフェクトのパラメータは、カスタムスタイルとして保存することができます。あなたが同じ効果をテキストまたはいくつかのイメージの断片をいくつか作成する必要がある場合に便利です。
新しいスタイルを追加するには、"+"ボタンをクリックしてください。
カスタムスタイルを削除するには、リストで選択し、" - "ボタンをクリックします。組み込みスタイルは削除できません。
スタイルのオプションから使用コンテンツを使用すると、デフォルトのコンテンツとしたり、独自で選択したスタイルを表示するかどうかを選択できます。既定のコンテンツがスタイルを証明するための最良として選択されていることに注意してください
Using Templates(テンプレートの使用)
To access templates, choose File > Template Gallery (Cmd-Shift-N). Templates are grouped into categories. To open a different category, click on its name at the bottom of the window.
To open a template, double-click on its thumbnail. Or click on a thumbnail followed by the Choose button.
You can use templates to learn the program or modify them to create a new document.
Note that templates and styles are not the same. A template is a complete document. A style is a set of settings that can be applied to your text or image. Templates can consist of one or several layers.
テンプレートにアクセスするには、[ファイル]> [テンプレートギャラリーを(CMD - Shift - N)を選択します。テンプレートはカテゴリにグループ化されています。別のカテゴリを開くには、ウィンドウの下部にその名前をクリックします。
テンプレートを開くには、そのサムネイルをダブルクリックします。または[選択]ボタンに続いてサムネイルをクリックしてください。
あなたがプログラムを習得したり、新しい文書を作成するためにそれらを変更するテンプレートを使用することができます。
テンプレートとスタイルが同じではないことに注意してください。テンプレートは、完全なドキュメントです。スタイルは、テキストまたは画像に適用できる設定のセットです。テンプレートは、1つまたはいくつかの層で構成することができます。
12 Art Text Getting Started Guide(入門ガイド12アートのテキスト)
Chapter 3: Quick Start Guide(第3章:クイックスタートガイド)
This guide describes some possible steps of using Art Text. Steps described below and their order are not obligatory. Some of them can be skipped, performed several times, or in another order.
For a better understanding of the location and names of program controls, it is recommended that you look through “The Art Text Workspace” section.
このガイドでは、アートのテキストを使用してのいくつかの可能な手順を説明します。手順は以下のとおりとそれらの順序は必須ではありません。そのうちのいくつかは、スキップを数回行い、または別の順序ですることができます。
プログラムのコントロールの位置と名前の理解を深めるために、それはあなたが"アートテキストのワークスペース"セクションに目を通すことをお勧めします。
Step 1: Opening a New Document(ステップ1:新しい文書を開く)
To open a blank Art Text document, choose File > New. For learning purposes, you can load a template from the built-in collection
(File > Template Gallery) and then modify it. Step 2: Setting Up the Image Size
Set up the final image size (what will be exported to a file or another program). To do this, click the Set Size button in the main window. The white or chessboard-like background shows the image edges. Objects or their parts outside the image area will be trimmed at export.
You can change the image size at any time later.
ブランクアートのテキスト文書を開くには、[ファイル]> [新規]を選択します。学習目的のために、組み込みのコレクションからテンプレートをロードすることができます
([ファイル]> [テンプレートギャラリー)し、それを修正する。ステップ2:画像サイズの設定
最終的な画像サイズ(ファイルまたは別のプログラムにエクスポートされる内容)を設定します。これを行うには、メインウィンドウにセットサイズのボタンをクリックします。白やチェス盤のような背景は、画像のエッジを示しています。画像領域外のオブジェクトやそれらの部品は、輸出時に削除されます。
あなたは後でいつでも画像サイズを変更することができます。
Chapter 3: Quick Start Guide 13(第3章:クイックスタートガイド13)
Step 3: Changing Text or Choosing an Image(ステップ3:テキストを変更するまたはイメージを選択する)
By default the “Art Text” text is displayed on the canvas. To change text or replace it with an image, double-click the “Art Text” icon in the bottom panel (Layer bar). This will bring up the Layer Content window displaying the Text tab.
デフォルトでは"アートテキスト"テキストがキャンバスに表示されます。テキストを変更したり、画像とそれを置き換えるには、下のパネル(レイヤーバー)の"アートテキスト"アイコンをダブルクリックします。これは、[テキスト]タブを表示するレイヤのコンテンツウィンドウが表示されます。
To choose a shape or icon, switch to the corresponding tab.
形状またはアイコンを選択するには、対応するタブに切り替えます。
Once you have changed the layer content (text or image), close the panel. The icon in the Layer bar will change correspondingly.
あなたがレイヤのコンテンツ(テキストまたは画像)を変更したら、パネルを閉じます。レイヤーバーのアイコンがそれに応じて変わります。
14 Art Text Getting Started Guide(入門ガイド14アートのテキスト)
Step 4: Applying Effects(ステップ4:エフェクトをかける)
The color and fill related settings can be found in the Effects tab (4) of the right panel. You can choose color or gradient fill (1), texture library (2), or materials (3). You can also apply stroke (7), shadow (8), or glow (9) effects. The Geometry tab (5) is described below.
色と関連の設定を記入し、右側のパネルの[効果]タブ(4)に記載されています。あなたは、カラーまたはグラデーションの塗り(1)、テクスチャライブラリ(2)、またはマテリアル(3)を選択することができます。また、ストローク(7)、影(8)、またはグロー(9)エフェクトを適用できます。ジオメトリタブ(5)以下に記述されています。

Chapter 3: Quick Start Guide 15(第3章:クイックスタートガイド15)
Browse through the library of pre-designed styles (6). A style is a set of effects that can be applied at once. Styles are located in a separate tab.
You can preview them applied to your text or icon. To do this, deselect the Use Text from Templates check box at the bottom.
デザイン済みのスタイル(6)のライブラリをブラウズ。スタイルは、一度に適用できるエフェクトのセットです。スタイルは、別々のタブに配置されています。
あなたはそれらをあなたのテキストまたはアイコンに適用されるプレビューすることができます。選択を解除し、これを行うにはテンプレートから使用するテキストは、下部のボックスをチェックしてください。

16 Art Text Getting Started Guide(入門ガイド16アートのテキスト)
Step 5: Applying Transformation(手順5:変換の適用)
To change the shape of text or icon, open the Geometry tab in the right panel. It displays thumbnails of geometric transformations. Choose one by clicking on it and adjust the amount of distortion using the slider(s) below.
Handles on the corners and sides of the object frame can be moved with the mouse. Drag them to resize or change the shape (spline transformations only).
テキストやアイコンの形状を変更するには、右側のパネルでジオメトリ]タブを開きます。それは幾何学的変換のサムネールが表示されます。それをクリックして、いずれかを選択し、下のスライダ(s)を使用して歪みの量を調整する。
オブジェクトフレームの四隅と側面にあるハンドルをマウスで移動することができます。形状(スプラインの変換のみ)のサイズを変更したり、変更にドラッグします。

Chapter 3: Quick Start Guide 17(第3章:クイックスタートガイド17)
Step 6: Adding More Text or Graphic Objects(ステップ6:複数のテキストまたはグラフィックオブジェクトの追加)
Each new text or image should be located in a new layer. Icons of layers are shown in the Layer bar at the bottom of the main window.
それぞれの新しいテキストまたは画像を新しいレイヤーに配置する必要があります。レイヤーのアイコンは、メインウィンドウの下部にあるレイヤーバーに表示されています。
To add a new layer, click the “+” button in the Layer bar. Unnecessary layers can be removed using the “–” button.
A new layer will contain the default text. Step 3 describes how to change it. Steps 4 and 5 describe how to apply effects to the content of new layers.
新しいレイヤーを追加するには、レイヤーバーの"+"ボタンをクリックしてください。 " - "ボタンを不必要なレイヤーを使用して削除することができます。
新しいレイヤーは、デフォルトのテキストが含まれます。ステップ3は、それを変更する方法について説明します。手順4と5は、新しいレイヤーの内容にエフェクトを適用する方法について説明します。
Step 7: Organizing Layers in Your Document(手順7:文書内で整理するレイヤー)
Note that depending on your design idea, this step can be performed after adding new layers, but before applying or adjusting any effects.
Two controls in Art Text are responsible for layers: Layer bar and Layers panel. The Layer bar is located at the bottom of the main window.
デザインのアイデアに応じて、このステップは新しいレイヤを追加した後、任意のエフェクトを適用したり、調整する前に実行できることに注意してください。
レイヤーバーおよびレイヤーパネル:アートのテキストの2つのコントロールがレイヤーの責任です。レイヤーバーはメインウィンドウの下部に位置しています。

18 Art Text Getting Started Guide(入門ガイド18アートのテキスト)
The Layer bar displays icons of layers with layer content. When a layer is active, the icon is highlighted. When you apply effects or change their settings, the active layer is affected.
To add a new layer, click the “+” button. To remove the active layer, click the “-” button.
Layers overlap each other. The icon of the top layer is to the right in the Layer bar. The bottom layer is to the left. Drag an icon left of right in the bar to change the layer order.
The Layers panel displays names of all the layers in the document. You can drag them in the list to change the layer order. The panel lets you rotate layers and change their opacity and blend mode.
To open the panel, choose Window > Show Layers Panel from the menu.
レイヤーバーでは、レイヤのコンテンツでレイヤーのアイコンが表示されます。レイヤーがアクティブなとき、アイコンが強調表示されます。エフェクトを適用したり、設定を変更すると、活性層が影響を受けます。
新しいレイヤーを追加するには、"+"ボタンをクリックしてください。アクティブなレイヤーを削除するには、" - "ボタンをクリック。
レイヤーは互いにオーバーラップ。最上層のアイコンは、レイヤーバーの右側にあります。底層は左側にあります。レイヤーの順序を変更するバーで右から左にアイコンをドラッグします。
レイヤーパネルでは、ドキュメント内のすべてのレイヤーの名前が表示されます。あなたは、レイヤーの順序を変更するリストにドラッグすることができます。パネルでは、レイヤーを回転させると、その不透明度とブレンドモードを変更することができます。
パネルを開くには、メニューからウィンドウ>レイヤーパネルを選択します。
Step 8: Adding the Background(ステップ8:背景を追加する)
To add a background image or colored background:
1. Add a new layer. 2. Move its icon in the Layer bar to the leftmost position. 3. Double click the icon to open the Layer Content panel. 4. Open the Shapes tab of the panel. 5. Click on a rectangle and close the panel.
背景画像や背景色を追加するには:
1。新しいレイヤーを追加します。 2。一番左の位置にレイヤーバーの中にアイコンを移動します。 3。レイヤコンテンツ]パネルを開くにはアイコンをダブルクリックしてください。 4。パネルの形状のタブを開きます。 5。長方形をクリックしてパネルを閉じます。
Chapter 3: Quick Start Guide 19(第3章:クイックスタートガイド19)
6. To choose a plain color or gradient, open the Fill tab in the Effects section.
6。プレーンカラーまたはグラデーションを選択するには、エフェクトセクションの[塗りつぶし]タブを開きます。

To choose an image, open the Texture tab in the Effects section. Click the Category drop-down list and choose a library section. Then click on an image. To select an image located on the hard drive, choose the Finder item in the Category drop-down. Select a folder containing images.
画像を選択するには、エフェクトセクションの[テクスチャ]タブを開きます。 [カテゴリ]ドロップダウンリストをクリックし、ライブラリのセクションを選択します。画像をクリックする。ハードドライブ上のイメージを選択するには、ドロップダウンカテゴリにある、Finder項目を選択してください。画像を含むフォルダを選択します。
20 Art Text Getting Started Guide(入門ガイド20アートのテキスト)
Step 9: Saving Your Document(ステップ9:文書を保存)
To save your document, choose File > Save in the menu. Step 10: Exporting the Final Image
To export your work, click the Export To... button in the main window. Then choose the destination: the clipboard or a graphic file.
あなたの文書を保存するには、[ファイル]>メニューでSaveを選択します。ステップ10:最終的なイメージのエクスポート
あなたの仕事をエクスポートするには、にエクスポート]をクリックします...メインウィンドウのボタン。クリップボードまたはグラフィックファイル:宛先を選択してください。

The resolution of the image pasted into the clipboard can be set in the program Preferences (Cmd-,).
When you are exporting to a file, choose the graphic format, resolution, and type a file name. Some formats have more export options.
クリップボードに貼り付けられた画像の解像度は、プログラムの環境設定(CMD -、)で設定することができます。
あなたがファイルにエクスポートしているときは、グラフィック形式、解像度を、選択し、ファイル名を入力します。一部の形式は、より多くのエクスポートオプションを持っている。